The project ‘Temperature Controlled Fan using Arduino is simply fabricated around Arduino uno board and temperature sensor LM35. The projects are a good example of embedded systems designed using a closed-looped feedback control system. For proper user interface visual indication we had also used LCD which indicate the temperature as well as the speed of the fan.
Circuit Description of Temperature Controlled Fan using Arduino
The entire circuit of ‘Temperature Controlled Fan using Arduino’ utilizes very few components, an MCU (Arduino Uno), a temperature sensor (LM35), an LCD, a motor (Fan), a transistor, and a few other passive components, etc.
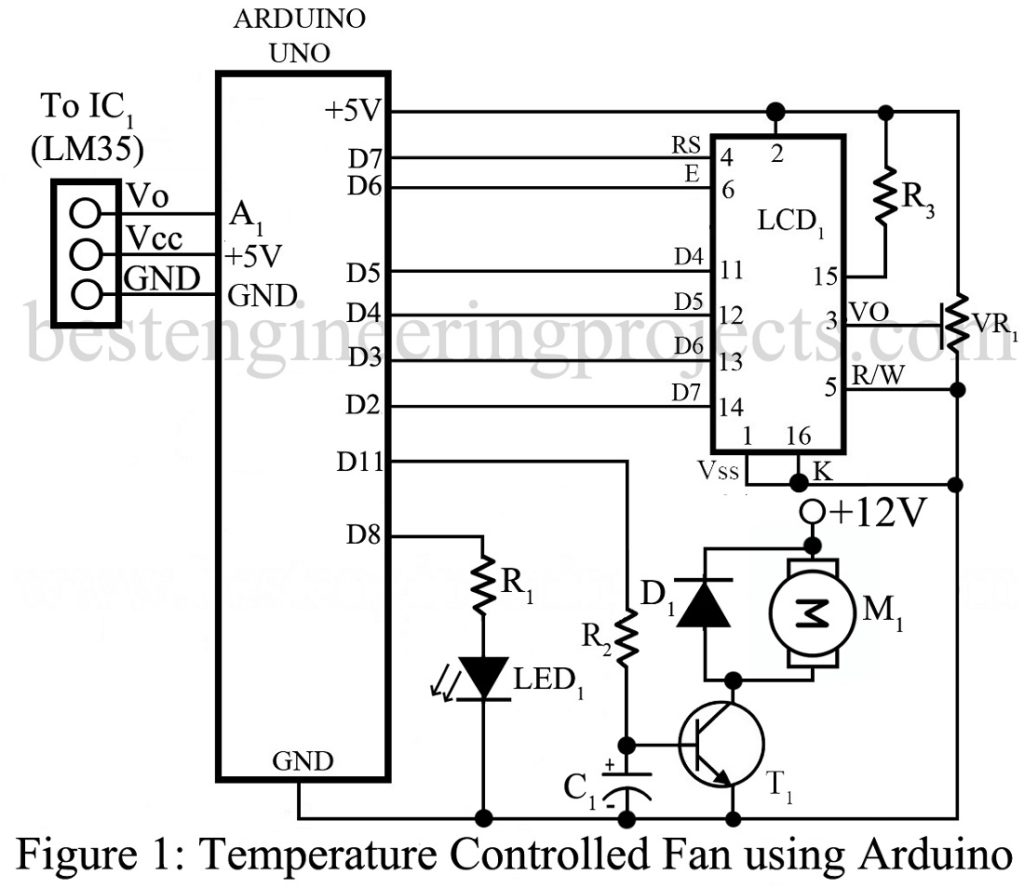
IC1 (LM35) is a transducer that converts temperature to an electrical signal. As the output is analog so the output is connected to an analog input pin (A1) as shown in the figure. The temperature sensed is displayed in LCD and controls the output of the fan as per command in the source code. The output is taken from pin D11 which is further given to the base of the NPN transistor (T1) through resistor R2.
Transistor T1 is a switching circuit that switches the motor (Fan) on and off as per command. A diode is connected across the motor which is also called a flyback diode used to eliminate voltage spikes generate across the inductive load.
Another project on temperature indication and controlling posted in bestengineeringprojects.com
- Dynamic Temperature Indicator and Controller Using Arduino
- PIC16F73 Based Temperature Indicator and Controller
- Wireless Temperature and Humidity Indicator for Fridge
- Arduino Based Data Logger (Temperature)
- ESP8266 Temperature Logger using PIC16F887
Operation of Temperature Controlled Fan using Arduino: –
The circuit designed here is used to control the speed of the fan by the method of pulse-width modulation (PWM) signal. The signal generated here is of low-frequency generally in the range of 30 Hz. As the circuit posted here used a general-purpose transistor for switches which may generate noise because the signal is of pulsed nature.
Software: –
The core section of the project; the software part is written in Arduino programming language which is very much like C. The program is compiled and burned to Arduino uno using Arduino IDE. You can directly download the code and use it without any modification.
Click Here to Download Software Code
PARTS LIST OF TEMPERATURE CONTROLLED FAN USING ARDUINO
| Resistors (all ¼-watt, ± 5% Carbon) |
| R1, R2 = 1 KΩ
R3 = 470 Ω VR1 = 10 KΩ |
| Capacitor |
| C1 = 10 µF, 16 µF (Electrolytic Capacitor) |
| Semiconductor |
| IC1 = LM35 (Temperature Sensor)
T1 = BD139 (NPN Transistor) D1 = 1N4007 (Rectifier Diode) LED1 = 5mm LED LCD1 = 16×2 LCD Arduino Uno Board |
| Miscellaneous |
| M1 = 12V DC Operated Fan
12V Battery for Fan |