Interfacing the CHT8305 Sensor with ESP32: Real-Time Temperature and Humidity Display

cht8305 i2c temperature and humidity sensor

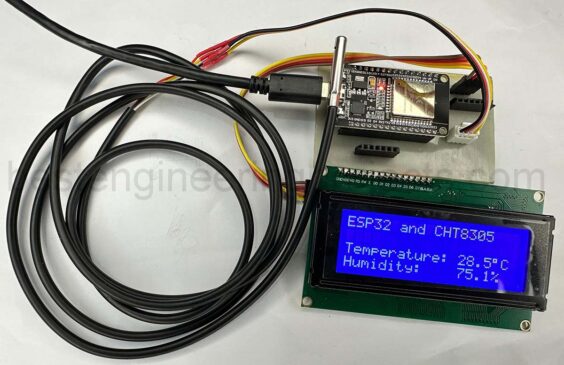
The CHT8305 sensor is a reliable temperature and humidity sensor popularly known for its high accuracy and low power consumption. It uses I2C to talk, and the device interfaces easily with most microcontrollers like Arduino and ESP32. Adding a 20×4 I2C LCD display to your setup is a great way to easily monitor real-time temperature and humidity values. In this article, I’ll walk you through how to interface the CHT8305 sensor with both Arduino and ESP32, and we’ll also incorporate the LCD display. I’ll break down each step, provide the…

Read More

How to Set Up a Real-Time Clock (RTC) with ESP32 and DS3231 Using NTP Time Synchronization

How to Set Up a Real-Time Clock (RTC) with ESP32 and DS3231 Using NTP Time Synchronization

Introduction Accurate timekeeping is crucial for electronics and IoT projects. A Real-Time Clock (RTC) is essential for maintaining precise time, especially during power outages. However, more than relying solely on the RTC module might be required for long-term projects due to drift over time. This is where Network Time Protocol (NTP) comes in. By synchronizing the RTC with an internet time server, you can ensure that your system stays perfectly in sync, regardless of how long it runs. In this guide, we’ll show you how to set up a Real-Time…

Read More

How to: AC Voltage Measurement using Arduino without Transformer

ac voltage measurement using arduino without transformer

In electronics, Arduino has reshaped how we tinker with technology. Voltage measurement is a core aspect, but dealing with AC voltage adds complexity, especially without a transformer. Usually, transformers isolate high AC voltages for measurement. But when space or components are limited, Arduino offers an alternative. In this article, we’ll unravel measuring AC voltage using Arduino without the bulky transformer. Component Requirements for AC Voltage Measurement using Arduino without Transformer Arduino Board x 1 Grove- AC Voltage Sensor x 1 I2C LCD x 1 Circuit Description of AC Voltage Measurement…

Read More

Interfacing LORA SX1278 Module With Arduino

Long-distance communication (or constant data transmissions) has become essential to modern industries, the medical sector, and even the residential sector. These data include the status/outputs of sensors, operation logs of machines, images or videos, scheduled events, etc. Transferring these data between machines via wired or wireless medium without human input is called Machine-to-Machine communication (M2M). The same communication using a cloud platform instead of point-to-point becomes IoT. Realizing the growing demand for faster, more secure, and more efficient communication, technologies that enable long-range wireless communication were developed. Of many, “LoRa”…

Read More

Interfacing UV sensor with Arduino

uv sensor with arduino

In this article, we will learn to interface a UV sensor with Arduino nano. The term “UV” stands for ultraviolet and UV sensors are used to measure the power or intensity of incident ultraviolet (UV) radiation at a particular area. This form of electromagnetic radiation (UV radiation) has shorter wavelengths than visible radiation but is still longer than x-rays.  Some theory on UV spectrum: The UV spectrum ranges from 100 nm to 400 nm and is divided into three bands. UVA (315-400 nm) – least harmful but stay away from…

Read More

How to Interface Nokia 5110 LCD with Arduino

Displaying Text on Nokia 5110 LCD Display with Arduino

In this article, we will learn to interface a compact and monochrome LCD display named Nokia 5110 with Arduino Nano. This article will also demonstrate how we can display alphanumeric characters, draw lines and other shapes and even display bitmap images after converting them into a data array via “Nokia 5110”. Introduction of Nokia 5110 LCD Display: Nokia 5110 is a low-powered, inexpensive, and easy-to-use LCD display module. This display features a low-powered CMOS LCD controller/driver called PCD8544. The PCD8544 is designed to drive a graphic array of 84×48 pixels…

Read More

Interfacing GP2Y1010 Dust Sensor with Arduino

Interfacing GP2Y1010 Dust Sensor with Arduino

In this article, you will see how to interface GP2Y1010AU0F Dust Sensor with Arduino. GP2Y1010AU0F is an optical dust sensor that can detect very fine particles such as smoke, environmental dust, etc. It is designed for application in commercial air purifiers. However, it is also used in air conditioners and portable air quality monitoring systems. This sensor can detect dust particles up to the size of 0.5 µm. Features of Dust Sensor GP2Y1010AU0F Can easily differentiate smoke and house dust Consumes less current: 20mA max Sense dust particles in less…

Read More

Micro SD Card Module and Arduino Interface

Micro SD Card Module and Arduino Interface

The majority of Microcontroller Units (MCU) include a limited amount of storage space that is adequate to hold your code or software. The Arduino Mega (ATmega2560) has 8 KB of bootloader space, 256 KB of flash memory for code storage, 8 KB of SRAM, and 4 KB of EEPROM (which can be read and written with the EEPROM library). The issue now is what to do if you need to store data for applications like data loggers, data visualization, etc., but the microcontroller unit memory is too small to be…

Read More

Arduino Countdown Timer using P10 Display

Arduino Countdown Timer using P10 Display

In this article, we make an Arduino Countdown Timer using P10 Display. The counting is done by Arduino and then displayed in the P10 LED module. This project might come in handy for time-keeping purposes during physical games. The details about pin configuration, display specifications, and hardware interfacing between Arduino Nano and P10 are referenced from the “Interfacing P10 single color LED Display with Arduino Nano” article. In this article you will learn two things: How to display a countdown of 3 minutes in P10. How to include a Reset…

Read More

Interfacing P10 LED Display with Arduino

HELLO WORLD using SystemFont5x7.h

The P10 LED display is a single color (red, blue, and yellow), high brightness, lower power consumption, and long lifetime display module designed for semi-outdoor use. One display module we are using contains 16×32 = 512 LEDs. In the tutorial “Interfacing P10 LED Display with Arduino“, you will learn: How to interface P10 Led display with Arduino How to select text font and size of the character How to display static character and running character.   Introduction to P10 Display P10 display is a dot-matrix LED display. Dot-matrix Led means a…

Read More