The CHT8305 sensor is a reliable temperature and humidity sensor popularly known for its high accuracy and low power consumption. It uses I2C to talk, and the device interfaces easily with most microcontrollers like Arduino and ESP32. Adding a 20×4 I2C LCD display to your setup is a great way to easily monitor real-time temperature and humidity values. In this article, I’ll walk you through how to interface the CHT8305 sensor with both Arduino and ESP32, and we’ll also incorporate the LCD display. I’ll break down each step, provide the code you need, and explain how it works together.
Table of Contents
- Overview of the CHT8305 sensor
- Components and Pin Connections
- Interfacing of CHT8305 with Arduino having 20×4 I2C LCD
- Interface of CHT8305 with 20×4 I2C LCD and ESP32
- Code Explanation
Overview of the CHT8305 sensor
CHT8305 is a highly integrated sensor solution that measures temperature and relative humidity with high accuracy. Communications are based on the I2C protocol, guaranteeing ease of communication with any microcontroller. This sensor supports voltages from 1.8V to 5.5V; thus, it is compatible with 3.3V logic devices like Arduino and 5V logic devices like ESP32.
Key Features of CHT8305 Temperature and Humidity Sensor
- Operating Temperature Range: -40°C to +125°C
- Range of Humidity: 0-100% RH
- I2C: Fast and efficient data interchanging
- Accuracy: ± 1°C for temperature, ±2% RH for humidity
- Low Power Consumption: Suitable for battery-driven applications.
Components and Pin Connections
Required Elements
- ESP32 Dev Board
- CHT8305 Temperature and Humidity Sensor
- 20×4 I2C LCD Display – type LCD1602 or LCD2004
- Jumper Wires

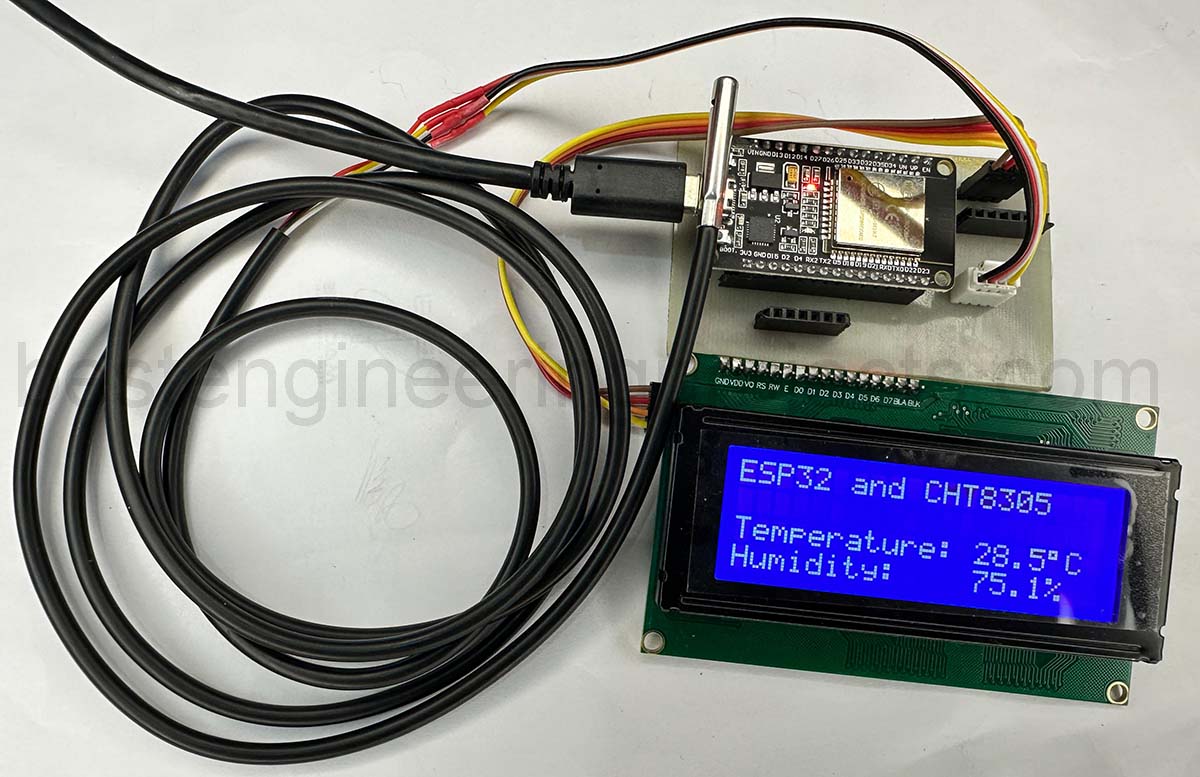
Figure 1: Interfacing the CHT8305 Sensor with ESP32
Pin Connections
- CHT8305 VCC → 3.3V
- CHT8305 GND → GND
- CHT8305 SDA → ESP32 GPIO 21
- CHT8305 SCL → ESP32 GPIO 22
- LCD VCC → 5V
- LCD GND → GND
- LCD SDA → ESP32 GPIO 21
- LCD SCL → ESP32 GPIO 22
Interfacing of CHT8305 and 20×4 I2C LCD with ESP32
Now, let’s go through the procedure to connect the CHT8305 sensor to ESP32. The code setup for ESP32 is very similar to that of Arduino. Here, you’ll use the same libraries: Wire.h and LiquidCrystal_I2C.h. Now, define SDA and SCL pins for ESP32: GPIO 21 and GPIO 22.
|
1 2 3 4 5 6 7 8 9 10 11 12 13 14 15 16 17 18 19 20 21 22 23 24 25 26 27 28 29 30 31 32 33 34 35 36 37 38 39 40 41 42 43 44 45 46 47 48 49 50 51 52 53 54 55 56 57 58 59 60 61 62 63 64 65 66 67 68 69 70 71 72 73 74 75 76 77 78 79 80 81 82 83 84 85 86 87 88 89 90 91 92 93 94 95 96 97 98 99 100 101 |
#include <Wire.h> #include <LiquidCrystal_I2C.h> #define CHT8305_I2C_ADDRESS 0x40 // I2C address of the CHT8305 sensor // Initialize the LCD (I2C address, columns, rows) LiquidCrystal_I2C lcd(0x27, 20, 4); // Variables to store sensor data uint8_t buf[4] = {0}; // Buffer to read data from the sensor uint16_t tempData, humData; // Raw temperature and humidity data float temperature; // Calculated temperature float humidity; // Calculated humidity void setup() { // Start serial communication for debugging Serial.begin(9600); // Initialize I2C communication for sensor and LCD Wire.begin(); // Initialize the LCD lcd.init(); lcd.backlight(); // Turn on the LCD backlight // Display initial message on LCD lcd.setCursor(0, 0); lcd.print("CHT8305 Sensor Init"); } void loop() { // Read 4 bytes of data starting from register 0x00 if (readReg(0x00, buf, 4)) { // Extract raw temperature and humidity data from the buffer tempData = (buf[0] << 8) | buf[1]; // Combine first two bytes for temperature humData = (buf[2] << 8) | buf[3]; // Combine next two bytes for humidity // Convert raw data to human-readable values using the sensor's formula temperature = ((float)tempData * 165 / 65535.0) - 40.0; humidity = ((float)humData / 65535.0) * 100; // Print results to Serial Monitor Serial.print("Temperature (°C): "); Serial.print(temperature); Serial.print("\tHumidity (%RH): "); Serial.println(humidity); // Clear the LCD and display temperature and humidity lcd.clear(); lcd.setCursor(0, 0); // Set cursor to first column, first row lcd.print("ESP32 and CHT8305"); lcd.setCursor(0, 2); // Set cursor to first column, first row lcd.print("Temperature: "); lcd.print(temperature, 1); // Display temperature with one decimal place lcd.print((char)223); // Print degree symbol (°) lcd.print("C"); lcd.setCursor(0, 3); // Set cursor to first column, second row lcd.print("Humidity: "); lcd.print(humidity, 1); // Display humidity with one decimal place lcd.print("%"); // Add "%RH A5" to the display } else { // Display error message on the LCD lcd.clear(); lcd.setCursor(0, 0); lcd.print("Sensor Read Error"); Serial.println("Failed to read from CHT8305."); } delay(1000); // Wait 500 milliseconds before the next read } // Function to read data from a register uint8_t readReg(uint8_t reg, uint8_t* buffer, size_t size) { if (buffer == NULL) { Serial.println("Buffer ERROR!! : null pointer"); return 0; } // Start I2C transmission to the sensor Wire.beginTransmission(CHT8305_I2C_ADDRESS); Wire.write(reg); // Send the register address to read from // End the transmission and check if successful if (Wire.endTransmission() != 0) { return 0; // Return 0 if there's an error } delay(20); // Small delay to ensure data is ready // Request 'size' bytes of data from the sensor Wire.requestFrom(CHT8305_I2C_ADDRESS, (uint8_t)size); // Read the requested bytes into the provided buffer for (uint16_t i = 0; i < size; i++) { if (Wire.available()) { buffer[i] = Wire.read(); } } return size; // Return the number of bytes read } |
Code Explanation
This code interfaces a CHT8305 temperature and humidity sensor with an ESP32 microcontroller and displays the sensor data on a 20×4 I2C LCD. It reads the temperature and humidity values from the sensor over the I2C protocol and displays them on both the Serial Monitor and the LCD screen. Here’s a detailed breakdown:
Step 1: Initialize I2C Communication and LCD
Examples for both Arduino and ESP32 initialize I2C communication with Wire.begin(). To initialize the I2C LCD display, it informs about its address-commonly 0x27-and the size of the display, which is 20×4.
Reading Sensor Data:
- readReg(0x00, buf, 4): Reads 4 bytes from the sensor starting at register 0x00. This data includes both temperature and humidity values.
- Extracting Data:
- tempData = (buf[0] << 8) | buf[1]: Combines the first two bytes in buf to form the raw temperature data.
- humData = (buf[2] << 8) | buf[3]: Combines the next two bytes in buf to form the raw humidity data.
Calculating Temperature and Humidity:
- Temperature: temperature = ((float)tempData * 165 / 65535.0) – 40.0
- The formula converts the raw temperature data into degrees Celsius, following the CHT8305 sensor’s conversion equation.
- Humidity: humidity = ((float)humData / 65535.0) * 100
- The formula converts the raw humidity data into a percentage of relative humidity.
Error Handling:
- If readReg fails, an error message will be printed on both the serial monitor and the LCD.
readReg Function:
The readReg function reads data from a specific register in the CHT8305 sensor.
- Checks for Null Buffer: Ensures that the buffer passed is not NULL.
- Starts I2C Transmission:
- Wire.beginTransmission(CHT8305_I2C_ADDRESS): Initiates communication with the sensor.
- Wire.write(reg): Sends the register address to the sensor to read data from.
- Wire.endTransmission(): Ends the transmission and checks if the communication was successful.
- Waits for Data Readiness: A 20ms delay to ensure data is ready to be read.
- Requests Data: Uses Wire.requestFrom to request a specified number of bytes from the sensor.
- Reads Data into Buffer: Stores the data read from the sensor into the provided buffer.
- Returns Number of Bytes Read: Returns the size of the data read if successful.
Conclusion
Interfacing the CHT8305 temperature and humidity sensor with Arduino or ESP32 is quite straightforward and efficient, especially over I2C communication. The sensor’s compactness, moreover, allows it to integrate an I2C LCD display, which will make it ideal for measuring temperature and humidity for several purposes. All you have to do is connect a few components, and your environmental data real-time monitoring will be up and running.
By following this guide, you’ll be able to get your project up and running fast with either Arduino or ESP32 and display temperatures and humidities safely with the CHT8305 sensor. Enjoy building and coding!