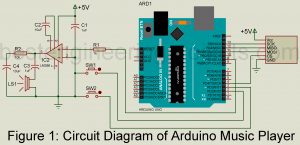
Dark Sensor using Arduino

arduino based dark sensor using LDR

The project ‘Dark Sensor using Arduino’ uses an arduino board, a LDR and switching circuit. The circuit is basically a light operated circuit which operates when dark is detected on LDR. Circuit Diagram of Dark Sensor using Arduino. Circuit diagram of the projects ‘Dark Sensor using Arduino’ is shown in figure 1, build around a arduino uno board, a LDR, three transistors and few other electronics components. The LDR is basically a transducer which change one form of energy to another form (change in light intensity to change in resistance).…

Read More

RGB Colour Generator using Arduino

arduino based RGB color generator

Basically, RGB represent three basic colour RED GREEN and BLUE which is used in our digital system for generation various other colour. The project ‘RGB Colour Generator using Arduino’ is basically a tutorial on how to generate colour code and hex code of that color. Circuit Description of RGB Colour Generator using Arduino The circuit of RGB colour generating using arduino is basically designed using a microcontroller unit (Arduino uno), a 16×2 alpha numeric LCD, a RGB LED and few resistor and variable resistor. The circuit diagram is shown in…

Read More

Soil Moisture Meter using Arduino

arduino based soil moisture meter

The project ‘Soil Moisture Meter using Arduino’ uses arduino board, a 16×2 LCD module and soil moisture sensor in order to display the humidity (moisture) of soil. This project is very useful for farmer, floriculture, researchers etc. in order to know the moisture of soil at different stage. The working principle and circuit description is very simple that anymore can understand who have little knowledge of arduino board. The project is basically an interfacing circuit between arduino board with LCD and sensor. Previously, we had posted Greenhouse Automation System for easy, cost effective,…

Read More

Arduino VU Meter

VU meter using arduino

The project ‘Arduino VU Meter’ uses 16×2 alphanumeric LCD to display signal level of audio. Basically, VU Meter is used to represent volume of audio equipment. Previously we had posted a project Sound VU Meter using Arduino which uses LEDs to represent the level of volume where audio is taken from microphone. Unlike sound VU meter using arduino the project Arduino VU meter take input audio from two different channels i.e. left channel and right channel. Circuit Description of Arduino VU Meter The circuit of Arduino VU Meter is shown…

Read More

Temperature Controlled Fan using Arduino

arduino based temperature controlled fan

The project ‘Temperature Controlled Fan using Arduino is simply fabricated around Arduino uno board and temperature sensor LM35. The projects are a good example of embedded systems designed using a closed-looped feedback control system. For proper user interface visual indication we had also used LCD which indicate the temperature as well as the speed of the fan. Circuit Description of Temperature Controlled Fan using Arduino The entire circuit of ‘Temperature Controlled Fan using Arduino’ utilizes very few components, an MCU (Arduino Uno), a temperature sensor (LM35), an LCD, a motor…

Read More

Arduino FM Receiver Circuit using TEA5767

author prototype of fm receiver using arduino

The circuit posted here is of Arduino FM Receiver using digital radio—receiver module TEA5657 by Philips. Additional components like audio power amplifier, Arduino uno board, and LCD module to display station number and frequency. However, for the receiving system to function flawlessly, external components like a capacitor, resistor, etc are included in the circuit, which is necessary. if you wish to make your FM transmitter circuit using Arduino please go through this link: Arduino FM Transmitter Description Arduino FM Receiver Circuit using TEA5767 The circuit of the project Arduino FM…

Read More

Arduino Fingerprint Sensor Lock

arduino fingerprint sensor circuit

The project “Arduino Fingerprint Sensor Lock” is simply fabricated around Arduino board. Not only to ensure door security, this project also make certain to assist in fields like forensics, crime investigation, personal identification, attendance system and there is a lot more. Introduction of Arduino Fingerprint Sensor Lock Recently, there has been recorded tremendous increase in the crime rate everywhere in the world. This issue is turning more severe every day. To get away with this problem, we decided to take help from technology and there this project “Arduino Fingerprint Sensor Lock”…

Read More

Earthquake Detector using Arduino

output of earthquake detector using arduino

Earthquake Detector using Arduino:- Circuit Diagram, working and circuit description with result and software code including library file of Earth Quake Detector They say, ‘Prevention is better than cure. This statement goes perfectly with the events whose probability of occurrence is highly possible. Earthquake is one such disaster that comes as an evil fate and sweeps away precious human lives and civilization, it is an unpredictable phenomenon whose occurrence cannot be avoided, but at least we can take measures to minimize the adverse effect of its consequences. In doing so,…

Read More

High Powered Strobe Light Using Arduino

arduino based high powered strobe led light

The project High Powered Strobe Light Using Arduino is the extended version of strobe light using arduino. Here, in this project we uses six high power Luxeon LED as used in previous project. This project show different strobe effect like flashing, fading, continuous illuminating etc. We can select any of this effect through serial monitor. Lets see the circuit diagram and how its work. Circuit Description of High Powered Strobe Light Using Arduino The circuit is shown in figure 1 and is designed around arduino uno board, N-Channel MOSFET, LM317…

Read More

Strobe Light Using Arduino

circuit diagram of led strobe light using arduino

Here is one another project which is useful in our daily life using aduino. As we had already posted “High Brightness LED Strobe Using NE555” using array of 36 LEDs now here we use single high brightness Luxeon LED. The circuit of strobe light using arduino is shown in figure 1. The potentiometer VR1 is used to control the flashing rate of strobe light. PARTS LIST OF STROBE LIGHT USING ARDUINO Resistor (all ¼-watt, ± 5% Carbon) R1 = 270 Ω R1 = 4 Ω/1W VR1 = 100 KΩ Semiconductors…

Read More