In this article, we will learn to interface a compact and monochrome LCD display named Nokia 5110 with Arduino Nano. This article will also demonstrate how we can display alphanumeric characters, draw lines and other shapes and even display bitmap images after converting them into a data array via “Nokia 5110”.
Introduction of Nokia 5110 LCD Display:
Nokia 5110 is a low-powered, inexpensive, and easy-to-use LCD display module. This display features a low-powered CMOS LCD controller/driver called PCD8544. The PCD8544 is designed to drive a graphic array of 84×48 pixels (i.e. GDDRAM – Graphical Display Data RAM) which interfaces to microcontrollers via SPI protocol. This module is a good choice when it comes to battery-operated systems.
The display driver has a built-in GDDRAM of 504 bytes. This memory area is organized into 6 banks (0 – 5) in row format, containing 84 columns/segments (0 – 83) so that each column can store 8 bits (0 – 7) of data.
Mathematically :- 6 banks x 84 segments x 8 bits of data = 4032 bits = 504 bytes
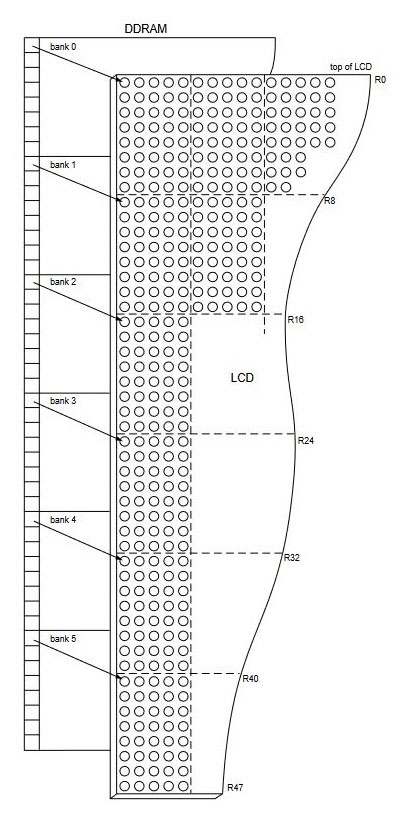 Figure 1: Memory Arrangement of Nokia 5110 LCD Display
The Nokia 5110 LCD is popularly used to display beautiful graphical images and User Interface. These bitmap images are first converted into data arrays and then displayed.
Nokia 5110 LCD Display Specifications:
- Operation Voltage : 2.7V – 3.3V (typically 3.3V)
- Temperature range: −25 to +70 °C
- Current consumption: 6mA
- Pixel density: 84 ×48 pixels (monochrome)
- Communication Method: SPI interface (MISO / MOSI)
- Serial interface maximum 4.0 Mbits/s
- Pixel Colour: Black
- Dimension : 45mm × 45mm
Application of Nokia 5110 LCD:
- Used in applications where fancy graphics are required.
- Comes with a backlight that can be adjusted via PWM signal and hence can be used in different lighting conditions.
- Can be used to create retro games using microcontrollers.
- Can be used to display alphanumeric characters and bitmap images (via data arrays) to create basic UI.
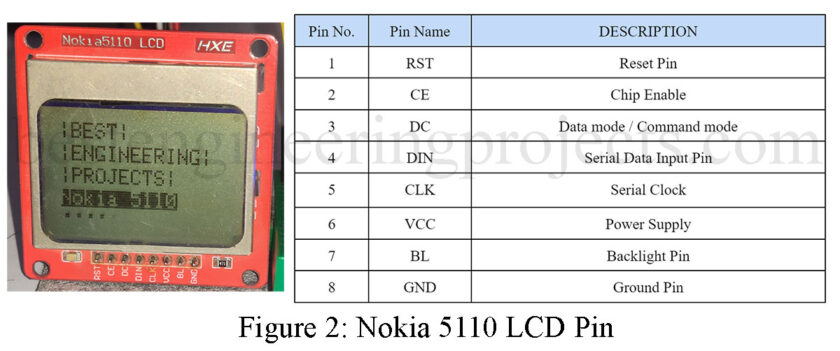
Pin Description of Nokia 5110 LCD Display
- RST: This pin resets the module. It is an active low pin (resets when 0V is provided)
- CE: This pin is made low (0V) to select this particular display when more than one SPI peripheral are used.
- DC: This pin is used to switch between Data mode (high) and Command mode (low)
- DIN: This is the serial input pin (MOSI) through which serial instructions are sent
- CLK: The clock source is supplied to this pin.
- VCC: Input voltage from 2.7 to 3.3V.
- BL: This pin powers the backlight of the display (3.3V maximum).To control its brightness, you can add a potentiometer or connect this pin to any PWM-capable Arduino pin.
- GND: Ground pin (0V)
Nokia 5110 LCD with Arduino Wiring Diagram
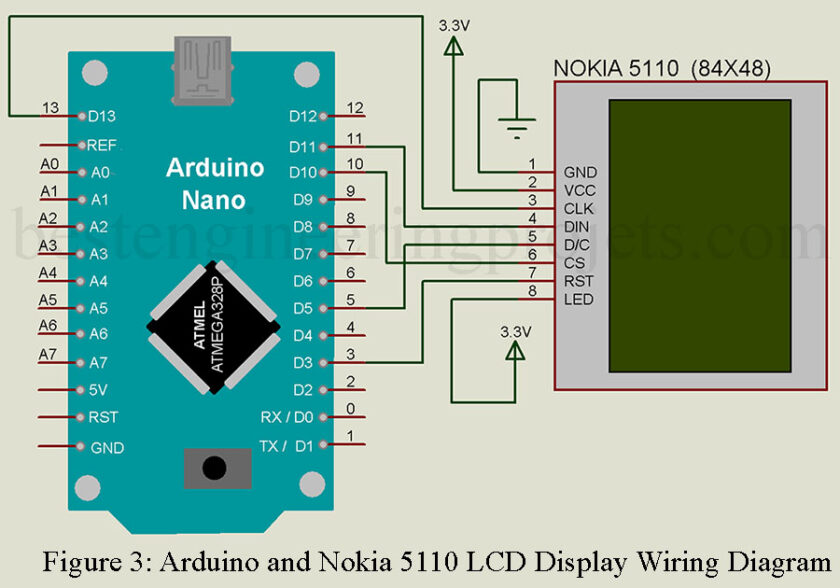
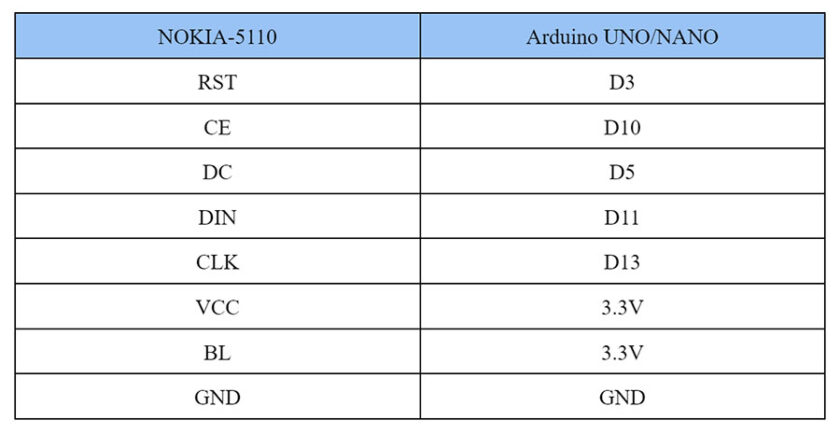
The Pin connection between the LCD module and Nano can be understood easily from the following table:
Software Code of Nokia 5110 LCD with Arduino and its Explanation:
Nokia 5110 LCD Display Library
|
1 2 3 |
#include <SPI.h> #include <Adafruit_GFX.h> #include <Adafruit_PCD8544.h> |
Firstly, we will include all the following libraries which are required for this project. SPI.h will allow us to communicate through the SPI protocol. Whereas the other libraries (i.e. Adafruit_PCD8544.h and Adafruit_GFX.h) are required for the proper functionality of the Nokia 5510 LCD display. The “Adafruit_PCD8544.h” library is for operating the PCD8544-based Nokia display whereas “Adafruit_GFX.h” is the core graphics library that provides a common set of graphics primitives (points, lines, circles, etc.) for the Nokia display.
Initialise pins of Nokia5110 Display
|
1 |
Adafruit_PCD8544 nDisplay = Adafruit_PCD8544(13,11,6,10,5); |
Next, we will initialize the Nokia5110 display by creating an object of Adafruit_PCD8544 named “nDisplay”. We have connected Nokia 5510’s CLK, DIN, DC, CE, and RST pins to Arduino digital pins: 13, 11, 6, 10, and 5 respectively.
Displaying Text on Nokia 5110 LCD Display with Arduino:
For displaying characters we have to set a few parameters
|
1 2 3 4 5 6 7 8 9 10 11 12 13 |
nDisplay.begin(); nDisplay.setContrast(57); nDisplay.clearDisplay(); nDisplay.setTextSize(1); nDisplay.setTextColor(BLACK); nDisplay.setCursor(0,0); nDisplay.println("|BEST ENGINEERING|"); nDisplay.setCursor(28,20); nDisplay.println("|PROJECTS|"); nDisplay.setCursor(12,32); nDisplay.setTextColor(WHITE, BLACK); nDisplay.println("Nokia 5110"); delay(4000); // Wait for 4 seconds |
display.begin() = initialize the LCD display
setContrast() = It will set the contrast of the display. The “setContrast()” method takes in values between 0-100 but values from 50-60 give a good result. You can change the values and see what suits you better. Right now, we set the contrast to 57.
clearDisplay() = To clear the display (display buffer).
Similarly, in the text display command the fonts, size, and types can be adjusted.
setTextSize() = To set the size of the text, we will use the “setTextSize()” method and pass the font size parameter inside it. Here we have set the font size as 1 (i.e. default), which denotes the smallest size. The characters are rendered in the ratio of 5:7. Meaning, passing font size 1 will render the text at 5×7 pixels per character, and passing font size 2 will render the text at 10×14 pixels per character, and so on.
setTextColor() = Next, we will control the color of the text by using the “setTextColor()” method and passing BLACK as an argument. If we have a dark background, we would have to set the display color parameter as “WHITE”.
setCursor() = We will use the “setCursor()” function to denote the x and the y-axis position from where the text should start. We have passed (0,0) as the parameter. The first parameter is the x-axis position that (+x) increases towards the right. The second parameter is the y-axis position that (+y) increases downwards.
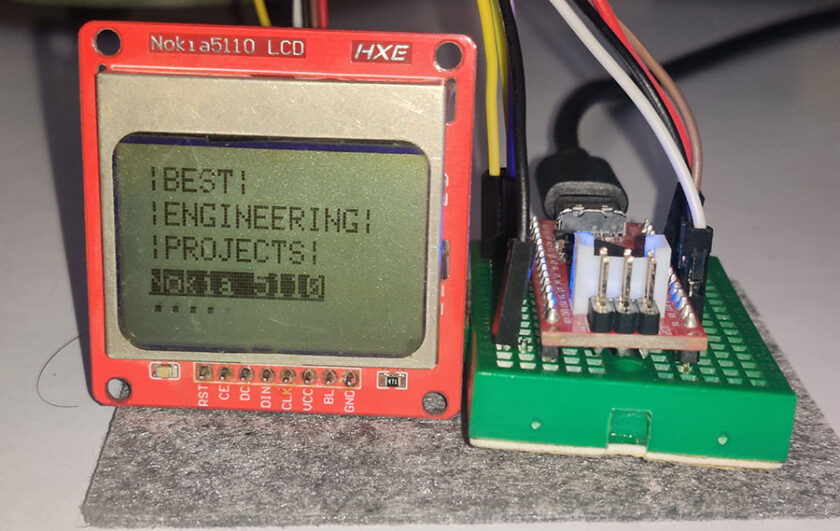
println() = By using the “println()” method we will pass the text, that we want to display (i.e. “|BEST|”) and set the cursor to the next line. Then re-adjusting the cursor to (0,10) to pass “|ENGINEERING|” and again set the cursor to (0,20) to pass “|PROJECTS|”. Then lastly set the cursor to (0,30) and pass the message “Nokia 5110” in an inverted font by providing two parameters to the “setTextColor()” method. This method will now set the “font color” and “Background color” respectively. This is because of something called “function overloading” which enables the function implementation to change depending upon the parameters passed.
Finally, we will call the ”display()” method to display the passed text and symbols on the LCD screen.
Figure 4: Displaying Text on Nokia 5110 LCD Display with Arduino
Text Rotation in Nokia 5110 LCD Display
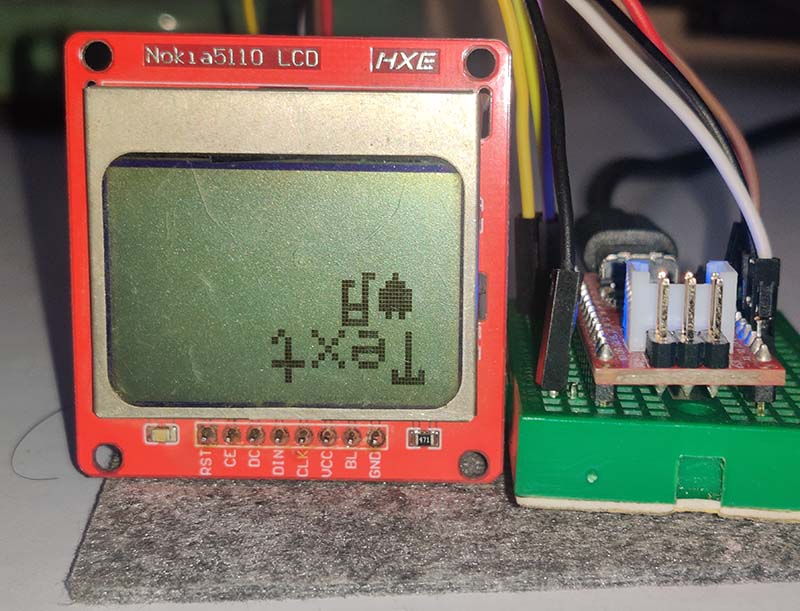
we can also rotate the text messages displayed on the LCD. The code is written within the Setup() function to invoke it once.
|
1 2 3 4 5 6 7 8 9 10 11 12 13 14 15 16 17 |
for(int k =0;k<=3;k++) { nDisplay.clearDisplay(); nDisplay.setRotation(k); nDisplay.setTextSize(1); nDisplay.setTextColor(BLACK); nDisplay.setCursor(4,4); nDisplay.println("Text"); nDisplay.setTextSize(2); nDisplay.setCursor(4,15); nDisplay.write(3); //ASCII character for heart symbol nDisplay.setCursor(15,15); nDisplay.write(14); //ASCII character for musical note symbol nDisplay.display(); delay(1000); nDisplay.clearDisplay(); } |
Here, the contents of the display can be rotated by using the “setRotation()” method. It allows you to view your display in portrait mode, or flip it upside down. The function accepts only one parameter which corresponds to only 1 out of 4 cardinal rotations. This value can be any non-negative integer starting from 0 up to 3. Each time you increase the value, the contents of the display are rotated 90 degrees anti-clockwise.
- 0 – Keeps the screen to the standard landscape orientation.
- 1 – Rotate the screen 90° to the right.
- 2 – Flip the screen upside down.
- 3 – Rotate the screen 90° to the left.
Also, we can display ASCII symbols using the “write()” method which sends unique binary data to display according to the argument value. The display converts this binary data to ASCII text and displays corresponding symbols.
Figure 5: Nokia 5110 LCD Text Rotation
Displaying Bitmap on Nokia 5110 LCD Display
To show a bitmap image on the Nokia 5110 LCD display, we need to call the “drawBitmap()” function. It takes six parameters (i.e. Top left corner X coordinate, top left corner Y coordinate, bitmap byte array, the width of bitmap in pixels, the height of bitmap in pixels, and Colour). In our example, the bitmap image is 84×48 in size. So, X & Y coordinates are set to 0 while width & height is set to 84 & 48.
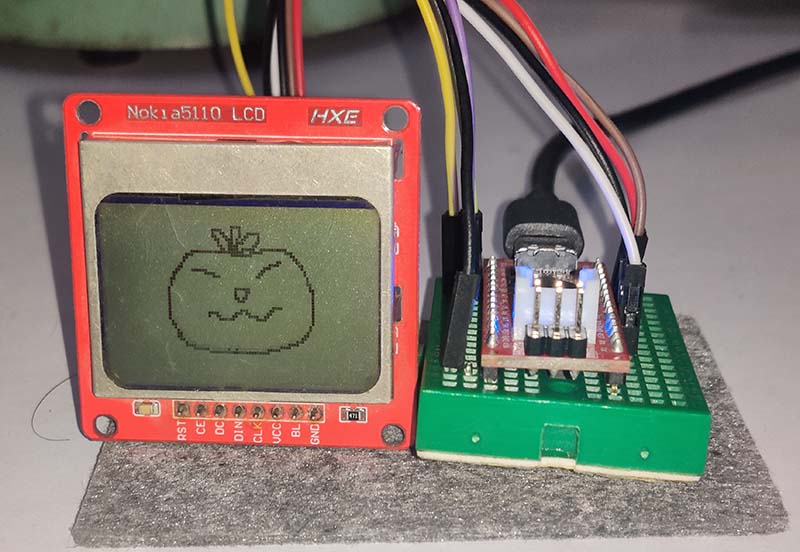
But, before we can call the drawBitmap() function, we first need to declare the data array of required bitmap images (converted by link: “https://javl.github.io/image2cpp/ ”) as a global variable. The call the array (i.e. Tomato) inside the drawBitmap() function.
When you declare the data array, you might want to store it inside the program memory (i.e. PROGMEM) instead of SRAM or Arduino as it provides better performance. The PROGMEM is primarily used for large chunks of data (an array mostly), which can overwhelm the SRAM (which is generally much smaller in size than the flash memory, but faster to access). The implication of storing something in PROGMEM is that it cannot be modified dynamically at runtime. Therefore, people generally use PROGMEM to store large immutable text or data.
Complete Code:
|
1 2 3 4 5 6 7 8 9 10 11 12 13 14 15 16 17 18 19 20 21 22 23 24 25 26 27 28 29 30 31 32 33 34 35 36 37 38 39 40 41 42 43 44 45 46 47 48 49 50 51 52 53 54 55 56 57 58 59 60 61 62 63 64 65 66 67 68 69 70 71 72 73 74 75 76 77 78 79 80 81 82 83 84 85 86 87 88 89 90 91 92 93 94 95 96 97 98 99 100 101 102 103 104 105 106 107 108 109 110 111 112 113 114 115 116 117 118 119 120 121 122 123 124 125 126 127 128 129 130 131 132 133 134 135 136 137 138 139 140 141 142 143 144 145 146 147 148 149 150 151 152 153 154 155 156 157 158 159 160 161 162 163 164 165 166 167 168 |
#include <SPI.h> #include <Adafruit_GFX.h> #include <Adafruit_PCD8544.h> /* // Hardware SPI (faster, but must use certain hardware pins): // pin 13 - SCK for LCD serial clock (SCLK) // pin 11 - MOSI for LCD DIN // pin 5 - DC for Data/Command select // pin 10 - CS for LCD chip select // pin 3 - RST for LCD reset */ /* Declare LCD object as Adafruit_PCD8544(CLK,DIN,D/C,CE,RST);*/ Adafruit_PCD8544 nDisplay = Adafruit_PCD8544(13, 11, 5, 10, 3); // DATA ARRAY of 'Tomato', (84x48) pixels const unsigned char Tomato [ ] PROGMEM = { 0x00, 0x00, 0x00, 0x00, 0x01, 0xe0, 0x00, 0x00, 0x00, 0x00, 0x00, 0x00, 0x00, 0x00, 0x00, 0xf1, 0x20, 0x00, 0x00, 0x00, 0x00, 0x00, 0x00, 0x00, 0x00, 0x00, 0x99, 0x27, 0xc0, 0x00, 0x00, 0x00, 0x00, 0x00, 0x00, 0x00, 0x00, 0xcd, 0x2c, 0x40, 0x00, 0x00, 0x00, 0x00, 0x00, 0x00, 0x00, 0x00, 0x67, 0x58, 0x40, 0x00, 0x00, 0x00, 0x00, 0x00, 0x00, 0x00, 0x00, 0x23, 0x70, 0xc0, 0x00, 0x00, 0x00, 0x00, 0x00, 0x00, 0x00, 0x00, 0x33, 0xc1, 0x80, 0x00, 0x00, 0x00, 0x00, 0x00, 0x00, 0x00, 0x00, 0x1b, 0xdf, 0x3f, 0xf0, 0x00, 0x00, 0x00, 0x00, 0x00, 0x00, 0xff, 0xff, 0xf3, 0xe0, 0x1c, 0x00, 0x00, 0x00, 0x00, 0x00, 0x03, 0x80, 0x01, 0xfe, 0x00, 0x06, 0x00, 0x00, 0x00, 0x00, 0x00, 0x06, 0x00, 0x00, 0x00, 0x00, 0x03, 0x00, 0x00, 0x00, 0x00, 0x00, 0x04, 0x00, 0x00, 0x00, 0x00, 0xc1, 0x80, 0x00, 0x00, 0x00, 0x00, 0x08, 0x00, 0x00, 0x00, 0x07, 0x80, 0xc0, 0x00, 0x00, 0x00, 0x00, 0x18, 0x00, 0x00, 0x00, 0x1c, 0x00, 0x40, 0x00, 0x00, 0x00, 0x00, 0x30, 0xfc, 0x00, 0x00, 0x30, 0x00, 0x20, 0x00, 0x00, 0x00, 0x00, 0x60, 0x07, 0x80, 0x00, 0x60, 0x00, 0x20, 0x00, 0x00, 0x00, 0x00, 0x40, 0x00, 0xe0, 0x00, 0xc0, 0x00, 0x10, 0x00, 0x00, 0x00, 0x00, 0xc0, 0x00, 0x00, 0x00, 0x00, 0x00, 0x10, 0x00, 0x00, 0x00, 0x00, 0x80, 0x00, 0x00, 0x00, 0x00, 0x00, 0x18, 0x00, 0x00, 0x00, 0x00, 0x80, 0x00, 0x00, 0x00, 0x00, 0x00, 0x08, 0x00, 0x00, 0x00, 0x01, 0x00, 0x00, 0x00, 0xfc, 0x00, 0x00, 0x0c, 0x00, 0x00, 0x00, 0x01, 0x00, 0x00, 0x00, 0x8c, 0x00, 0x00, 0x04, 0x00, 0x00, 0x00, 0x01, 0x00, 0x00, 0x00, 0x88, 0x00, 0x00, 0x04, 0x00, 0x00, 0x00, 0x01, 0x00, 0x00, 0x00, 0xd8, 0x00, 0x00, 0x04, 0x00, 0x00, 0x00, 0x01, 0x00, 0x00, 0x00, 0x70, 0x00, 0x00, 0x04, 0x00, 0x00, 0x00, 0x01, 0x00, 0x00, 0x00, 0x00, 0x00, 0x00, 0x04, 0x00, 0x00, 0x00, 0x01, 0x00, 0x00, 0x00, 0x00, 0x03, 0xc0, 0x04, 0x00, 0x00, 0x00, 0x01, 0x00, 0x00, 0x00, 0x38, 0x06, 0x00, 0x04, 0x00, 0x00, 0x00, 0x01, 0x00, 0x03, 0xc0, 0xec, 0x0c, 0x00, 0x04, 0x00, 0x00, 0x00, 0x01, 0x00, 0x02, 0x61, 0x87, 0x98, 0x00, 0x04, 0x00, 0x00, 0x00, 0x01, 0x00, 0x00, 0x3f, 0x00, 0xf0, 0x00, 0x04, 0x00, 0x00, 0x00, 0x00, 0x80, 0x00, 0x00, 0x00, 0x00, 0x00, 0x04, 0x00, 0x00, 0x00, 0x00, 0xc0, 0x00, 0x00, 0x00, 0x00, 0x00, 0x08, 0x00, 0x00, 0x00, 0x00, 0x40, 0x00, 0x00, 0x00, 0x00, 0x00, 0x08, 0x00, 0x00, 0x00, 0x00, 0x20, 0x00, 0x00, 0x00, 0x00, 0x00, 0x10, 0x00, 0x00, 0x00, 0x00, 0x30, 0x00, 0x00, 0x00, 0x00, 0x00, 0x30, 0x00, 0x00, 0x00, 0x00, 0x30, 0x00, 0x00, 0x00, 0x00, 0x00, 0x60, 0x00, 0x00, 0x00, 0x00, 0x18, 0x00, 0x00, 0x00, 0x00, 0x01, 0xc0, 0x00, 0x00, 0x00, 0x00, 0x04, 0x00, 0x00, 0x00, 0x00, 0x0f, 0x00, 0x00, 0x00, 0x00, 0x00, 0x07, 0x80, 0x00, 0x00, 0x00, 0x78, 0x00, 0x00, 0x00, 0x00, 0x00, 0x00, 0xfc, 0x04, 0x80, 0x0f, 0x80, 0x00, 0x00, 0x00, 0x00, 0x00, 0x00, 0x03, 0xff, 0xff, 0xf8, 0x00, 0x00, 0x00, 0x00, 0x00, 0x00, 0x00, 0x00, 0x00, 0x00, 0x00, 0x00, 0x00, 0x00, 0x00, 0x00, 0x00, 0x00, 0x00, 0x00, 0x00, 0x00, 0x00, 0x00, 0x00, 0x00, 0x00, 0x00, 0x00, 0x00, 0x00, 0x00, 0x00, 0x00, 0x00, 0x00, 0x00, 0x00, 0x00, 0x00, 0x00, 0x00, 0x00, 0x00, 0x00, 0x00, 0x00, 0x00, 0x00, 0x00, 0x00, 0x00, 0x00, 0x00, 0x00, 0x00, 0x00, 0x00, 0x00, 0x00, 0x00, 0x00, 0x00, 0x00, 0x00, 0x00, 0x00, 0x00, 0x00, 0x00 }; // DATA ARRAY of 'Marilyn Monroe ( 84x48 ) pixels const unsigned char MarilynMonroe [ ] PROGMEM = { 0x00, 0x00, 0x00, 0x7f, 0x00, 0x02, 0xfe, 0xf8, 0x00, 0x00, 0x00, 0x00, 0x00, 0x00, 0xbe, 0x00, 0x00, 0x1f, 0xe0, 0x00, 0x00, 0x00, 0x00, 0x00, 0x00, 0x20, 0x00, 0x00, 0x3f, 0x80, 0x00, 0x00, 0x00, 0x00, 0x00, 0x00, 0xf0, 0x00, 0x00, 0x1f, 0xe1, 0x80, 0x00, 0x00, 0x00, 0x00, 0x00, 0xc0, 0x00, 0x00, 0x0f, 0xf1, 0xc0, 0x00, 0x00, 0x00, 0x00, 0x00, 0x00, 0x00, 0x00, 0x0e, 0xd8, 0xe0, 0x00, 0x00, 0x00, 0x00, 0x00, 0x1f, 0x80, 0x00, 0x07, 0xe0, 0x70, 0x00, 0x00, 0x00, 0x00, 0x03, 0x3f, 0xe0, 0x00, 0x07, 0xf0, 0x78, 0x00, 0x00, 0x00, 0x00, 0x01, 0xe0, 0x70, 0x00, 0x0f, 0xee, 0x7c, 0x00, 0x00, 0x00, 0x00, 0x03, 0xc0, 0x00, 0x00, 0x0f, 0xf7, 0x1c, 0x00, 0x00, 0x00, 0x00, 0x07, 0x80, 0x00, 0x0f, 0xc7, 0xf3, 0x1e, 0x00, 0x00, 0x00, 0x00, 0x07, 0xc0, 0x00, 0x0f, 0xf3, 0xdf, 0x7f, 0x80, 0x00, 0x00, 0x00, 0x07, 0xfe, 0x00, 0x08, 0x7d, 0xef, 0xff, 0xc0, 0x00, 0x00, 0x00, 0x7f, 0xff, 0x80, 0x30, 0x0f, 0xfc, 0xe0, 0xc0, 0x00, 0x00, 0x01, 0x9e, 0x73, 0xc0, 0xe0, 0x07, 0xf8, 0xc1, 0xc0, 0x00, 0x00, 0x03, 0xfc, 0x00, 0x01, 0xc0, 0x0f, 0xfd, 0xe1, 0x80, 0x00, 0x00, 0x03, 0xf8, 0x00, 0x01, 0x9c, 0x0f, 0xff, 0xc1, 0xc0, 0x00, 0x00, 0x02, 0xc0, 0x00, 0x01, 0x9f, 0xbf, 0xfe, 0x01, 0x40, 0x00, 0x00, 0x02, 0x60, 0x00, 0x03, 0x07, 0xef, 0xff, 0x01, 0x40, 0x00, 0x00, 0x00, 0x60, 0x00, 0x07, 0x01, 0xf7, 0xff, 0x80, 0xc0, 0x00, 0x00, 0x00, 0x50, 0x01, 0xdf, 0x00, 0x7f, 0xff, 0x1c, 0x80, 0x00, 0x00, 0x00, 0x40, 0x01, 0xff, 0x00, 0x1f, 0xff, 0x1e, 0xe0, 0x00, 0x00, 0x02, 0x08, 0x00, 0x3f, 0x80, 0x07, 0xef, 0x03, 0xe0, 0x00, 0x00, 0x06, 0x08, 0x00, 0x03, 0xc0, 0x07, 0xdf, 0x07, 0xc0, 0x00, 0x00, 0x06, 0x08, 0x0f, 0x81, 0x80, 0x1f, 0xdf, 0x1f, 0x80, 0x00, 0x00, 0x03, 0x08, 0x1f, 0x98, 0x00, 0x3f, 0xfe, 0x19, 0x80, 0x00, 0x00, 0x18, 0x08, 0x3f, 0xfe, 0x00, 0x7f, 0xfe, 0x3f, 0x00, 0x00, 0x00, 0x08, 0x08, 0x30, 0x3f, 0x00, 0xff, 0xff, 0x3f, 0x00, 0x00, 0x00, 0x01, 0xe0, 0x76, 0x0f, 0x89, 0xff, 0xff, 0x9f, 0x00, 0x00, 0x00, 0x03, 0xe0, 0x7f, 0xc3, 0x81, 0xff, 0xfe, 0x9f, 0x80, 0x00, 0x00, 0x03, 0xf0, 0x7f, 0xf3, 0xc3, 0xff, 0xfe, 0x1f, 0x00, 0x00, 0x00, 0x03, 0xf0, 0x7f, 0xfd, 0xc3, 0xff, 0xfe, 0x5e, 0x00, 0x00, 0x00, 0x03, 0xf0, 0x7f, 0xff, 0xc3, 0xff, 0xf3, 0x1e, 0x00, 0x00, 0x00, 0x03, 0xf0, 0x71, 0xff, 0x87, 0xff, 0xe3, 0xff, 0x00, 0x00, 0x00, 0x07, 0xf0, 0x7c, 0x3f, 0x87, 0xff, 0xe3, 0xfe, 0x00, 0x00, 0x00, 0x0f, 0xf0, 0x3c, 0xff, 0x05, 0xff, 0xf3, 0xfc, 0x00, 0x00, 0x00, 0x0f, 0xf0, 0x0f, 0xfe, 0x09, 0xff, 0xf7, 0xfc, 0x00, 0x00, 0x00, 0x08, 0xf8, 0x01, 0xfc, 0x19, 0xff, 0xff, 0xf8, 0x00, 0x00, 0x00, 0x0c, 0x78, 0x00, 0x00, 0x13, 0xff, 0xff, 0xf8, 0x00, 0x00, 0x00, 0x0e, 0x78, 0x00, 0x00, 0x23, 0xff, 0xff, 0xf0, 0x00, 0x00, 0x00, 0x0e, 0xf8, 0x00, 0x00, 0x47, 0xff, 0xff, 0xf0, 0x00, 0x00, 0x00, 0x0c, 0xfa, 0x00, 0x01, 0x8f, 0xff, 0xff, 0xe0, 0x00, 0x00, 0x00, 0x08, 0x7b, 0x00, 0x03, 0x3f, 0xff, 0xff, 0xe0, 0x00, 0x00, 0x00, 0x0c, 0x3b, 0xf8, 0x0f, 0xff, 0xff, 0xff, 0xe0, 0x00, 0x00, 0x00, 0x0f, 0xbb, 0xff, 0xff, 0xff, 0xff, 0xff, 0xf0, 0x00, 0x00, 0x00, 0x07, 0xfb, 0xff, 0xff, 0xff, 0xff, 0xff, 0xf0, 0x00, 0x00, 0x00, 0x00, 0x71, 0xff, 0xff, 0xff, 0xff, 0xff, 0xe0, 0x00, 0x00, 0x00, 0x00, 0x41, 0xff, 0xff, 0xff, 0xff, 0xff, 0xe0, 0x00, 0x00 }; void setup() { /* Initialize the Display*/ nDisplay.begin(); /* Change the contrast using the following API*/ nDisplay.setContrast(57); /* Clear the buffer */ nDisplay.clearDisplay();// clears the screen and buffer /* Now let us display some text */ nDisplay.setTextSize(1); // all text are set to size '1', if unchanged. nDisplay.setTextColor(BLACK); // setTextColor(font colour) nDisplay.setCursor(0,0); // setCursor(x,y); nDisplay.println("|BEST|"); nDisplay.setCursor(0,10); // setCursor(x,y); nDisplay.println("|ENGINEERING|"); nDisplay.setCursor(0,20); nDisplay.println("|PROJECTS|"); nDisplay.setCursor(0,30); nDisplay.setTextColor(WHITE, BLACK); // Function Overloading : setTextColor(font colour, Background colour) nDisplay.println("Nokia 5110"); nDisplay.display(); // Display these text on screen //Loading animation nDisplay.setCursor(0,36); nDisplay.setTextColor(BLACK); for(int x = 0; x<15 ; x++) { delay(500); nDisplay.write(46); nDisplay.display(); } //Clear screen to proceed nDisplay.clearDisplay(); // Text Rotation for(int k =0;k<=3;k++) { nDisplay.setRotation(k); nDisplay.setTextSize(2); nDisplay.setTextColor(BLACK); nDisplay.setCursor(0,0); nDisplay.println("Text"); nDisplay.setCursor(4,15); nDisplay.write(3); //ASCII character for heart symbol nDisplay.setCursor(15,15); nDisplay.write(14); //ASCII character for musical note symbol nDisplay.display(); delay(1000); nDisplay.clearDisplay(); } nDisplay.setRotation(0); //resetting the orientation } void loop() { // Display Tomato bitmap nDisplay.drawBitmap(0, 0, Tomato, 84, 48, BLACK); nDisplay.display(); delay(2000); nDisplay.clearDisplay(); // Display Marilyn Monroe bitmap nDisplay.drawBitmap(0, 0, MarilynMonroe, 84, 48, BLACK); nDisplay.display(); delay(2000); nDisplay.clearDisplay(); } |
Figure 6: Tomato Image on Nokia 5110 LCD
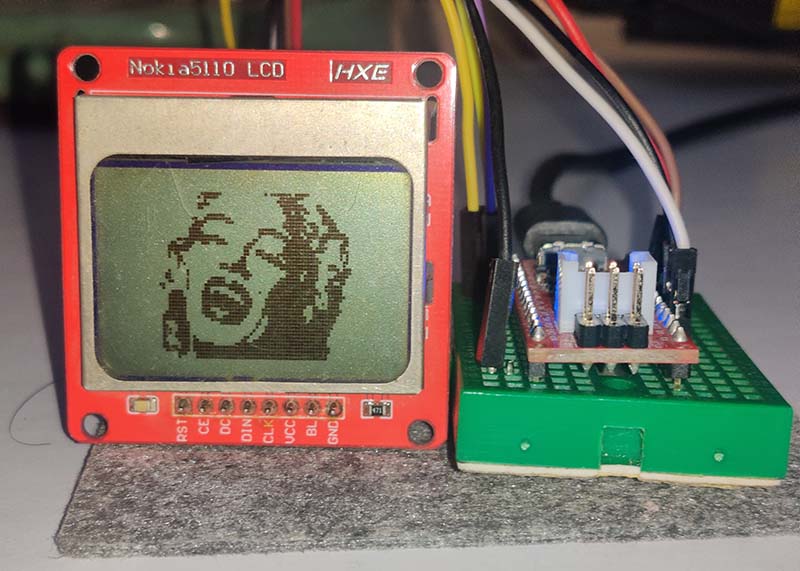
Figure 7: Marilyn Monroe Image on Nokia 5110 LCD
Tips and Tricks for Working with Nokia 5110 LCD Display and Arduino:
- It is recommended to operate the NOKIA 5110 display module in 3.3V for a longer life span.
- The “setContrast()” method takes in values between 0-100 but values from 50-60 give a good result.
