How to interface Load Cell with Arduino? How to make your very own Arduino Weighing Machine? Today, in this article you will learn about interfacing of Load Cell with Arduino and finally make your own Arduino Weighing Machine. This project is designed to weigh up to 50 Kg (depending upon the load cell you are using) accurately and efficiently.
Components Required for Arduino Weighing Machine
Arduino UNO Board x 1
16×2 Alphanumeric LCD x 1
Load Cell x 1
HX711 Module x 1
10K variable Resistor x 1
4.7K Resistor x 1
100 Resistor x 1
Push-to-on Switch x 1
Circuit Description of Arduino weighing Machine
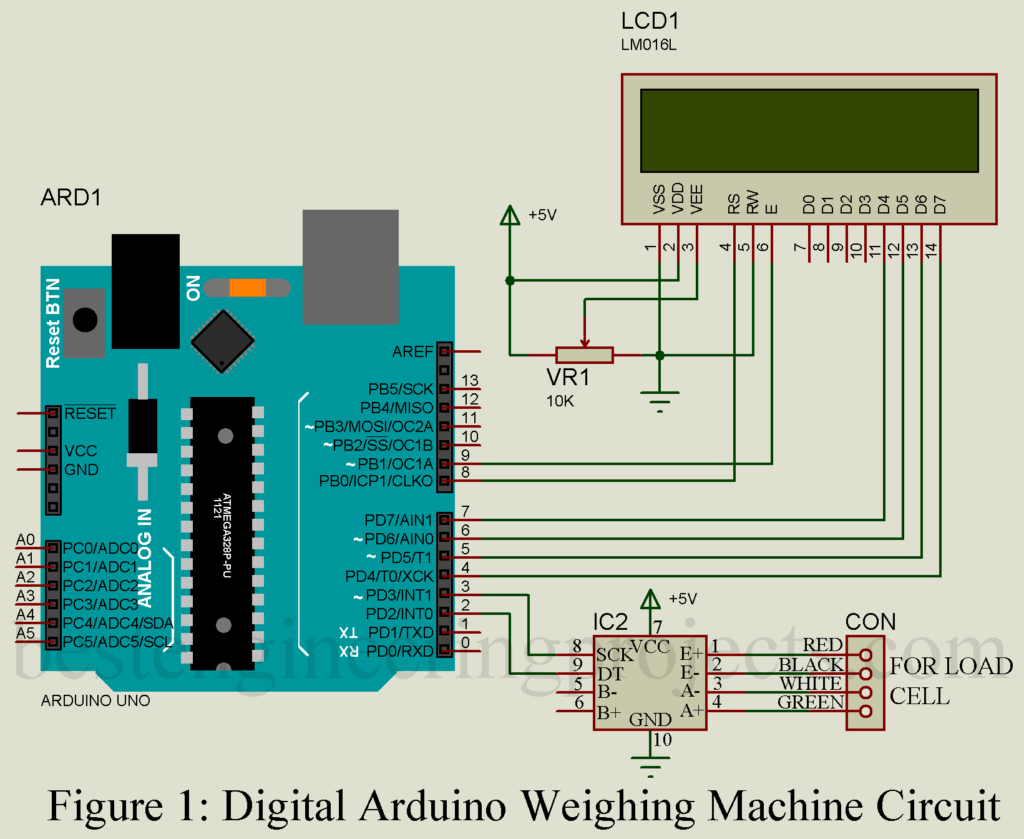
The Arduino-based layout of the project is shown in figure 1. As stated earlier, the Arduino UNO Board is the heart of the circuit. It is accompanied by other components like Load Cell, analog to digital converter cum amplifier module, 16×2 alphanumeric LCD, and a few other passive components like resistors.
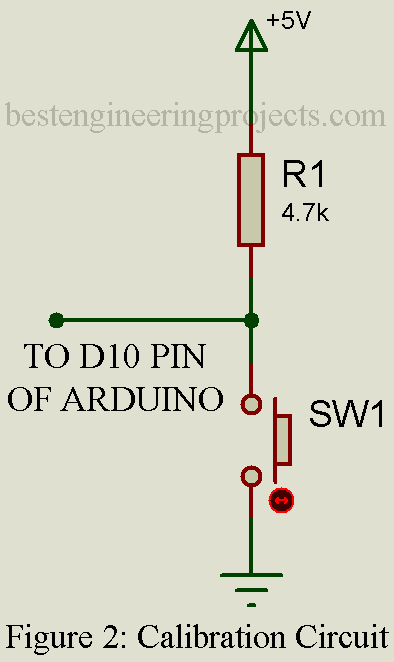
Calibration Circuit: The weight calibration circuit is shown in figure 2. This circuit is a switch with pull back resistor connected to Arduino uno board digital pin D10. When we push the switch the weight is automatically calibrated to 0 KG and display the value 0.0 on LCD.
Load Cell | Arduino Weighing Machine
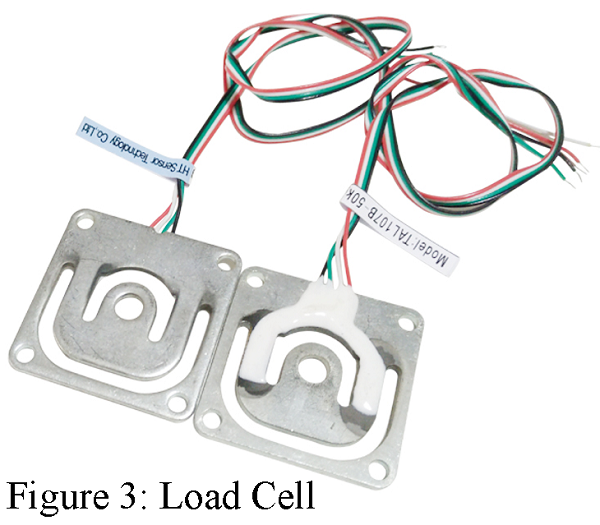
The load cell is a strain gauge that converts pressure into an electrical signal. This utilizes the basic method of measuring elongating or displacement. The method consists in using a strain gauge which provides a variation in resistance corresponding to the elongating or displacement to the measure. This load cell is a resistance-type strain gauge. The load cell available in the market is made from aluminum alloy because it has various advantages like lightweight, more accurate, anti-rusting structure, etc. The load cell shown in figure 2 is a strain gauge and operated as a Wheatstone bridge.
HX711 Module | Arduino Weighing Machine
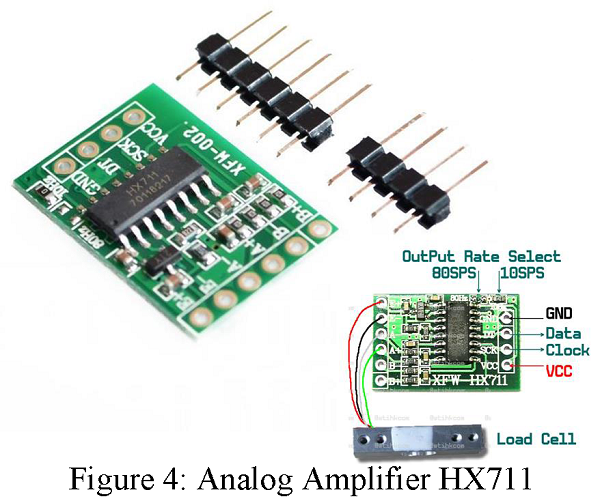
The output of the load cell is low and is analog. Thus, we have decided to use an amplifier module that takes input from a load cell, amplifies it, and converts it into digital form. It has distinct two input channels i.e. Channel A and Channel B. Channel A is a programmable gain amplifier having a gain of 128 or 64 whereas channel B is a fixed gain amplifier of 32. Other features of this module are a 24-bit high precision analog to digital converter. HX711 Module with connector is shown in figure 3.
Arduino weighing machine circuit connection details
The four-wire of load cell red, black, white, and green is connected to the HX711 module to E+, E-, A-, and A+ Pin respectively as shown in figure 1. The two outputs of HX711 (SCK and DT) are connected to digital pin D3 and D2 of Arduino uno board. This output is digital in nature. Channel B is left open, if you want more precision then you can connect another load cell and calculate the average.
Arduino UNO process this value and display it into LCD. The LCD we are using for the project Arduino weighing machine is a 16×2 alphanumeric LCD. LCD can be interfaced in either 4-bit mode or in 8-bit mode. Here in this project, we are using 4-bit mode. The higher data bit of LCD D4 to D& is connected to Arduino UNO digital pin. Potentiometer VR1 is used to adjust the constant of LCD.
Note: Cathode and Anode pin of LCD (pin 15 and pin 16) is not shown in the circuit diagram. Connect +5 volt to pin 15 with a current limiting resistor (generally 100-ohm) and pin 16 of LCD to ground.
Other Interesting projects using Arduino UNO Board posted in bestengineeringprojects.com
- Arduino GPS Digital Clock
- Earthquake detector | Indicator Circuit using Vibration Sensor
- Car Lock System using Arduino and GSM
- Multiplexed 4 LCD Display using Arduino UNO
- Automatic wiper for Automobile using Arduino and Rain sensor
Software Code:
The software program for Arduino weighting machine is written in Arduino programming language and is compiled using Arduino IDE. You can download the complete code form below. For working on the code, you most have to use a few header files which you can download from the link below.
This software is written to take multiple reading from a load cell, converts them into gram, and finally take their average for accuracy. This software code takes 25 readings and averages it five-time (you can increase or decrease the number of readings as required.) To speeding up the system you can reduce the number average taken.
Click Here to Download the Library File
|
1 2 3 4 5 6 7 8 9 10 11 12 13 14 15 16 17 18 19 20 21 22 23 24 25 26 27 28 29 30 31 32 33 34 35 36 37 38 39 40 41 42 43 44 45 46 47 48 49 50 51 52 53 54 55 56 57 58 59 60 61 62 63 64 65 66 67 68 69 70 71 72 73 74 75 76 77 78 79 80 81 82 83 84 85 86 87 88 89 90 91 92 93 |
#include <EEPROM.h> #include "writeAnything.h" #include "HX711.h" #include <LiquidCrystal.h> #include "floatToString.h" #include <string.h> #define calibration_factor -7050.0 //This value is obtained using the SparkFun_HX711_Calibration sketch // #define zero_factor 8421804 //This large value is obtained using the SparkFun_HX711_Calibration sketch //made off as this is obtained from memory //#define zero_factor 8330000 - h2 #define DOUT 2 #define CLK 3 struct config_t{ int myInteger; int myInteger1; } int2IEeprom; HX711 scale(DOUT, CLK); LiquidCrystal lcd(4,5,6,7,8,9); float x; long pos = 37; long h2,h1; int l,m; byte tracker=0; void setup() { Serial.begin(9600); lcd.begin(16, 2); pinMode(10,INPUT); lcd.setCursor(0,0); lcd.print("Wt.(gm):"); scale.set_scale(calibration_factor); //This value is obtained by using the SparkFun_HX711_Calibration sketch EEPROM_readAnything(pos,int2IEeprom); // Read the last set valuefrom EEPROM h2= 8330000 - int2IEeprom.myInteger; //convert to the original value Serial.println(h2); lcd.print(h2); scale.set_offset(h2); //Zero set the scale using a previously known zero_factor scale.tare(); } void loop() { x=scale.get_units(25)*16.5 ; //convert to gram //The multiplying factor 16.5 . //Change this factor suitably to match a known load if (x<0.5 and x>-1) x=0.0; //just to stabilize around 0 scale String buffer1; buffer1=String(x,1); if(x<10) { lcd.setCursor(3,1); lcd.print(buffer1); lcd.print(" "); } if(x>=10 and x<100) { lcd.setCursor(3,1); lcd.print(buffer1); } if(x>=100 and x<1000) { lcd.setCursor(3,1); lcd.print(buffer1); } if(x>=1000) { lcd.setCursor(3,1); lcd.print(buffer1); } int val=digitalRead(10); if(val==LOW){ lcd.setCursor(0,0); lcd.print(" ...calibrating"); scale.set_scale(calibration_factor); //This value is obtained by using the SparkFun_HX711_Calibration sketch scale.set_offset(scale.read_average(5) ); //Zero out the scale using a previously known zero_factor scale.tare(); l=8330000-scale.read_average(5); //Reduce the figure to a 4 digit integer value int2IEeprom.myInteger=l; tracker=EEPROM_writeAnything(pos,int2IEeprom.myInteger); //Write this into the EEPROM for next use lcd.setCursor(0,0); lcd.print("Wt.(gm):"); lcd.print("(C):"); lcd.print(l); } } |