We often visit to restaurant for food and drink, there we see a waiter came and ask for order. The most annoying part is waiter wait while we are choosing items for menu. At the time of pick hour customer increase, requires more manpower and as a result the situation becomes annoying and expensive too. In order to solve these problem, here we had design a simple automation system called restaurant menu ordering system based on 8-bit microcontroller ATmega8.
Different concept of digital menu ordering system has flourished along with different equipment, like Mobile App based menu ordering system which need to operate manually and need a manpower for order.
More other interesting project using ATmega MCU posted in bestengineeringprojects.com
- Interface 4×4 Keypad and ATmega32 with Single Pin
- VU Meter Circuit using ATmega32
- ATmega16 Based Voting Machine
- Ultrasonic Water Level Meter
The project ATmega8 based restaurant menu ordering system has various advantage over traditional digital menu ordering system and are listed below:
- Fully automation system
- No need of extra manpower
- Fast and efficient
- First come first service based
The customer can order three items (can be increased) at a time by pressing number from keypad.
Circuit Description of ATmega8 Based Restaurant Menu Ordering System
The circuit is divided into two main section i.e. Transmitter unit and Receiver unit. Before preceding to transmitter and receiver unit, let us first discuss on electronics component used here.
ATmega8 Microcontroller | ATmega8 Based Restaurant Menu Ordering System
It is an 8-bit microcontroller from AVR family having 8 K-bytes system programmable flash, 130 powerful instruction set, 32×8 general purpose register available for programmer. Here we had used DIL package which is of 28pin having I/O ports, memory, CPU, clock timer etc. internally.
LCD Module | ATmega8 Based Restaurant Menu Ordering System
In this project, we had used 16×2 alpha numeric LCD for output which display alphabets, numbers or even other special characteristics. The LCD have two rows and each row we can display 16 characters. It can operate in either 8-bit mode or 4-bit mode, but here we are using 4-bit mode.
Zigbee Module | ATmega8 Based Restaurant Menu Ordering System
Basically, zigbee module is a wireless networking device which is used to control the remote device and sensor application also. This module is popular for operating in isolated location and harassed radio environment.
4×3 Keypad | ATmega8 Based Restaurant Menu Ordering System
It is basically a multiplexed matrix keypad where 12 switches are connected only using 7 lines (4 for row and 3 for column). It has four rows and three columns.
Transmitter Section of ATmega8 Based Restaurant Menu Ordering System
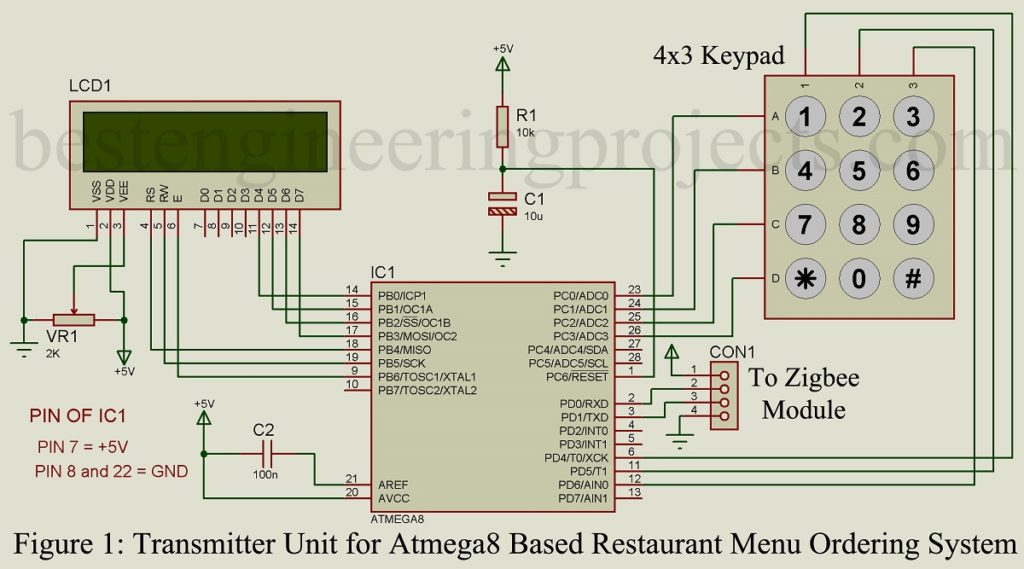
The circuit diagram of transmitter section is shown in figure 1, built around ATmega8 microcontroller, a LDC module, a zigbee module and a keypad. Microcontroller ATmega 8 act as brain which control all the other electronic components. LCD is configured in 4-bit mode used to view the selected item from the menu. LDC communicate with microcontroller using port B.
A keypad is used to select the items from menu. The row pin connected to port C where column pin is connected to port D as shown in circuit diagram.
A zigbee module is used as communication link between transmitter circuit and receiver circuit. The job of data transmission is done by zigbee module, it transmit the data what user gives by pressing keypad.
The transmitter unit is configured in each table.
Receiver Unit of ATmega8 Based Restaurant Menu Ordering System
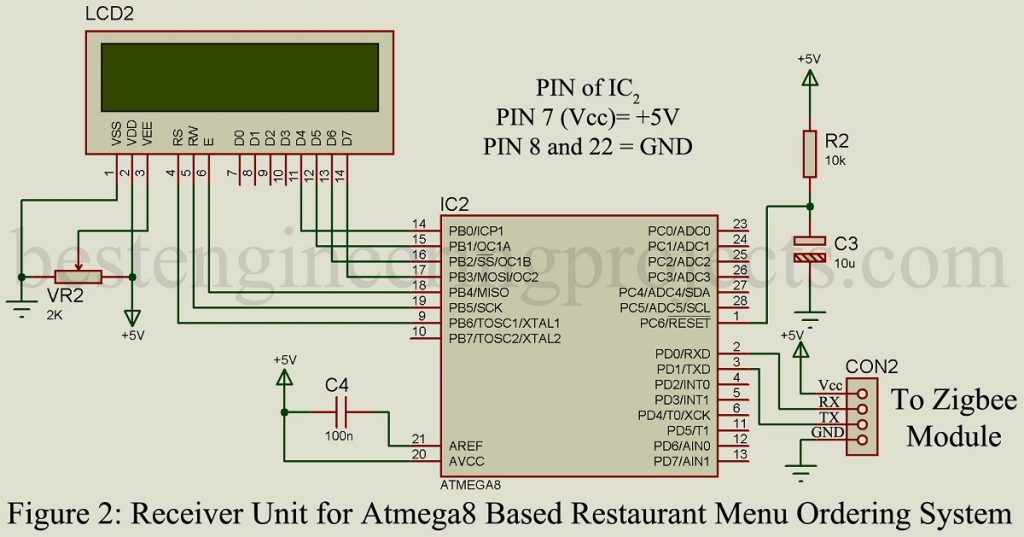
The circuit diagram of receiver unit is shown in figure 2. The working of receiving unit is same as transmitting unit but except keypad because it located in kitchen and no need of inputs. The order given by user is received by zigbee module connected in receiver module. The received data is displayed in LCD which is also configured in 4-bit data mode.
Procedure for Placing Order
- The menu is displayed in LCD with its corresponding number like 1. MOMO, 2. Coffee, 3. Ice-cream etc.
- User select the item code by pressing number from keypad.
- After selecting items from menu (max 3 items at a time) one has to press ‘#’ key.
- When microcontroller detect ‘#’ it places order to kitchen (in receiver section).
Software: The software code for ATmega8 based restaurant menu ordering system is written in C++ language using Atmel Studio and simulate using Proteous 8.0. You can directly download the code from blow
Click Here to Download Software Code
PARTS LIST OF ATMEGA8 RESTAURANT MENU ORDERING SYSTEM
| Resistors (all ¼-watt, ± 5% Carbon) |
| R1, R2 = 10 KΩ |
| Capacitors |
| C1, C3 = 10 µF, 16V (Electrolytic Capacitor)
C2, C4 = 100nF (Ceramic Disc) |
| Semiconductors |
| IC1, IC2 = ATmega8 (Microcontroller) |
| Miscellaneous |
| Two Zigbee Module
16×2 Alphanumeric LCD 4×3 matrix keypad Two connector |


I have a few questions Sir.
1. While simulating on Proteus, how will the receiver section know what has been transmitted? On Proteus how do we interface the two Zigbee modules?
2. For the hardware part, how do we interface the Zigbee modules?
3. In Proteus, do we need to dump the program in the transmitter secrion Atmega8 IC or both transmitter and receiver Atmega ICs?
At first you have to download Zigbee library for proteus.
There are various tutorial and video over internet about simulation of zigbee module,
For hardware interfacing simply connect transmitter pin and receiver pin of zigbee module to TX and RX pin of ATMEGA8.
Yes, for simulate you have to upload to both of the microcontroller, but you can simulate individual also.
Yes I have already created the simulation on proteus however the LCD does not show the menu. Is the code foolproof or do we need to modify it?
In hardware, do I need to dump the code in both the atmega IC’s? How is the dumping done in hardware?
The entire circuit and software code is tested and verified.
Yes, you have to burn the code in both of these microcontroller. Before, burning code you most have burner and HEX code.
Here in our lab we are using miniPro programmer.
Do we have to use 2 microcontroller?
Yes, One microcontroller is used in transmitting unit and one is used in receiving unit.
Can we buy this project at how much will it cost ?