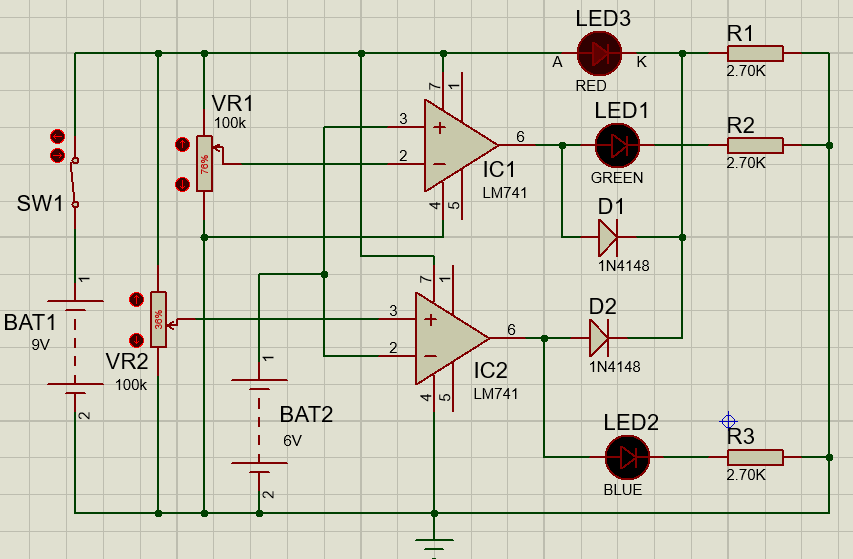
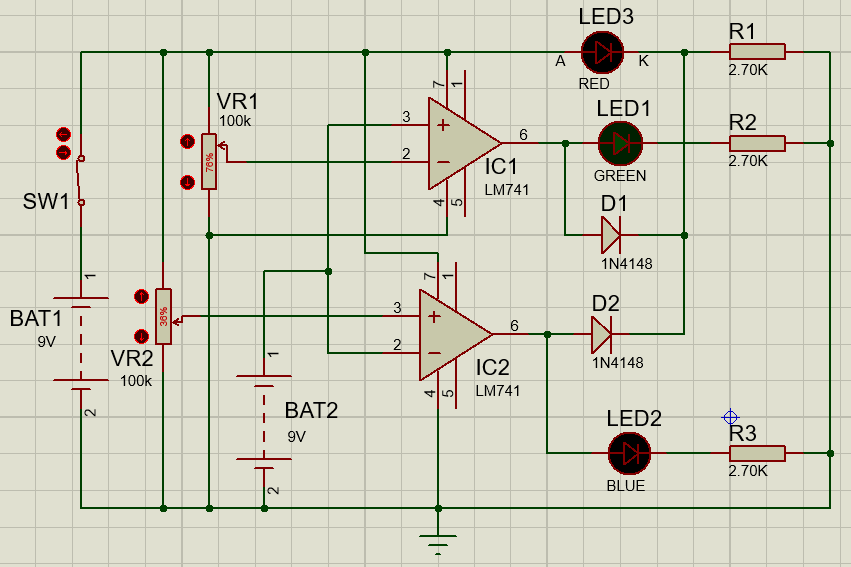
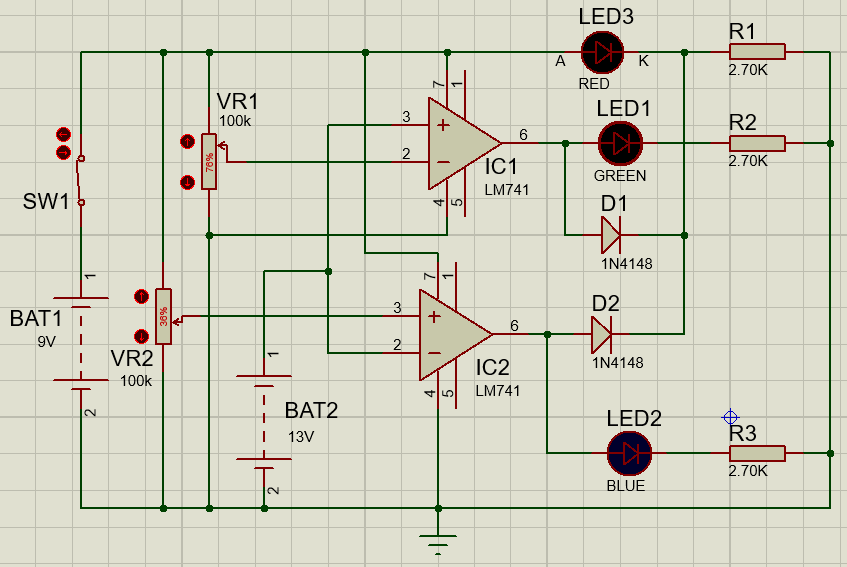
Here is a simple circuit using op-amp 741 called “Battery voltage state indicator using 741” used to indicate whether the battery is charged or not. The circuit shows three states of battery voltage i.e. charged, discharged, and normal using three different color LEDs (LED1, LED2, and LED3).
you may also like other battery state indicator circuit
- Battery level state indicator (Designed using general-purpose NPN transistor 2N2222, indicate two states of battery i.e. undercharged and overcharged).
- 10 Level battery Charge Indicator Circuit (Designed using comparator IC LM3914, used to indicate the charge of a battery in 10 different levels)
Circuit Description of Battery Voltage State Indicator using 741
The circuit of battery voltage state indicator is built around the very popular and low costs op-amp IC 741. This circuit uses two op-amps in comparator mode, which compare the battery voltage with the reference voltage. The battery voltage is connected to E (pin 2 of IC1 and pin 3 of IC2) as shown in the circuit diagram. Which further compares with reference voltage E1 and E2.
If the battery voltage is less than 6V, LED3 glow. Similarly, if the battery voltage is 9V to 13V LED1 glow and if the battery voltage is greater than 13V LED2 glow.
The variable resistors VR1 is so adjusted that the voltage between pin 2 of IC1 and earth is 13V. Similarly, variable resistor VR2 is so adjusted that the voltage between pin 3 of IC2 and earth is 11V.
Figure 3: Simulation circuit for 6V
Figure 4: Simulation circuit for 9V.
Figure 5: Simulation circuit for 13V.
Note: If you need to monitor the battery voltage of a higher range then you also have to replace the power supply voltage with a higher value. Let’s say if you wish to monitor 24V DC then you have to replace the power supply with 15V.
PARTS LIST OF BATTERY VOLTAGE STATE INDICATOR USING 741
| Resistor (all ¼-watt, ± 5% Carbon) |
| R1 – R3 = 2.7 KΩ
VR1, VR2 = 22 KΩ |
| Semiconductors |
| IC1, IC3 = 741 (Operational Amplifier IC)
D1, D2 = 1N4148 (silicon switching signal diode) LED1 = Red LED LED2 = Orange LED LED3 = Green LED |
Check out other top popular Articles :
Clock Signal Generator Circuit


What if I use it to check the 220 V or more? What if I change the VR to 10k?
is the project practically tested???
yes, this project is practically verified.
Plz explain the working of this project…
The circuit posted here uses two op-amp in comparator mode i.e. which compare the input voltage with reference voltage and display the output.
what the purpose of IC1 pin no 3 & IC2 pin no 2 connect E that E means
As i had mention in Circuit description section The battery voltage (whose voltage should me measured) is connected to E (pin 2 of IC1 and pin 3 of IC2) as show in circuit diagram, which further compares with reference voltage E1 and E2.
Sir, what do you mean by “E1” and “E2”
E1 and E2 is the refrence voltage given to both op-amp IC.
how did 11v and 13v come at pins when we gave 9v input..
The 9V input is the power supply for the functioning of circuit.
Similarly, 11v and 13v is the voltage of battery whose state (low or need charge or full charge) is to be indicate.
thanq sir, what should be connected to pin 3 of ic1 and pin 2 of ic2
sir what we have to connect to pin3 of ic1 anf pin2 of ic2…..
suppose that we have to check the condition of a 15v battery…
you are telling to maintain 13v and 11v using variable resistrs…..
am i correct ???
sir…!!!
please answer what should we connect to pin 3 of ic1 and pin 2 of ic2
do we need to adjust voltages e1 and e2 using potentiometer every time after changing the input e
can i use any led instead of given ones
Temme some advantages to this. Please
how do I know that if I want to measure 13, I should use 9
The circuit is designed to test the state of the 12V battery.
When the battery voltage is less than 6V i.e. dead then LED3 glows whereas when the battery is good but greater and need charge than LED1 glows. And when the battery is charged than LED 2 will glow.
Why do we choose 9V source to measure 12V
What is the function of the diode?
the change of led green and led blue is hard to understand, so notice the change carefully. or replace them with red led for better understanding