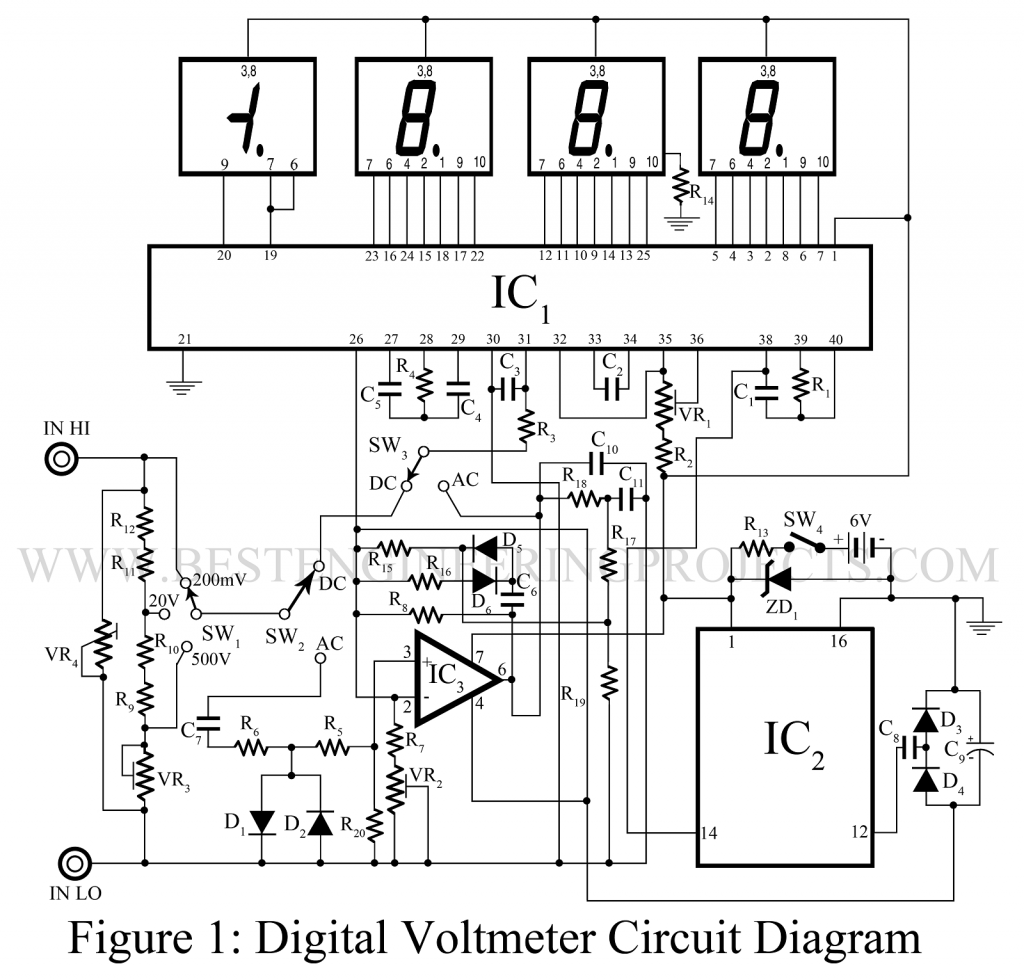
A digital voltmeter (DVM) Circuit displays measurements of AC or DC voltage as discrete numerals instead of a pointer deflection on a continuous scale as in analog instruments. Digital Voltmeter Circuit is a versatile and accurate instrument that is employed in many laboratory measurement applications. Because of the development and perfection of the IC modules, the size, power requirement, and cost of the digital voltmeter as been drastically reduced, and therefore, digital voltmeter circuits can actively compete with the conventional analog instruments in price, portability, and accuracy.
Here, in this article, we publish a multi-range digital voltmeter circuit that has been designed for providing professional performance. The digital voltmeter posted here is of 3 ½-digit types, comprising a 7-segment readout with some significant technical advantages like automatic polarity indication, overflow in direction, auto-zeroing, and many more. The full-scale reading of this digital voltmeter circuit is 1999 with 0.05% resolution i.e. it can measure voltage up to 1999V.
Description of Digital Voltmeter Circuit
The digital voltmeter circuit is designed around analog to digital converter IC, op-amp, and. whereas the heart of the circuit is low power, high performance 3 ½ -digit display analog to digital converter IC ICL-7107 (IC1). The CMOS IC (ICL-7107) is a large-scale integrated IC that incorporates all necessary active devices, including a clock, references, 7-segment-decoder, and display drive to directly drive the 7-segment display.
We can make ICL-7107 a 200mV or 2V full-scale deflection type digital voltmeter by selecting the value of resistors R2, R4, and capacitors C1. Here we use a 200mV full-deflection type. As the input impedance of the digital voltmeter circuit is very high in the range of 100 M, it draws very little current from the input.
We can use switch SW1, SW2, and SW3 to select voltage range and its category (i.e. AC o DC). The voltage to be measured is fed to the terminal 1N HI and 1N LO to the attenuator made from resistor R9 through R12 and a pot. VR3 and then connected to the HI and LO terminal of the IC1.
If the measuring voltage is AC, then it passes through a high-reliable operational amplifier IC (IC2) which is used in the non-inverting configuration. If the measuring voltage is noisy, capacitor C3 with resistor R3 has been used for filtering and limiting the input voltage. And it also helps in case of overload.
To clamp the transient voltage, voltage-dependent resistor VR4 is used in input terminals. Normally, VR4 possesses a very high resistance, but when its threshold voltage is exceeded, it acts as low resistance to shunt out the transients. Thus, it does not affect the input terminals.
Capacitor C1 with resistor R1 controls the frequency of the clock which is of the order of 48 kHz for producing the conversion rate of thee reading per second. The time constant of the integrator is maintained by capacitor C5 with resistor R4 where capacitor C4 is helpful in auto-zeroing.
PINs 2 to 25 of the IC1 are used to control the seven-segment display, three full-digits and one half-digit display have been connected with their corresponding terminals. Variable resistors VR1 through VR3 have been used for calibration of the DC reference voltage and AC input voltages respectively.
Digital Voltmeter Circuit Calibration
DC calibration:
In the circuit digital voltmeter, three voltage ranges have been provided for measuring DC as well as AC voltage. If the measuring voltage is less than or equal to 200mV, DC voltage will come directly into the input of the chip without any attenuation.
A DC source is given to the input of the digital voltmeter circuit and makes the reading appropriate in comparison with the reference to another high precision digital voltmeter. Input voltage comes through an attenuator (R12 – R16) at the time of using the 20-volt and 500-volt scales. The reading of these ranges may be adjusted by varying the pot VR3. And finally, the reading may be checked in comparison with the reference digital voltmeter.
AC calibration:
The same procedure is followed while measuring AC voltage except for the adjustment of VR2.
PARTS LIST OF DIGITAL VOLT METER CIRCUIT
| Resistor (all ¼-watt, ± 5% Carbon) |
| R1, R8, R17 = 100 KΩ
R2 = 24 KΩ R3 = 1 MΩ R4 = 47 KΩ R5, R6 = 1 KΩ R7 = 5.6 KΩ R9 = 8.2 KΩ (metal film) R10 = 82 KΩ (metal film) R11 = 820 KΩ (metal film) R12 = 8 MΩ (metal film) R13, R14 = 150 Ω R15, R16 = 15 KΩ R18 = 4.7 MΩ R19 = 10 KΩ R20 = 10 MΩ VR1 = 1 KΩ trim-pot. VR2 = 5 KΩ pot VR3 = 1 KΩ pot, o.25% tolerance VR4 = voltage dependent resistor, 500V |
| Capacitors |
| C1 = 100 pF (polysterene capacitor)
C2 = 0.1 µF (mylar capacitor) C3 = 0.01 µF (ceramic disc) C4 = 0.47 µF (mylar capacitor) C5 = 0.22 µF (polypropylene capacitor) C6 = 0.1 µF (polyester capacitor) C7 = 47 nF (polyester capacitor) C8 = 0.47 µF (polyester capacitor) C9 = 10 µF (electrolytic capacitor) C10 = 1 µF (polyester capacitor) C11 = 10 kpF (ceramic disc) |
| Semiconductors |
| IC1 = ICL-7107 (Analog to digital converter IC)
IC2 = CA3140 (BiMOS Operational Amplifier) IC3 = CD4009 (CMOS HEX Inverter) D1, D2 = OA85 (Germanium Diode) D3 – D6 = 1N914 (Small signal fast switching diode) ZD1 = 5.1V, 400mW zener diode DP1 = FND508 display DP2 – DP4 = FND507 display |
| Miscellaneous |
|
B1 = 6V battery SW1 = One-pole three-way switch SW2, SW3 = One-pole two way switch SW4 = OFF-ON switch |
