One of the most common analog temperature sensors used for temperature monitoring and controlling is LM35. According to the manufacturer, LM35 is a precise centigrade temperature sensor, but the reality is a bit different when we directly wire this sensor with Arduino. There are various reasons for fluctuation in output. Here in the article ” LM35: How to get Stable Temperature Reading” we will address almost all the reasons and solving one by one. But before that let’s see how this sensor work.
Basic Working of LM35
According to the datasheet of LM35D, it can measure temperature from 00C to 1000C with 10mv per degree change in temperature. This sensor senses the temperature and produces a corresponding voltage from its output pin i.e. 10mv/0C. At 00C it produces 0mV and at most 1000C it produces 1000mv i.e. 1V output.
Reason of error/deviation in temperature output.
- Noise in power supply
- Self-heating and electromagnetic interference
- Taking Single reading at a time
- References voltage
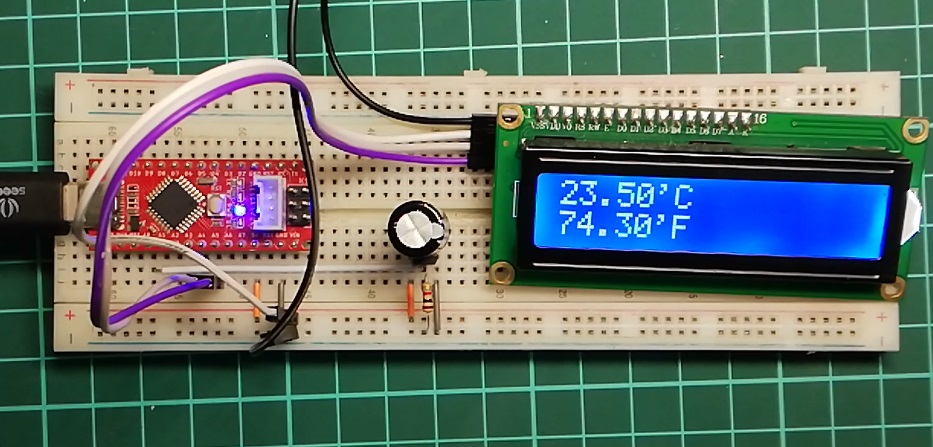 Figure: Author Prototype
How to get stable Temperature Reading.
- Adding Filter Capacitor at power rails of LM35:
The fluctuation of temperature output might be the noise available in the power supply so it’s better to use an electrolytic capacitor at the power supply i.e. connected to Vcc and GND of LM35. Let’s say adding 10uF to the power supply will stable output to some extent.
- Adding resistance between the output pin and GND pin
According to the datasheet of LM35, it has low sinking capability, as a result, its output becomes more sensitive to electromagnetic interference. 1K or 2K resistor between output and GND can solve this issue to some extent and also solve self-heating error.
- Taking average reading rather than a single reading
Fluctuation or drift is one of the major issues of the Arduino sensors. One way to make fluctuation less is by trying to calculate the average reading instead of a single reading.
How to minimize the error
When we use default reference i.e. 5V reference at analog input, it is less sensitive to voltage difference. At this reference, Arduino can map 5V input voltage into 1024 steps i.e. 0-1023. This means resolution at 5V = 5/1023 = 4.88 x 10⁻³V = 4.88mV. So, if we use the default 5v analog reference minimum temp deviation that Arduino can detect is 0.50C. If we use the default Arduino reference voltage we will end up adding a 0.50C extra error.
This error can be minimized by selecting the proper reference value for Arduino. Let’s say if we use a 1.1V internal reference for Arduino, the minimum temperature deviation that Arduino can measure is drastically improved.
Let’s calculate the minimum temperature deviation that Arduino can measure.
Internal reference voltage = 1.1V
ACD of arduino = 10 bit = 210 = 1024 Step
Resolution = 1.1V/1023 = 0.00107V = 1.07 mV.
If we use 1.1V internal reference voltage then resolution becomes equivalent to 1mV i.e. it can measure temperature 0.10C temperature deviation.
Related articles you may like:
- Arduino Based Temperature Controlled Fan
- Measuring Temperature using PT100 and Arduino
- ESP8266 Temperature Logger using PIC16F887
- Arduino Based Data Logger (Temperature)
Circuit Description of LM35: How to get Stable Temperature Reading
The circuit is shown in figure 1, designed around Arduino nano, I2C LCD, LM35 IC, and a few other electronic components like resistor and capacitor. LCD and Arduino share an I2C pin where LM35 is connected to the A0 pin of Arduino. A 1K or 2K resistor is connected between output and GND. A capacitor of a few microfarads is connected to Vcc and GND of LM35.
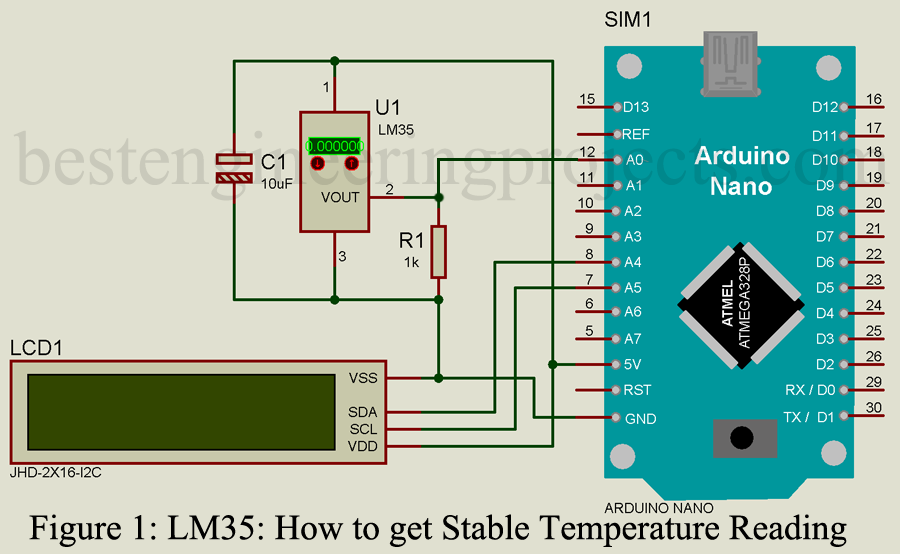
Component Required
Arduino uno/nano x 1
I2C 16×2 LCD x 1
Lm35 x 1
1K resistor x 1
10uF capacitor x 1
Software Code:
Software Code of LM35: How to get Stable Temperature Reading is written in C/C++ programming language and compiled using Arduino IDE. Here we are using mills function of Arduino instead of delay. For stable reading, we are taking a reading of 100 samples and computing its average, and displaying a change in temperature over LCD every 2 seconds.
|
1 2 3 4 5 6 7 8 9 10 11 12 13 14 15 16 17 18 19 20 21 22 23 24 25 26 27 28 29 30 31 32 33 34 35 36 37 38 39 40 41 42 |
#include <LiquidCrystal_I2C.h> //header for I2C lcd LiquidCrystal_I2C lcd(0x27,16,2); //I2C address = 0x27 const long eventTime_Tem = 2000; //delay time unsigned long previousTime_Tem = 0; int x; unsigned long temptot = 0; void setup() { Serial.begin(9600); analogReference(INTERNAL); //set reference of 1.1V lcd.init(); lcd.backlight(); } void loop() { int x; unsigned long currentTime = millis(); //assigning the value of mills unsigned long temptot = 0; //taking 100 sample and adding for(x=0; x<100 ; x++) { temptot += analogRead(A0); } float sensorValue = temptot/100; //calculating average float voltage = sensorValue * (1100 / 1023); //convert sensor reading into milli volt float temp = voltage*0.1; //convert milli volt to temperature degree Celsius float tempf = 1.8 * temp + 32; //converting Celsius to Fahrenheit if(currentTime-previousTime_Tem >= eventTime_Tem) //Check for delay time { lcd.clear(); lcd.setCursor(0,0); lcd.print(temp); lcd.setCursor(5,0); lcd.print("'C"); lcd.setCursor(0,1); lcd.print(tempf); Serial.println(temp); lcd.setCursor(5,1); lcd.print("'F"); Serial.println(tempf); previousTime_Tem = currentTime; } } |
Thank you so much for creating this web site. Your code is exactly what I needed.
I have noticed the final temp is -2deg to the actual deg. Is there a solution?