Introduction to Electronics Troubleshooting Techniques
Due to the increasing complexity of electronic communications equipment, the technician must have a good understanding of communication circuits and concepts. To be an effective troubleshooter, the technician must also be able to quickly isolate faulty components and repair the defective circuit. Recognizing the way, a circuit may malfunction is a key factor to speedy repair procedures.
After completing this tutorial on electronics troubleshooting techniques, you should be able to
- Explain general troubleshooting techniques
- Recognize major types of circuit failures
- List the four troubleshooting techniques
General Troubleshooting Techniques | Electronics Troubleshooting Techniques
Troubleshooting requires the technician to ask questions such as: What could cause this to happen? Why is this voltage so low or high? Or, if this resistance were open or shorted, what effect would it have on the operation of the circuit I’m working on? Each question calls for measurements to be made and tests to be performed. The defective component(s) is isolated when measurements give results far different than they would be in a properly operating unit, or when a test fails. The ability to ask the right questions makes a good troubleshooter. Obviously, the more you know about the circuit or system being worked on, the quicker the problem will be corrected.
Always start troubleshooting by doing the easy things first:
- be sure unit is plugged in and turned on
- check fuses
- check if all connections are made
- ask yourself, “Am I forgetting something?”
Basic troubleshooting test equipment | Electronics Troubleshooting Techniques
- digital multimeter (DMM) capable of reading at the frequencies you intend to work at
- broadband oscilloscope, preferably dual trace
- signal generators, both audio and RF. The RF generator should have internal modulation capabilities
- a collection of probes and clip leads
Advanced test equipment would include a spectrum analyzer to observe frequency spectra and a logic analyzer for digital work.
Time spent learning your test equipment, its capabilities and limitations, and how to use it will pay off with faster troubleshooting.
Always be aware of any possible effects the test equipment you connect to a circuit may have on the operation of that circuit. Don’t let the measuring equipment change that which is being measured. For example, a scope’s test lead may have a capacitance of several hundred pico farads. Should that lead be connected across the output of an oscillator, the oscillator’s frequency could be changed to the point that any measurements are worthless.
If the equipment you’re troubleshooting employs dangerous voltages, do not work alone. Turn off all power switches before entering equipment.
Keep all manuals that came with the equipment. Such manuals usually include troubleshooting procedures. Check them before trying any other approaches.
Maintain clear, up-to-date records of all changes made to equipment. Replace a suspicious unit with a known good one-this is one of the best, most commonly used troubleshooting techniques.
Test points are often built into electronic equipment. They provide convenient connections to the circuitry for adjustment and/or testing. There are various types, from jacks or sockets to short, stubby wires sticking up from PC boards. Equipment manuals will diagram the location of each test point and describe and sometimes illustrate the condition and/or signal that should be found there. The better manuals indicate the proper test equipment to use.
Plot a “game plan” or strategy with which you will troubleshoot a problem (just as you might with a car problem).
Use all your senses when troubleshooting | Electronics Troubleshooting Techniques
- Look – for discolored or charred components that might indicate overheating.
- Smell-some components, especially transformers, that emit characteristic odors when overheated.
- Feel-for hot components. Wiggle components to find broken connections,
- Listen-for “frying” noises that indicate a component is about to fail.
Reasons Electronic Circuits Fail | Electronics Troubleshooting Techniques
Electronic circuits fail in many ways. Let’s look at some major types of failures that you will encounter as an electronics technician.
- COMPLETE FAILURES Complete failures cause the piece of equipment to go totally dead. Equipment with some circuits still operating has not completely failed. Normally this type of failure is the result of a major circuit path becoming open. Blown (open) fuses, open power resistors, defective power supply rails, and bad regulator transistors in the power supply can cause complete failures. Complete failures are often the easiest problems to repair.
- INTERMITTENT FAULT Intermittent faults are characterized by sporadic circuit operation. The circuit works for a while and then quits working. It works one moment and doesn’t work the next. Keeping the circuit in a failed condition can be quite difficult. Loose wires and components, poor soldering, and effects of temperature on sensitive components can all contribute to intermittent operation in a piece of communication equipment. Intermittent faults are usually the most difficult to repair since troubleshooting can only be done when the equipment is malfunctioning.
- POOR SYSTEM PERFORMANCE Equipment that is functioning below specified operational standards is said to have poor system performance characteristics. For example, a transmitter is showing poor performance if the specifications call for 4W of output power but it is only putting out 2 W. Degradation of equipment performance takes place over a period of time due to deteriorating components (components change in value), poor alignments, and weakening power components. Regular performance checks are necessary for critical communications systems. Commercial radio transmitters require performance checks to be done on a regular basis.
- INDUCED FAILURES Induced failures often come from equipment abuse. Unauthorized modifications may have been performed on the equipment. An inexperienced technician without supervision may have attempted repairs and damaged the equipment. Induced failures can be eliminated by exercising proper equipment care. Repairs should be done or supervised by experienced technicians.
Troubleshooting Plan | Electronics Troubleshooting Techniques
Experienced technicians have developed a method for troubleshooting. They follow certain logical steps when looking for a defect in a piece of equipment. The following four troubleshooting techniques are popular and widely used to find defects in communication equipment.
- SYMPTOMS AS CLUES TO FAULTY STAGE This technique relates a particular fault to a circuit function in the electronic equipment. For example, if a white horizontal line were displayed on the TV screen of a set brought in for repair, the service technician would associate this symptom to the vertical output section. Troubleshooting would begin in that section of the TV set. As you gain experience in troubleshooting you will start associating symptoms to specific circuit functions.
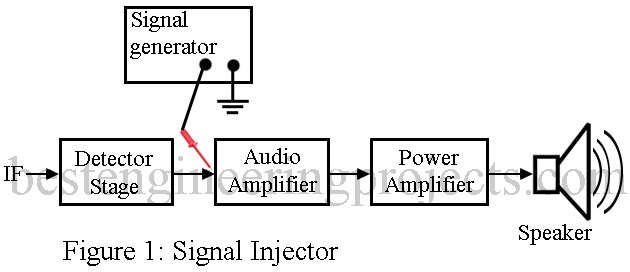
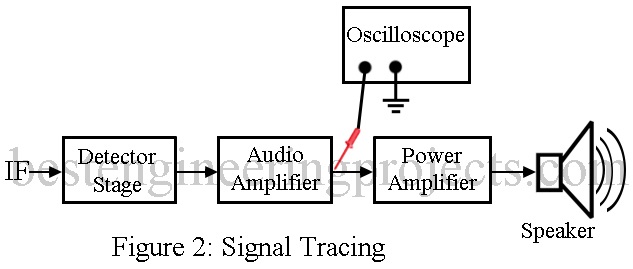
- SIGNAL TRACING AND SIGNAL INJECTION Signal injection is supplying a test signal at the input of a circuit and looking for the test signal at the circuit’s output or listening for an audible tone at the speaker (Fig. 1). This test signal is usually composed of an RF signal modulated with an audible frequency. If the signal is good at the circuit’s output, then move to the next stage down the line and repeat the test. Signal tracing, as illustrated in Fig. 2, is actually checking for the normal output signal from a stage. An oscilloscope is used to check for these signals. However, other test equipment is available that can be used to detect the presence of output signals. Signal tracing is monitoring the output of a stage for the presence of the expected signal. If the signal is there, then the next stage in line is checked. The malfunctioning stage precedes the point where the output signal is missing.
- VOLTAGE AND RESISTANCE MEASUREMENT Voltage and resistance measurements are made with respect to chassis ground. Using the DMM (digital multimeter), measurements at specific points in the circuit are compared to those found in the equipment’s service manual. Service manuals furnish equipment voltage and resistance charts or print the values right on the schematic diagram. Voltage and resistance checks are done to isolate defective components once the trouble has been pinpointed to a specific stage of the equipment. Remember that resistance measurements are done on circuits with the power turned off.
- SUBSTITUTION Another method often used to troubleshoot electronic circuits is to swap a known good component for the suspected bad components. A warning is in order here: the good component could get damaged in the substitution process. Don’t get into the habit of indiscriminately substituting parts. This method works best when you have narrowed the failure down to a specific component.

