In the tutorial Arduino NTP Clock using NodeMCU and DS3231, you will learn to make an accurate clock using the RTC module and NTP server. This circuit automatically updates the time of the RTC module from the network time protocol server.
RTC module shows some time delay after some days/week, this is due to temperatures dependent oscillator used in this module. The external oscillator is more prone to temperature than an internal oscillator. DS3231 module has an internal oscillator that is less prone to temperature and humidity but still has some time delay. According to the datasheet of DS3231, the time variation is about 2min/year but is not true when you practically use it. Previously, we had made a clock using the DS3231 module but the result was wired because it shows a time delay of about 5 minutes in a day (24 hours) in serve climate and frequently ON/OFF the circuit. Whenever I see an advertising LED display board with date and time, I used to check time accuracy. Often, I found that there is either time is slow or fast by a few minutes because of the RTC module. To solve this time accuracy problem, we came up with the simple project Arduino NTP Clock using NodeMCU and DS3231 which update the time of the RTC module from the NTP server.
Advantage of Arduino NTP Clock using NodeMCU and DS3231 over normal RTC Clock
- When the internet is available RTC gets a time update from the NTP server. Thus, no error in time.
- Suitable for every country unlike other NTP projects available on the internet (GMT 5:45).
- Showtime when the internet is not available unlike normal NTP using NodeMCU because of the RTC module.
- Arduino UNO board is used in case you require an extra pin say if you want to display the date, time, and temperature in 16×2 LCD.
While making this project you must be familiar with the interfacing of the RTC module with Arduino and how to program NodeMCU using Arduino IDE. If you are not familiar with these things then check out previously posted projects
- Appliance Control using IoT and AI Chatbot (Program NodeMCU using Arduino IDE).
- Arduino Digital clock using DS3231 Pi Module (Interfacing RTC module with Arduino UNO board).
Components Required for Arduino NTP Clock using NodeMCU and DS3231
NodeMCU x 1
RTC DS3231 x1
Arduino UNO x 1
16×2 LCD x 1
10K variable resistor x 1
470-ohm resistor x 1
Circuit Description of Arduino NTP Clock using NodeMCU and DS3231
Figure 1 shows the circuit of Arduino NTP Clock using NodeMCU and DS3231, built around NodeMCU, RTC module DS3231, Arduino UNO, 16×2 LCD, and a few other electronic components like a resistor and variable resistor, etc.
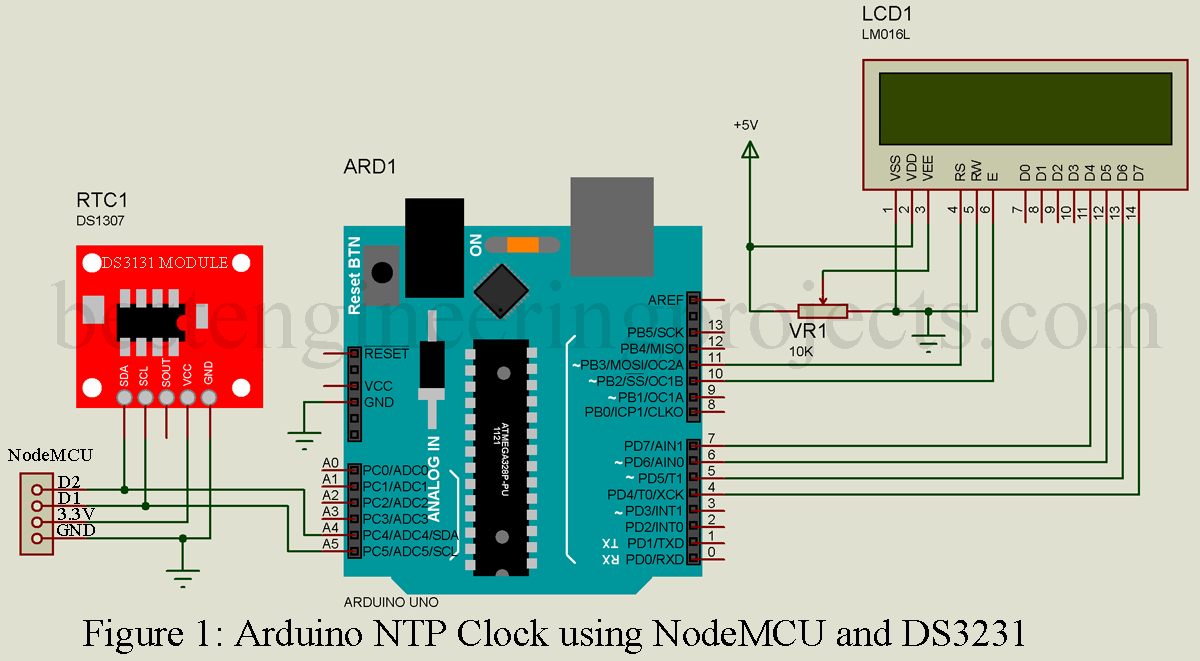
At first, let see the contribution of every component
NodeMCU: NodeMCU is the heart of this circuit because of the following reason.
- Communicate with the Network time provider server and get an accurate time.
- Convert that NTP time into the time of your region. (Say, convert the GMT +5 to GMT+5:45).
- Update this time to the RTC module regularly.
RTC Module DS3231: Real-Time Clock module keeps time running even you cut off the power supply. It contains a CMOS battery that supplies power to IC DS3231. It also has an internal oscillator to keep the time accurate. The main reason for using the RTC module is to keep time running even when the internet is not available.
Arduino UNO: Here, in this project, Arduino UNO is an optional component to get an accurate time. We are using it here just to control 16×2 LCD because nodeMCU has a smaller number of digital as well as an analog pin in comparison to Arduino UNO. You can add various other sensors like temperature and humidity sensors, gas sensors, etc. according to your requirements.
16×2 LCD: LCD is used here to display the date and time. Check out this video tutorial on interfacing 16×2 LCD with Arduino if you are not familiar with interfacing LCD video. Youtube Link
The connection of the entire component is shown in figure 1, RTC module is connected parallel to both the MCU board i.e. NodeMCU and Arduino UNO board. Power supply for the RTC module is given from NodeMCU where the ground of each component is connected (ground of NodeMCU, Arduino UNO board, RTC, and LCD must be connected to provide the same ground potential level). RTC module communicates with the board in I2C protocol thus we are using SDA and SCL pin of both of the boards. SDA and SCL pin of RTC module is connected to D2 and D1 of NodeMCU where these pins are connected to A4 and A5 of Arduino UNO board as shown in figure 1.

Now Let’s see the software code part
Software Code
There is two code because we are using here two different development board i.e. NodeMCU and Arduino UNO. Both of these codes are written in Arduino programming language and compiled using Arduino IDE. You have to download a few library files like ESP8266. At first, let’s see the software code for NodeMCU.
Software Code for NodeMCU: Code for NodeMCU as shown below you can directly download and use it but before that, you have to change something like SSID, Password of your internet. Your Timer zone (say GMT+5:45 for Nepal).
|
1 2 3 4 5 6 7 8 9 10 11 12 13 14 15 16 17 18 19 20 21 22 23 24 25 26 27 28 29 30 31 32 33 34 35 36 37 38 39 40 41 42 43 44 45 46 47 48 49 50 51 52 53 54 55 56 57 58 59 60 61 62 63 64 65 66 67 68 69 70 71 72 73 74 75 76 77 78 79 80 81 82 83 84 85 86 87 88 89 90 91 92 93 94 95 96 97 98 99 100 101 102 103 104 105 106 107 108 109 110 111 112 113 114 115 116 117 118 119 120 121 122 123 124 125 126 127 128 129 130 131 132 133 134 135 136 137 138 139 140 141 142 143 144 145 146 147 148 149 150 151 152 153 154 155 156 157 158 159 160 161 162 163 164 165 166 167 168 169 170 171 172 173 174 175 176 177 178 179 180 181 182 183 184 185 186 187 188 189 190 191 192 193 194 195 196 197 198 199 200 201 202 203 204 205 206 207 208 209 210 211 212 213 |
#if defined(ESP8266) #include <pgmspace.h> #else #include <avr/pgmspace.h> #endif //Library used in projects #include <TimeLib.h> #include <ESP8266WiFi.h> #include <WiFiUdp.h> #include <Wire.h> #include <RtcDS3231.h> RtcDS3231<TwoWire> Rtc(Wire); #define countof(a) (sizeof(a) / sizeof(a[0])) const char ssid[] = "netis"; // your network SSID (name) const char pass[] = "password"; // your network password unsigned int localPort = 2390; // local port to listen for UDP packets IPAddress timeServerIP; // time.nist.gov NTP server address const char* ntpServerName = "time.nist.gov"; const int NTP_PACKET_SIZE = 48; // NTP time stamp is in the first 48 bytes of the message byte packetBuffer[ NTP_PACKET_SIZE]; //buffer to hold incoming and outgoing packets // A UDP instance to let us send and receive packets over UDP WiFiUDP udp; //Function used in this projects time_t getNtpTime(); void digitalClockDisplay(); void printDigits(int digits); void sendNTPpacket(IPAddress &address); //Setup file void setup() { Serial.begin(115200); delay(250); Rtc.Begin(); Serial.println("TimeNTP Example"); Serial.print("Connecting to "); Serial.println(ssid); WiFi.begin(ssid, pass); while (WiFi.status() != WL_CONNECTED) { delay(500); Serial.print("."); } Serial.println(" "); Serial.print("IP number assigned by DHCP is "); Serial.println(WiFi.localIP()); Serial.println("Starting UDP"); udp.begin(localPort); Serial.print("Local port: "); Serial.println(udp.localPort()); Serial.println("waiting for sync"); setSyncProvider(getNtpTime); // Set the time using NTP if(timeStatus() != timeNotSet){ digitalClockDisplay(); Serial.println("here is another way to set rtc"); time_t t = now(); char d_mon_yr[12]; snprintf_P(d_mon_yr, countof(d_mon_yr), PSTR("%s %02u %04u"), monthShortStr(month(t)), day(t), year(t)); // get month, day and year Serial.println(d_mon_yr); char tim_set[9]; snprintf_P(tim_set, countof(tim_set), PSTR("%02u:%02u:%02u"), hour(t), minute(t), second(t)); // get time Serial.println(tim_set); Serial.println("Now its time to set up rtc"); RtcDateTime compiled = RtcDateTime(d_mon_yr, tim_set); printDateTime(compiled); Serial.println(""); if (!Rtc.IsDateTimeValid()) { Serial.println("RTC lost confidence in the DateTime!"); } Rtc.SetDateTime(compiled); RtcDateTime now = Rtc.GetDateTime(); if (now < compiled) { Serial.println("RTC is older than compile time! (Updating DateTime)"); Rtc.SetDateTime(compiled); } else if (now > compiled) { Serial.println("RTC is newer than compile time. (this is expected)"); } else if (now == compiled) { Serial.println("RTC is the same as compile time! (not expected but all is fine)"); } Rtc.Enable32kHzPin(false); Rtc.SetSquareWavePin(DS3231SquareWavePin_ModeNone); } } // Loop Function void loop() { if (!Rtc.IsDateTimeValid()) { Serial.println("RTC lost confidence in the DateTime!"); } Serial.println("ready to get date time"); // get date and time repeatedly in every five second from DS3231 RtcDateTime now = Rtc.GetDateTime(); printDateTime(now); Serial.println(); delay(5000); } void digitalClockDisplay() { Serial.print(hour());//print hour in serial monitor printDigits(minute());//print minutes in serial monitor printDigits(second()); //print second in serial monitor Serial.print(" "); Serial.print(day()); //print day in serial monitor Serial.print("."); Serial.print(month()); //print month in serial monitor Serial.print("."); Serial.print(year()); //print year in serial monitor Serial.println(); } void printDigits(int digits) { Serial.print(":"); if (digits < 10) Serial.print('0'); Serial.print(digits); } //This function get time from NTP Server time_t getNtpTime() { IPAddress ntpServerIP; // NTP server's ip address while (udp.parsePacket() > 0) ; // discard any previously received packets Serial.println("Transmit NTP Request"); WiFi.hostByName(ntpServerName, ntpServerIP); Serial.print(ntpServerName); Serial.print(": "); Serial.println(ntpServerIP); sendNTPpacket(ntpServerIP); uint32_t beginWait = millis(); while (millis() - beginWait < 1500) { int size = udp.parsePacket(); if (size >= NTP_PACKET_SIZE) { Serial.println("Receive NTP Response"); udp.read(packetBuffer, NTP_PACKET_SIZE); // read packet into the buffer unsigned long secsSince1900; secsSince1900 = (unsigned long)packetBuffer[40] << 24; secsSince1900 |= (unsigned long)packetBuffer[41] << 16; secsSince1900 |= (unsigned long)packetBuffer[42] << 8; secsSince1900 |= (unsigned long)packetBuffer[43]; // change you GMT time zones here; For nepal its GMT +5:45 //So you have to add the you GMT zones in second i.e. 5 hour 45 minutes = 20700 seconds //for that 5*Second for hours and 2700 seonds for 45 minutes return secsSince1900 - 2208988800UL + 5 * SECS_PER_HOUR + 2700; } } Serial.println("No NTP Response :-("); return 0; // return 0 if unable to get the time } // send an NTP request to the time server at the given address void sendNTPpacket(IPAddress &address) { // set all bytes in the buffer to 0 memset(packetBuffer, 0, NTP_PACKET_SIZE); // Initialize values needed to form NTP request // (see URL above for details on the packets) packetBuffer[0] = 0b11100011; // LI, Version, Mode packetBuffer[1] = 0; // Stratum, or type of clock packetBuffer[2] = 6; // Polling Interval packetBuffer[3] = 0xEC; // Peer Clock Precision // 8 bytes of zero for Root Delay & Root Dispersion packetBuffer[12] = 49; packetBuffer[13] = 0x4E; packetBuffer[14] = 49; packetBuffer[15] = 52; // all NTP fields have been given values, now // you can send a packet requesting a timestamp: udp.beginPacket(address, 123); //NTP requests are to port 123 udp.write(packetBuffer, NTP_PACKET_SIZE); udp.endPacket(); } //Print Time Function void printDateTime(const RtcDateTime& dt) { char datestring[20]; snprintf_P(datestring, countof(datestring), PSTR("%02u/%02u/%04u %02u:%02u:%02u"), dt.Month(), dt.Day(), dt.Year(), dt.Hour(), dt.Minute(), dt.Second() ); Serial.print(datestring); } |
Software Code for Arduino UNO: Code for Arduino UNO is written in Arduino programming language and compiled using Arduino IDE. You can directly download the code and use it in your project without modification.
|
1 2 3 4 5 6 7 8 9 10 11 12 13 14 15 16 17 18 19 20 21 22 23 24 25 26 27 28 29 30 31 32 33 |
#include <Wire.h> #include "RTClib.h" #include <LiquidCrystal.h> LiquidCrystal lcd(11, 10, 7, 6, 5, 4); RTC_DS1307 rtc; char daysOfTheWeek[7][12] = {"Sun", "Mon", "Tue", "Wed", "Thu", "Fri", "Sat"}; void setup() { Serial.begin(9600); Wire.begin(); lcd.begin(16,2); rtc.begin(); } void loop() { DateTime now = rtc.now(); lcd.setCursor(0,0); lcd.print(now.day()); lcd.print('/'); lcd.print(now.month()); lcd.print('/'); lcd.print(now.year()); lcd.setCursor(11,0); lcd.print(daysOfTheWeek[now.dayOfTheWeek()]); lcd.setCursor(0,1); lcd.print("Time:"); lcd.print(now.hour()); lcd.print(':'); lcd.print(now.minute()); lcd.print(':'); lcd.print(now.second()); lcd.print(" "); } |