IoT (Internet of thing) is one of the burning topics among electronic hobbyists and students due to its various advantage. There are many ways/devices with which you can interface your appliance with the internet, NODE MCU is one of them. Node MCU is very much popular due to its various advantage. Some of them are listed below. Thus we are going to make Appliance Control using IoT and AI Chatbot using NodeMCU.
- Smaller size and breadboard friendly
- Hardware and pinout are more like Arduino.
- Support API in Nodejs style thus speed increased greatly.
- Cheaper than any other version of Arduino.
Here in this project, we are going to use IoT and AI to control the appliance. After making this device you can turn on and off the electrical / electronics appliance from any corner of the world through messenger. Another interesting thing is you don’t have to remember the syntax for the device on and off. For this, we had used the term AI. Even if you type some mistake in the switching command it will know what you are trying to say and switch the appliance. The circuit is shown in figure 1.
Components required for the project Appliance Control using IoT and AI Chatbot
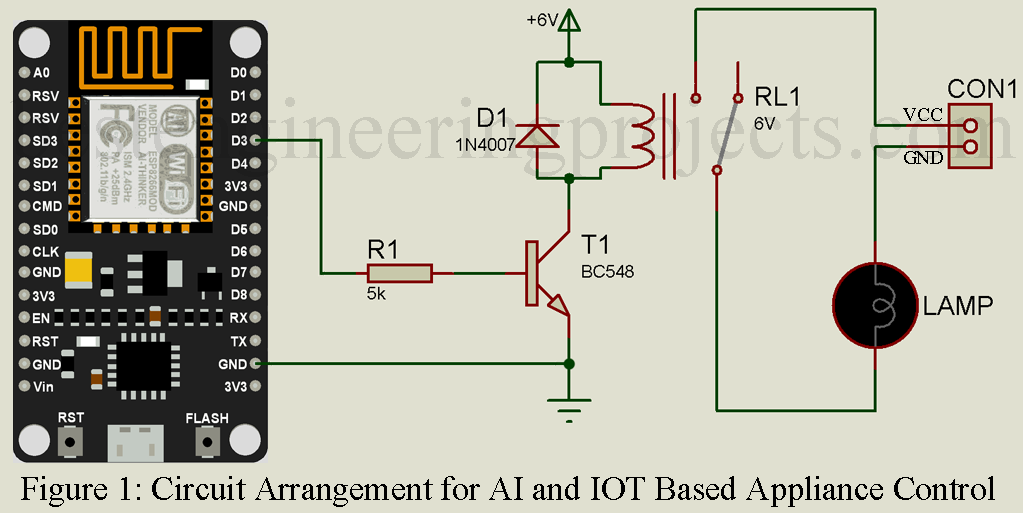
This project requires hardware as well as software parts, let’s see hardware requirements first.
- NodeMCU x 1
- 5K-ohm resistor x 1
- BC548 Transistor x 1
- 1N4007 Diode x 1
- 6V Relay x 1
If you are new to relay and its driving circuit then please do read the previous article posted on bestengineeringprojects.com
We had already posted a very detailed article and video on the relay switching circuits.
Article Link: How to Make Relay Switch Circuit
Making video link: https://youtu.be/LHtvv0Cara0
Before programming the NodeMCU using Arduino IDE you have to do some setup.
Check out the procedure for setup Arduino IDE for programming Node MCU.
How to Configure Arduino IDE for Node MCU
Before going to the software part let’s set up IOT, Chatbot, and Server.
Step 1: Creating and configuring Facebook page
At first, create a Facebook page (www.facebook.com/pages/creation/) there you will see two options 1. Business and brand 2. Community or public figure. Go with community or public figure select Get Started as shown in figure 5.

Figure 5: Creating Facebook Page
Give it a name that says “Best Engineering Projects” and the category says “Science website” and press Continue. You can add another detail like a cover photo or profile photo but here I am skipping it. You have to hide this page because if you don’t do so others can trigger your appliance. For hiding your Facebook page go to Setting>General>Page Visibility. There you will see two options Page Published and Page Unpublished. Mark as Unpublished Page and click on Save Change as shown in figure 6.
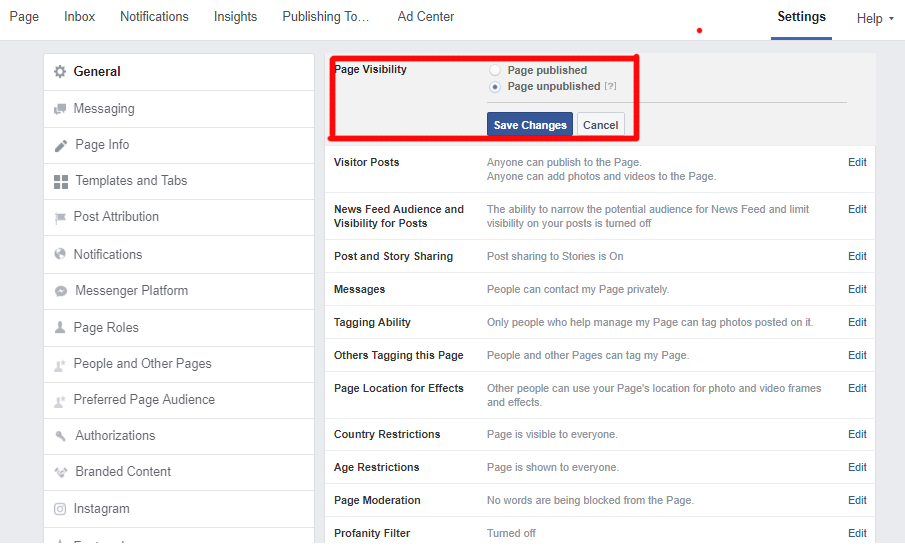 Figure 6: Hiding Facebook Page from public
Step 2: Setup your ChatBot
For setting ChatBot you have to make an account in chatfuel (https://dashboard.chatfuel.com/#/bots). Chatfuel is an automatic bot that communicates and responds using bots. Signup with your Facebook page that you have created before. A dashboard will appear as shown in figure 7, click on connect on blank bot which connects it to the Facebook page.
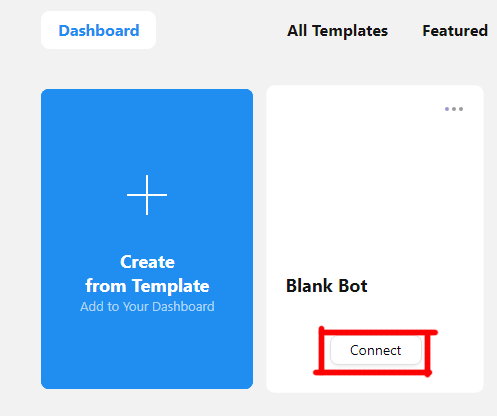 Figure 7: Connect to Blank Bot
A new window of Automate appears there you can edit and configure the welcome messages. You can edit the message according to your requirement. In place of {{First name}} use your name else it will publish the name of the user who sends the message to the chatbot (Figure 8).
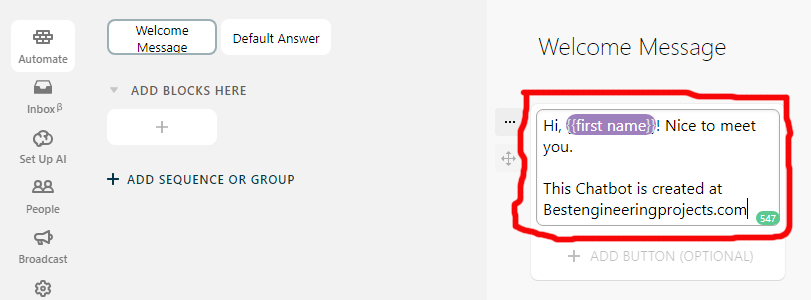 Figure 8: Adding Welcome Message to your Chatbot
Now, click on Default Answer located on the right side of the welcome message and edit it. This answer is an automatic response when the user sends a command which is not listed on “Set up AI” (Figure 9).
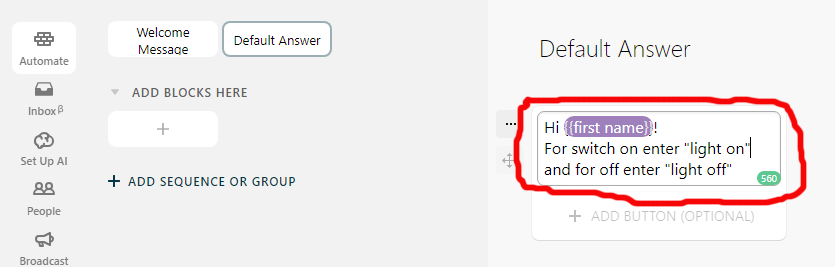 Figure 9: Adding Default Answer to your Chatbot
Now, we are going to create a button for switch ON and OFF for appliances i.e. Appliance ON and Appliance OFF. Click on the “+” button below ADD BLOCK HERE. Rename this as Appliance ON and click on the “Text” button from ADD A CARD (Figure 10). Add some message here which you want to show in response when you switch ON the appliance (Figure 11).
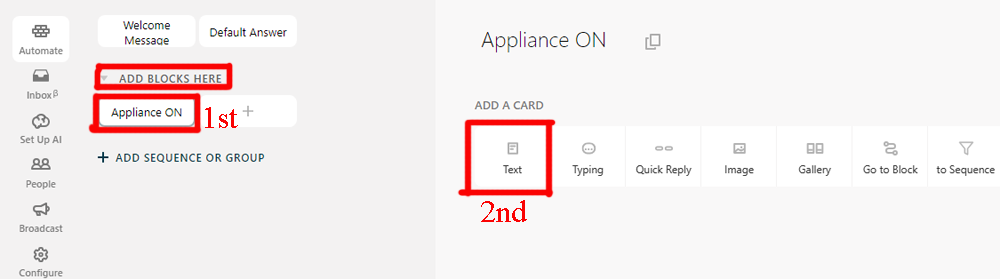 Figure 10: Adding Appliance ON button
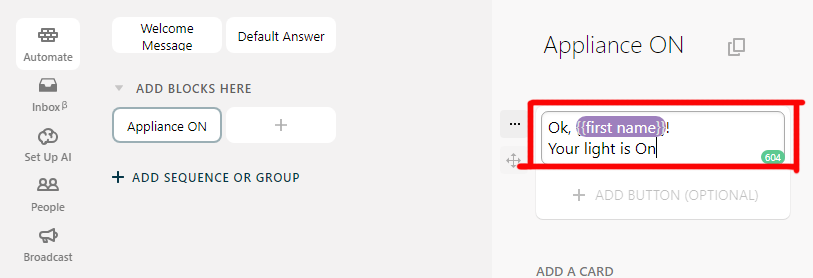 Figure 11: Adding Message to your Appliance ON button
Do the same thing for the Appliance OFF button (Figure 12).
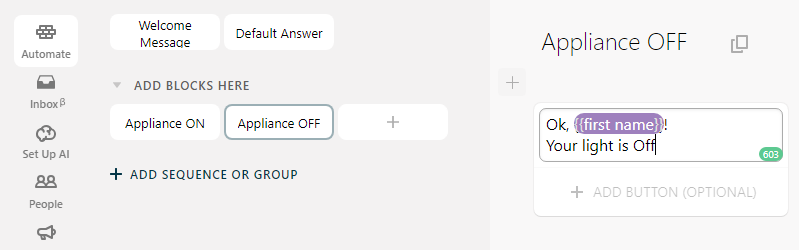 Figure 12: Adding a message to the appliance off button
Set Up the AI rule, for click on “Set Up AI” for the menu and then click on “+ ADD AI RULE” (Figure 13). At first, I would like to add the AI rule for Appliance OFF in the white box “if the user says something similar to” like turn off the light, light off, appliance off, etc. And then click on BLOCK appear on the right side of the AI rule. A drop-down menu appears select “Appliance OFF” (Figure 14).
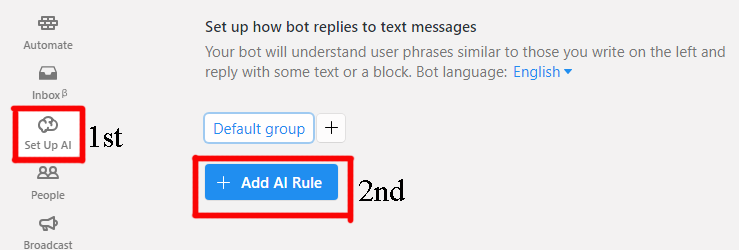 Figure 13: Adding AI rule to chatbot
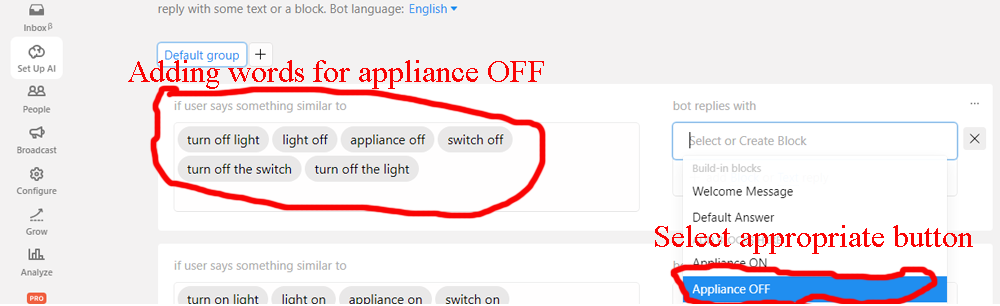 Figure 14: Adding Rule for Appliance OFF
Similarly, do the same thing for Appliance ON and you have set up the AI rule for both the button Appliance ON and Appliance OFF (Figure 15).
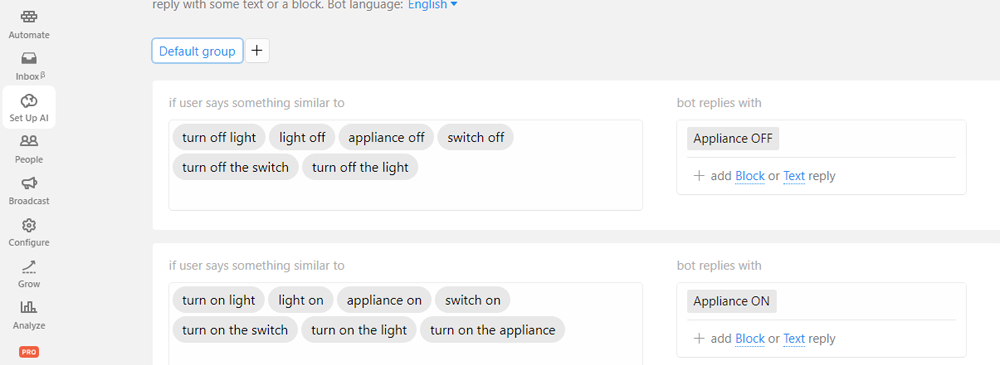 Figure 15: AI rule for both Appliance ON and Appliance OFF
Step 3: Setup the Adafruit IO
At first, make an account in Adafruit IO (https://io.adafruit.com/) for an IoT end. You need to configure this Adafruit IO to execute the command in your NodeMCU. After creating an account, you will be taken to the home screen of Adafruit IO. From the left-side menu click on “Feeds” there you will see the action button, click on it a drop-down menu appears (Figure 16).
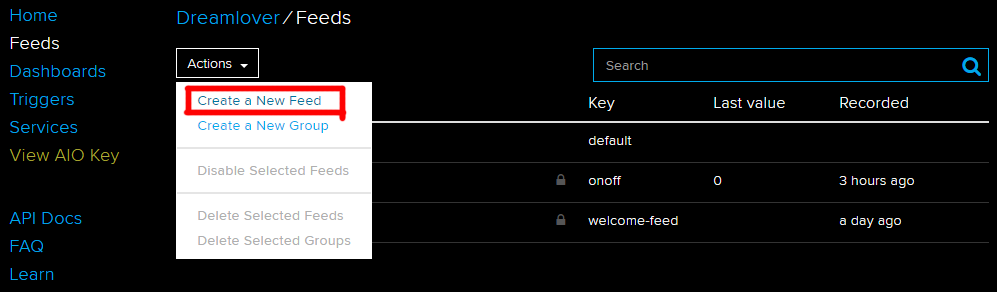 Figure 16: Creating new feed-in adafruit IO
Select create “Create a New Feed”. Give it a name as you won’t say “OnOff”, leave the decryption section blank, and click on Create button. Your feed is created (Figure 17).
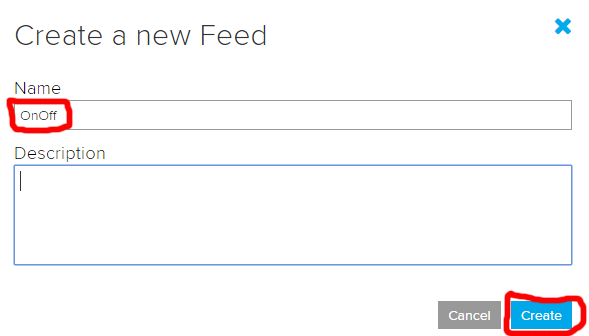 Figure 17: Giving a name to the new feed
Now you have to create a dashboard, click on “Dashboard” from the menu that appears on left, and then select an action. Select “Create a new Dashboard” from the dropdown menu. A blank window with various buttons in different colors appears in the top right corner. Now click on the “+” button (blue background). A new pop-up window will appear, select toggle switch as shown in figure 18 below.
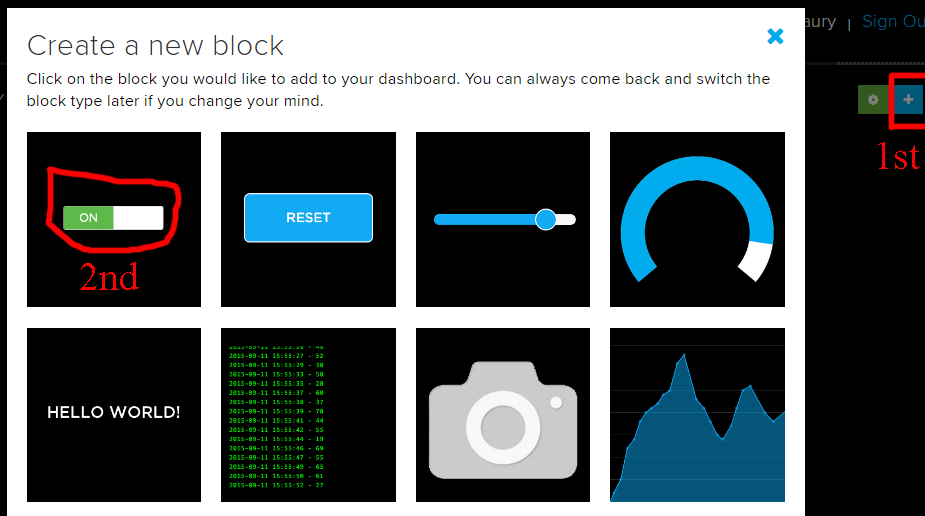 Figure 18: Creating a new block in Adafruit IO
When you choose the toggle to switch it will take you to “Choose Feed”. Tick the feed you have created before (say OnOff) and then click on the “Next Step” button (Figure 19).
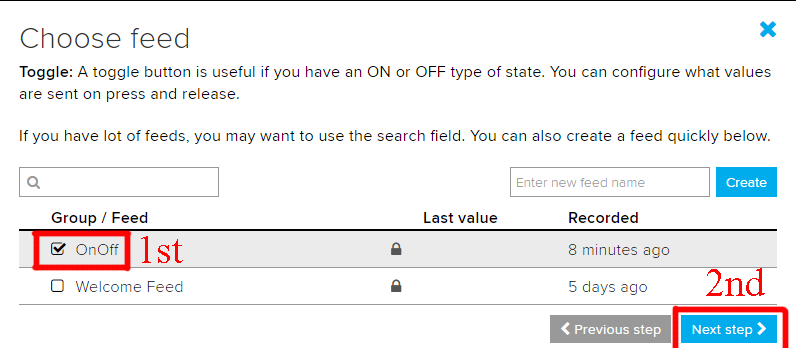 Figure 19: Choosing Feed that you have created before
A window of block setting will appear, there give tour block a title say OnOff and put the value for ON and OFF saying 1 for ON and 0 for OFF. Scroll down and click on the “Create” button and your Adafruit IO setup is finished (Figure 20).
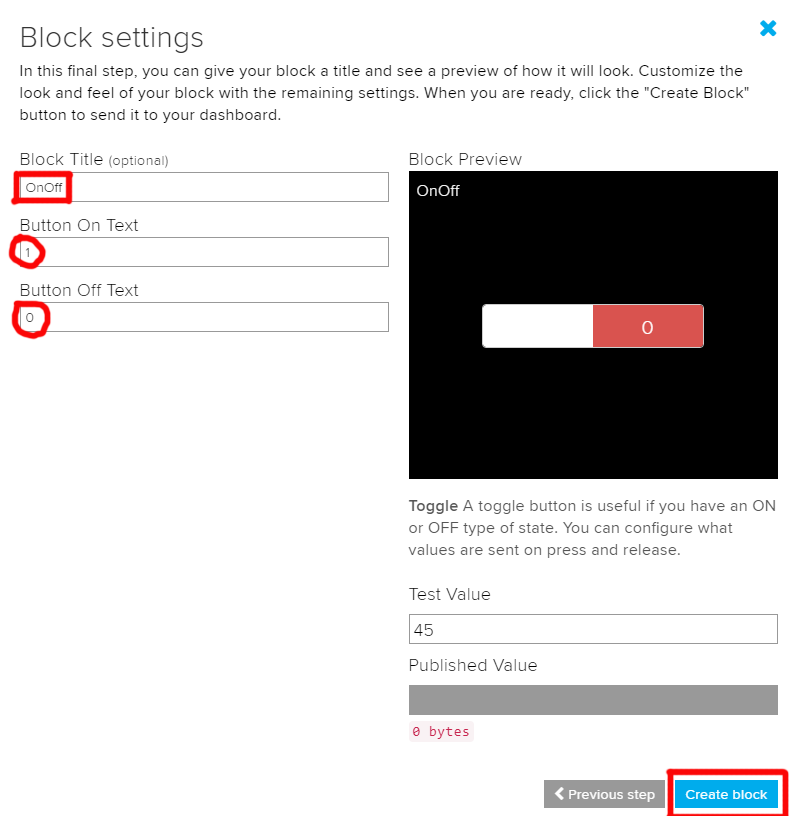 Figure 20: Giving the value to the ON and OFF button
Step 4: Setup the IFTTT Server
To set server at first, you have to create an account in IFTTT (https://ifttt.com). Go to “My Applets” there you will see “New Applets” on the right side of the window click on it.
You can set up your server in 6 easy steps.
- Click on “+ this”, a window appears “Choose a service” there search for a webhook, and select it.
- Select “Receive a web request”, a window appears there to enter an event name say “light” and then hit the “Create trigger” button. A window appears showing “if (Webhooks symbol) then + that”, click on “+ that”.
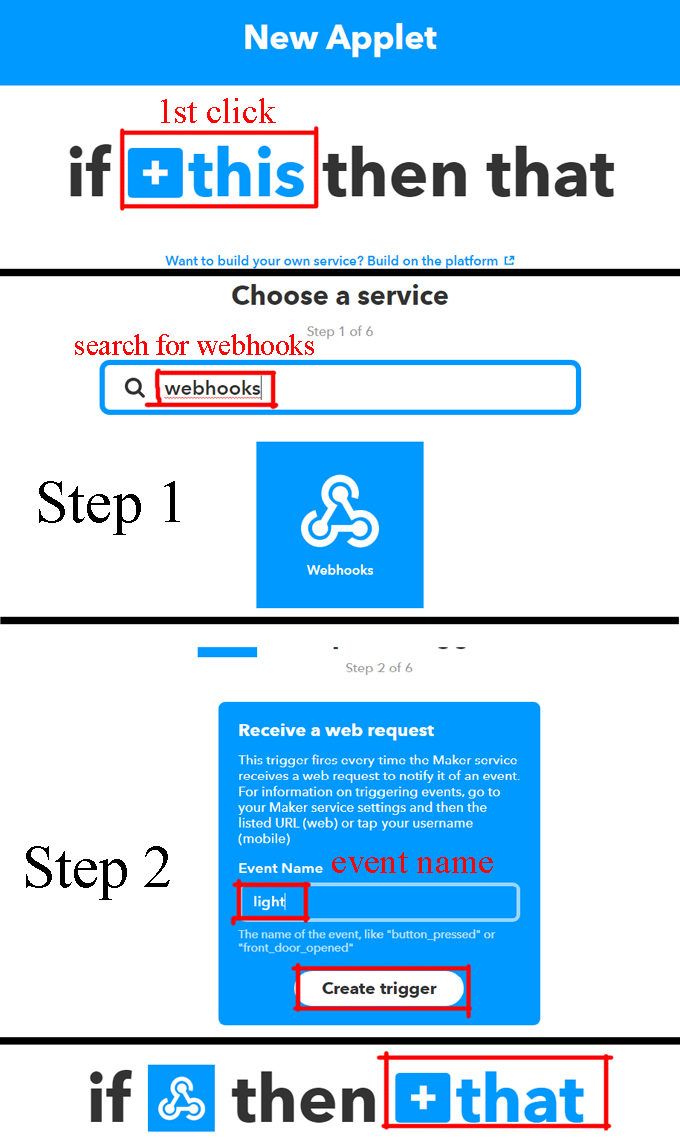 Figure 21: IFTTT Server (Step 1 and Step 2)
- In Choose action service window search for “adafruit” and select it.
- Click on “Send Data to Adafruit”.
- In this window choose a feed that you have already connected say “OnOff”. Now click on “Add ingredient”, select “value1” and hit “Create Button”.
- It is the last step here, you have to click on the “Finish Button”
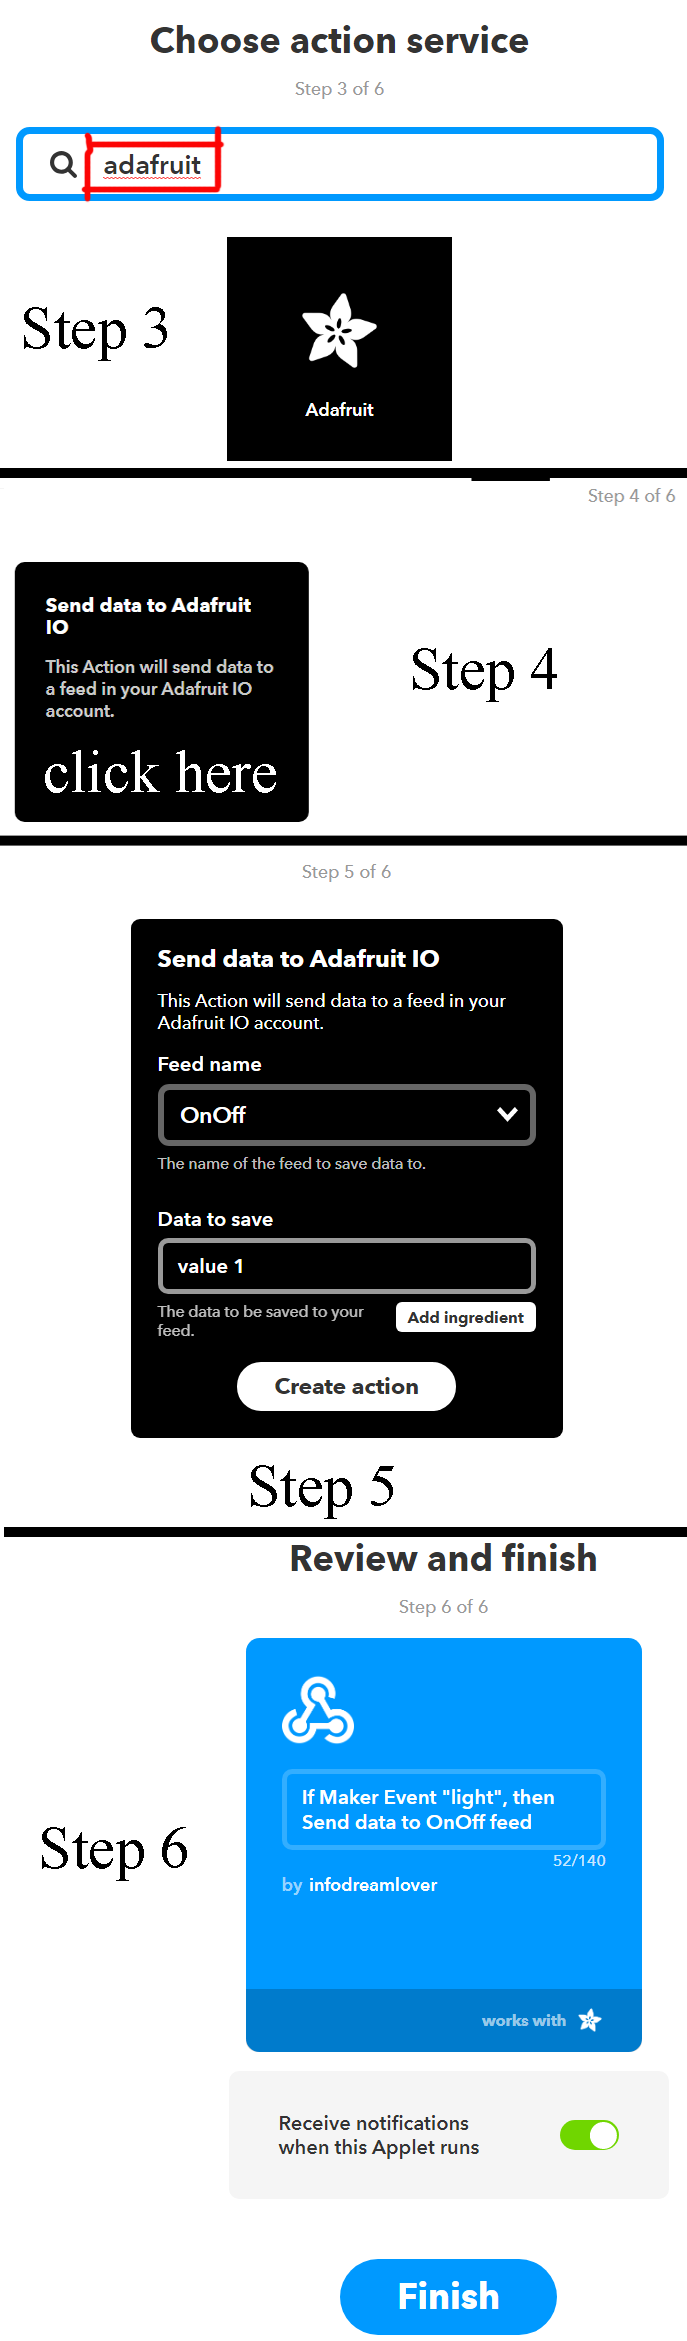 Figure 22: IFTTT Server (Step 3 to Step 6)
Now you need your URL for integrating it with the chatbot. For that click on “My Applets” and select the applets, you had created earlier. A window will appear “If Maker Event “light”, then Send data to OnOff feed”, click on “Learn more” and scroll down. Select “Webhooks” and then “documentation”. These all procedure is summarized in figure 23.
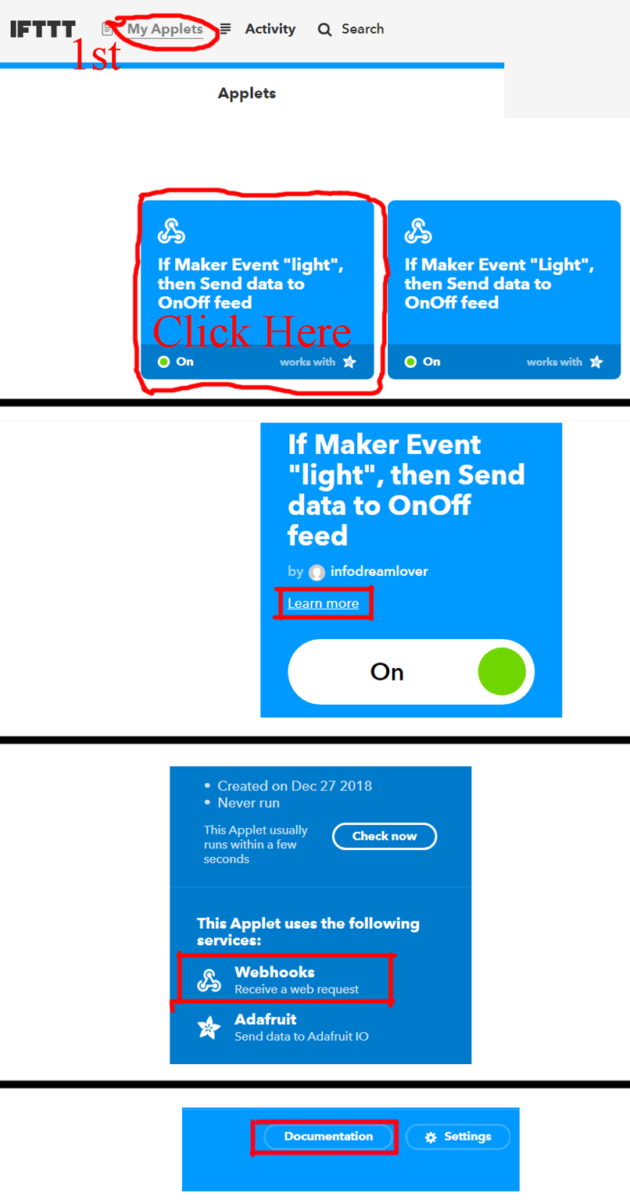 Figure 23: IFTTT Documentation
On the Documentation page, you will find your IFTTT key and URL, here you can also test if your Server is configured properly or not. Save the URL with the event name and proper value for value1. In place of event name put the name what you had created earlier (light) and for appliance ON value1=1 and for appliance off value1=0.
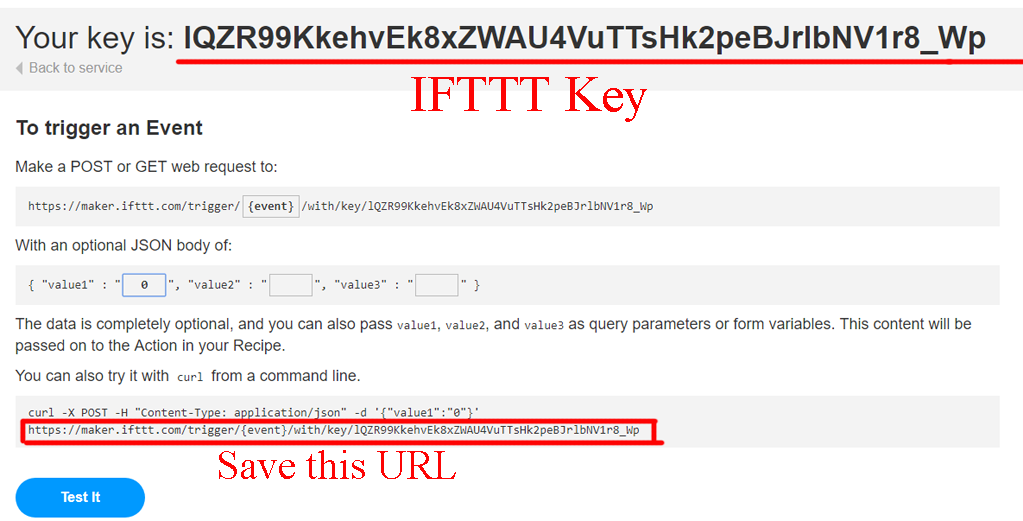 Figure 24: IFTTT Key and URL
|
1 2 3 4 |
JSON API for Appliance OFF https://maker.ifttt.com/trigger/light/with/key/hIHuDsERlUO51LjAyyhbdQpoFwEXcXOEttz02_WHLYL/?value1=0 JSON API for Appliance ON https://maker.ifttt.com/trigger/light/with/key/hIHuDsERlUO51LjAyyhbdQpoFwEXcXOEttz02_WHLYL/?value1=1 |
Now it’s time for updating your chatbot with API created at the IFTTT server. For that open the chatfuel account that you have created earlier and click on Appliance ON. Select “+” from ADD A CARD, a new popup appears called “Chatfuel Plugins”. Select JSON API. After that select POST in type and paste the URL with value1=1 in Appliance ON block and value1=0 in Appliance OFF block as shown in figure 25.
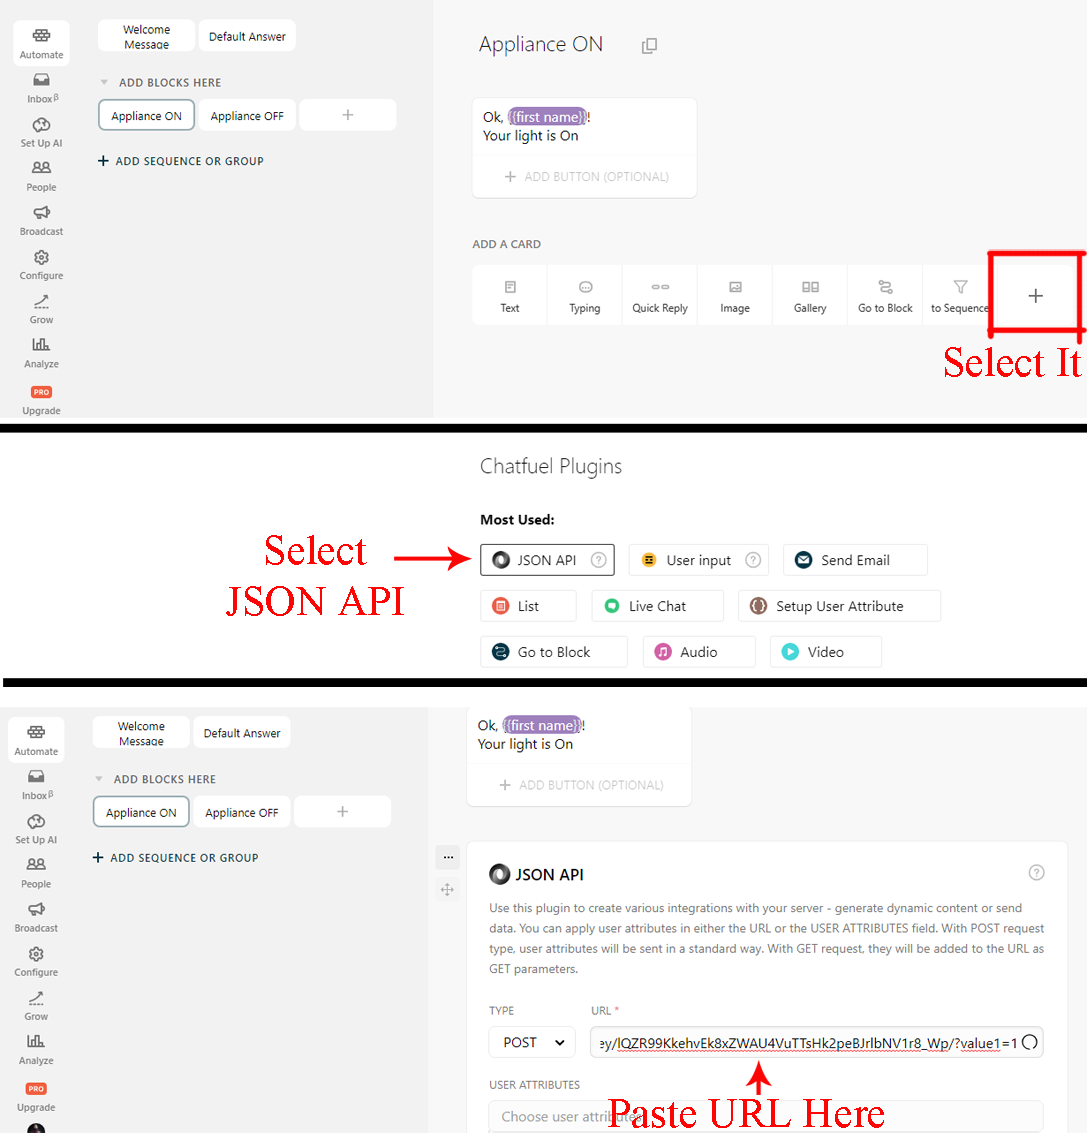 Figure 25: Updating JSON API in Chatfuel account
After this, we have to save the Adafruit IO Secret username and password which is used in Arduino programming. To get your secret key open your Adafruit IO dashboard then click on key symbol situated in the top right corner of the display there you will see your username and secret key as shown in figure 26.
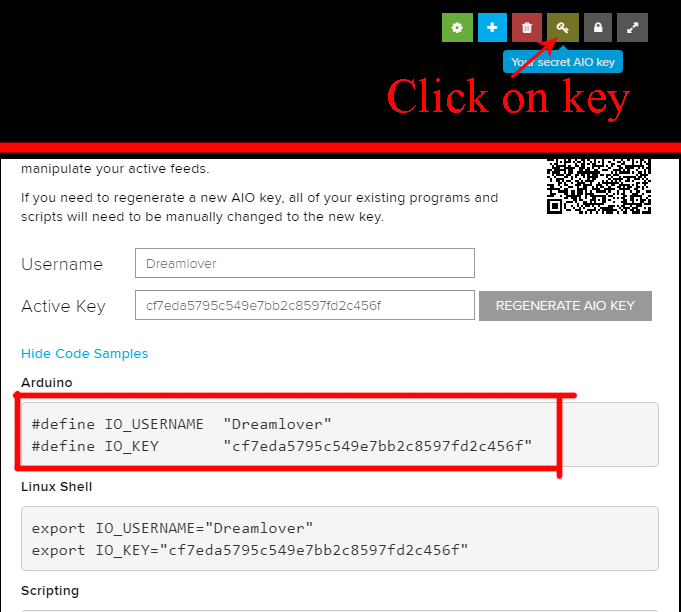 Figure 26: adafruit io username and secret key
Software Code Appliance Control using IoT and AI Chatbot:
Everything is set up now it’s time to program your NodeMCU. The software code is written in Arduino programming and compiled using Arduino IDE. You have to do a little change in code before uploading it to your NodeMCU. You have to update SSID i.e. name assign to your WiFi and its password. You have to update your username and secret key given by adafruit IO. Let’s see the program code
|
1 2 3 4 5 6 7 8 9 10 11 12 13 14 15 16 17 18 19 20 21 22 23 24 25 26 27 28 29 30 31 32 33 34 35 36 37 38 39 40 41 42 43 44 45 46 47 48 49 50 51 52 53 54 55 56 57 58 59 60 61 62 63 64 65 66 67 68 69 70 71 72 73 74 75 76 77 78 79 80 81 82 83 84 85 86 87 88 89 90 91 |
#include <Adafruit_MQTT.h> #include <Adafruit_MQTT_Client.h> #include <ESP8266WiFi.h> #define relayPin 3 //declaring pin for relay #define WLAN_SSID "SSID" //assign to your WiFi name in place of SSID #define WLAN_PASS "password" //Enter your WiFi Password here #define AIO_SERVER "io.adafruit.com" //IOT Server #define AIO_SERVERPORT 1883 // use 8883 is used for non SSL #define AIO_USERNAME "Username" //Username given bu Adafruit IO #define AIO_KEY "cf7eda5795c549e7bb2c8597fd2c456f" // Secret key given by adafruit IO WiFiClient client; // Create an ESP8266 WiFiClient class to connect to the MQTT server. Adafruit_MQTT_Client mqtt(&client, AIO_SERVER, AIO_SERVERPORT, AIO_USERNAME, AIO_KEY); // Setup the MQTT client class by passing in the WiFi client and MQTT server and login details. Adafruit_MQTT_Subscribe onoffbutton = Adafruit_MQTT_Subscribe(&mqtt, AIO_USERNAME "/feeds/onoff"); // Setup a feed called 'onoff' for subscribing to changes. void MQTT_connect(); void setup() { pinMode(relayPin, OUTPUT); digitalWrite(relayPin, LOW); Serial.begin(9600); delay(10); Serial.println(); Serial.println(); Serial.print("Connecting to "); // Connect to WiFi access point. Serial.println(WLAN_SSID); WiFi.begin(WLAN_SSID, WLAN_PASS); while (WiFi.status() != WL_CONNECTED) { delay(500); Serial.print("."); } Serial.println(); Serial.println("WiFi connected"); Serial.println("IP address: "); Serial.println(WiFi.localIP()); mqtt.subscribe(&onoffbutton); // Setup MQTT subscription for onoff feed. } uint32_t x=0; void loop() { // Ensure the connection to the MQTT server is alive (this will make the first // connection and automatically reconnect when disconnected). See the MQTT_connect // function definition further below. MQTT_connect(); // this is our 'wait for incoming subscription packets' busy subloop // try to spend your time here Adafruit_MQTT_Subscribe *subscription; while ((subscription = mqtt.readSubscription(5000))) { if (subscription == &onoffbutton) { Serial.print(F("Got: ")); Serial.println((char *)onoffbutton.lastread); String response = (char*)onoffbutton.lastread; //converts the received 1 or 0 to string to compare in the if-else statement if (response == "1") { digitalWrite(relayPin, HIGH); } else { digitalWrite(relayPin, LOW); } } } } void MQTT_connect() { int8_t ret; if (mqtt.connected()) // Stop if already connected. { return; } Serial.print("Connecting to MQTT... "); uint8_t retries = 3; while ((ret = mqtt.connect()) != 0) { Serial.println(mqtt.connectErrorString(ret)); // connect will return 0 for connected Serial.println("Retrying MQTT connection in 5 seconds..."); mqtt.disconnect(); delay(5000); // wait 5 seconds retries--; if (retries == 0) { while (1); // basically die and wait for WDT to reset me } } Serial.println("MQTT Connected!"); } |
Making video Part 1
Making video part 2
I got some error and I can’t able use my COM 3 port it’s not visible even after i installed the driver and using the preferences link board libraries and everything