The project posted here is of simple music player system based on Arduino uno board and SD card module. As we all know that Arduino can deal with digital signals or square signals only if we wish to work with sine waves we have to use further processing circuits. Previously we had posted Tune Player using Arduino for demonstration of using PWM pin of Arduino.
The audio signal is sine wave thus we have used PWM pin and OP-amp for audio output. In order to generate a pure audio signal (sine wave), we have o use some extra components because the output of Arduino is PWM rather than a sine wave.
Circuit Description of Arduino Based Music Player
The circuit of Arduino Based Music Player is shown in figure 1, designed using Arduino Uno Board. A few other essential components are the SD card, SD card module, Op-Amp IC (LM386), and a few other electronic components like resistors, capacitors, etc. in order to work flawlessly. The heart of the project Arduino Based Music Player is an Arduino uno board that read and process audio files from an SD card and produce audio signals through PWM pin (pin 9) by turning on and off-board frequently. Here in this project, we had only used digital pins.
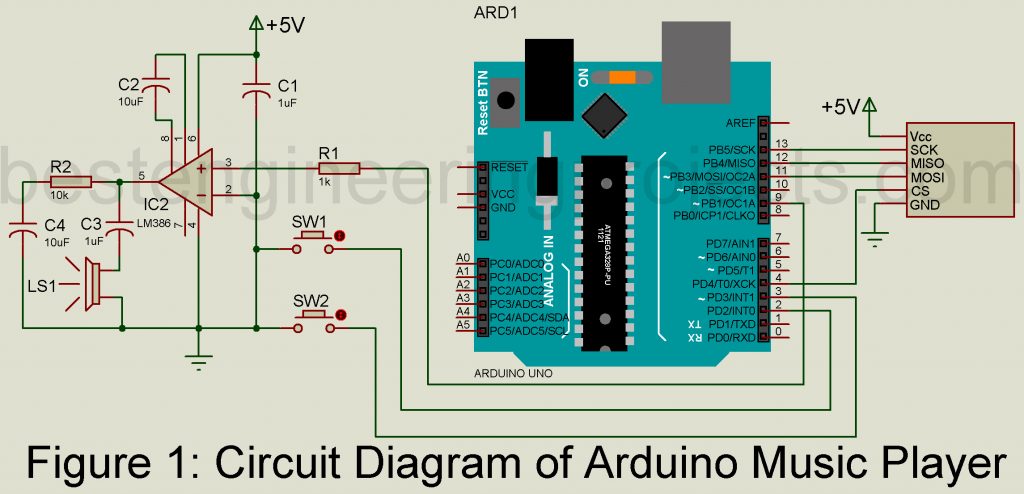
The audio file is first converted to .wav file format because Arduino cannot process MP3 files directly. In order to play MP3 files, we have to use an MP3 shield. For storing audio files (.wave audio files) we had used an SD card. SD cards cannot be directly interfaced with Arduino Uno Board thus we had used an SD card module. The four-pin of SD card module CS, MOSI, MISO, and SCK of SD card is connected to digital pin 4, 11, 12, and 13 of Arduino uno board respectively as shown in the circuit diagram.
The audio output is taken from digital pin 9 of Arduino uno board and is very weak thus it is not audible. As a result, we have to amplify the output signal. For amplification, we had used LM386 which is a low voltage, battery-powered power amplifier designed for application where low power is the main concern. Another advantage of using LM386 is it does not require any ground reference voltage and output is biased to ½ of the supply voltage.
The amplifier circuit designed here is for 200 gains. For portability and easy use, we had powered this IC with 5V from Arduino. This supply voltage is responsible for the increase and decrease of volume i.e. if you wish to increase the volume you have to increase supply voltage and if you wish to decrease volume then you have to decrease supply voltage. Output is taken from digital pin 9 of Arduino and is given to non-inverting input (pin 3) through resistor R1 where the inverting terminal (pin 2) is connected to the ground.
The output of IC2 is collected from pin 5 and then passed towards the loudspeaker via polarize electrolytic capacitor; C3. The pitch of frequency response in the audio system can be increased by replacing capacitor C3 with a high-value capacitor.
Learn more about Low Power Audio Amplifier using LM386 here.
Two switches SW1 and SW2 are connected to digital pin D2 and D3 of Arduino uno board. Switch SW1 is used to change the track of the song and SW2 is used to play/pause the music.
NOTE: For better output sound 8-ohm speaker is preferred.
Working of the circuit Arduino Based Music Player
- Convert the audio file to .wav format and save it on an SD card.
- Place the SD card in the SD card module and assemble the entire circuit as shown in the circuit diagram.
- When the power supply is connected music start to play. Use switch SW1 to change the track and SW2 to play/ pause the track
Software: The software code of the Arduino-based music player is written in Arduino programming language am is compiled using Arduino IDE. You can directly download the code and use it in your system without modifying the code.
CLICK HERE TO DOWNLOAD THE SOFTWARE CODE.
PARTS LIST OF ARDUINO BASED MUSIC PLAYER
| Resistors (all ¼-watt, ± 5% Carbon) |
| R1 = 1 KΩ
R2 = 10 KΩ |
| Capacitors |
| C1, C3 = 1 µF/16V (Electrolytic Capacitors)
C2, C4 = 10 µF/16V (Electrolytic Capacitors) |
| Semiconductors |
| ARD1 = Arduino Uno Board
IC2 = LM386 (Low Power Audio Amplifier) |
| Miscellaneous |
| LS1 = 8Ω loudspeaker
SW1, SW2 = Push to on switch SD Card Module |
how to add SD card module (6 pins) on proteus ?
The SD card module available in proteus is with hidden power pins. i.e. VCC and GND pin is not displayed in circuit but available for simulation.