Various kinds of stereo amplifier are readily available in market. But if we ask for good quality stereo amplifier with graphic equaliser facility, it’s price become very high. The cheaper varieties are generally based on discrete transistors, and suffer from drawback such as uncontrolled hum, ineffective tone control, poor base response, thermal runway etc. the use of inter-stage transformers in such circuits reduces their versatility. Here you find the tutorial to build 8W + 8W Stereo Amplifier with Graphic Equalisers.
Features | 8W + 8W Stereo Amplifier Circuit with Graphic Equalisers
8W+8W stereo amplifier is a reliable and perfect enough to implemented it in a real working environment. This project is very helpful because it is capable of providing an output of 8 watts into each channel. By using this circuit we can control and blend frequencies and tone over wide range in order to produce perfect sound because it contains in-build 6-band graphic equaliser.
- Can be used as an AF output stage of recorder player, CD player or just as an independent stereo amplifier itself.
- Offers high degree of flexibility as it can operate in environment temperature between 00 to 700
- Can operate off voltage in the 5V-20V range.
- Internally protected against input and output circuiting.
- Protected from high voltage (up to 40V).
- Noise and distortion level is extremely low and no turn-on transients occur.
- Low cost (around $3)
Working of the circuit | 8W + 8W Stereo Amplifier Circuit with Graphic Equalisers
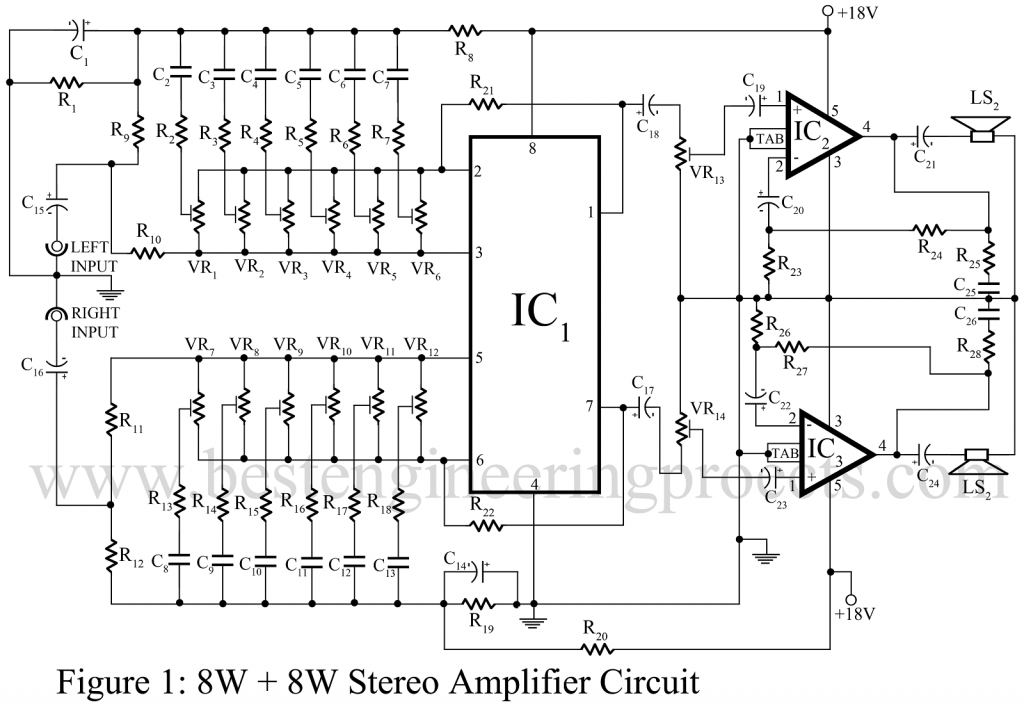
The circuit of the complete 8W+8W stereo amplifier is shown in figure 1. The heart of the circuit 8W+8W stereo amplifier is dual band graphic equaliser IC LM1458 (IC1). Corresponding pot is used to determine the gain of op-amp. The audio frequency spectrum is covered by six different band of tone control. For volume control we use VR13 and VR14, where VR13 control volume of left channel and VR14 control volume of right channel. In table I we show frequency control by different pot.
The out of IC1 is given to the input of two low cost op-amps IC (IC2 and IC3) for necessary power amplification. These two IC are current and thermal protected. The output from pin 1 and 7 of IC1 is given to inverting pin 1 of IC2 and IC3 through coupling capacitor C19 and C23 respectively as shown in figure 1. The output from pin 4 of both IC (IC2 and IC3) is given to the loudspeaker through capacitor C21 and C24 respectively.
Check out other stereo and equaliser related projects posted in bestengineeringprojects.com
- JFET Op-Amp Based Stereo Control Preamp
- 5 Band Audio Equalizer Circuit using LM833
- Audio Signal Tracer Schematic
For noise reduction we serially connect a resistor R25 and a capacitor C25 from output pin 4 to the ground as shown in figure 1. The LED dancing arrays, the circuit of which is given in figure 2, may be added to the main circuit. The LEDs flicker with a brightness level which is dependent upon the output power.
| TABLE I | ||
| Control Frequency | Control Potentiometer | |
| Left Channel | Right Channel | |
| 100Hz
300Hz 600Hz 1kHz 3kHz 16kHz Volume |
VR1
VR2 VR3 VR4 VR5 VR6 VR13 |
VR7
VR8 VR9 VR10 VR11 VR12 VR14 |
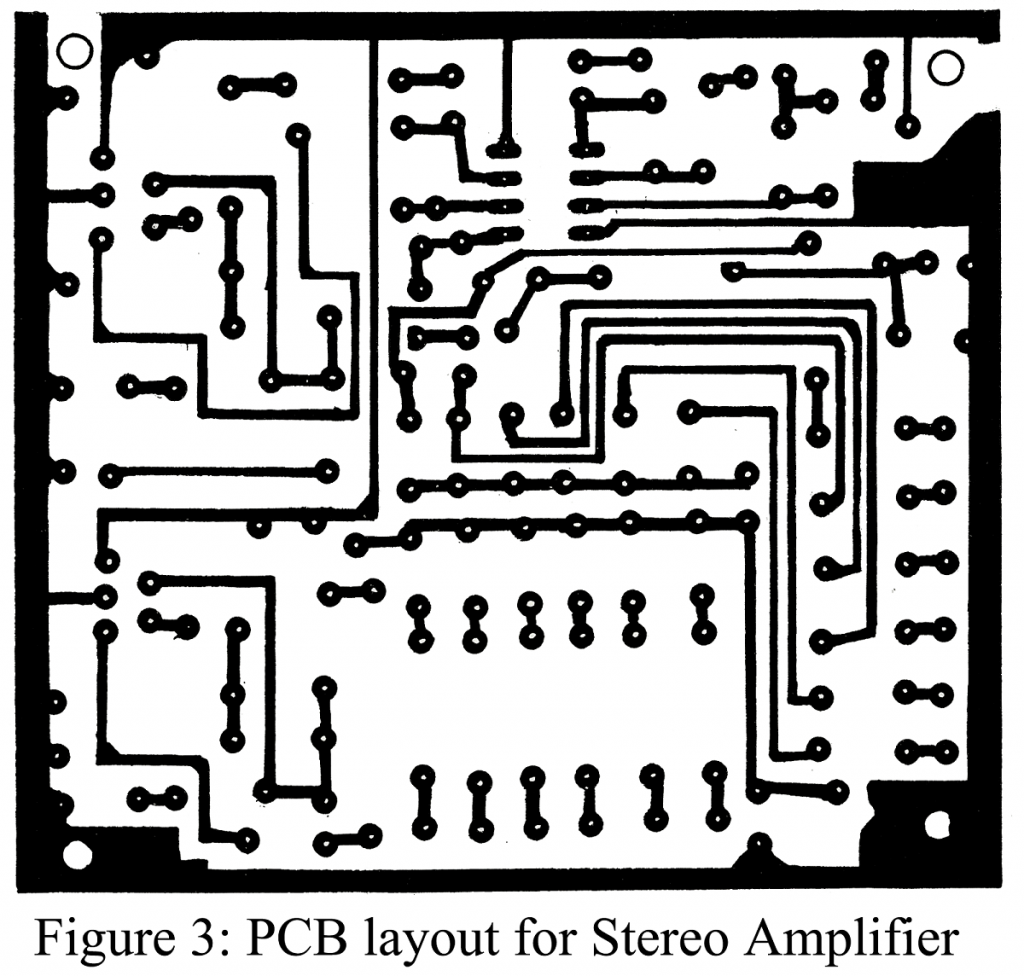
PCB DESIGN | 8W + 8W Stereo Amplifier Circuit with Graphic Equalisers
PARTS LIST OF 8W+8W STEREO AMPLIFIER CIRCUIT WITH GRAPHICS EQUALISER
| Resistor (all ¼-watt, ± 5% Carbon) |
| R1, R8, R19, R20 = 4.7 KΩ
R2 – R7, R13 – R18 = 33 KΩ R9, R12 = 100 KΩ R10, R11 = 330 KΩ R21, R22 = 470 KΩ R23, R26 = 2.2 Ω R24, R27 = 220 Ω R25, R28 = 1 Ω R29, R30 = 1 KΩ VR1 – VR14 = 100 KΩ potentiometer |
| Capacitors |
| C1, C14 = 50 µF, 25V (Electrolytic Capacitor)
C2, C8 = 47 nF (Ceramic Disc) C3, C9 = 15 nF (Ceramic Disc) C4, C10 = 8.2 nF (Ceramic Disc) C5, C11 = 4.7 nF (Ceramic Disc) C6, C12 = 1.5 nF (Ceramic Disc) C7, C13 = 300 pF (Ceramic Disc) C15 – C19, C23 = 10 µF, 25V (Electrolytic Capacitor) C20, C22 = 470 µF, 25V (Electrolytic Capacitor) C21, C24 = 2200 µF, 25V (Electrolytic Capacitor) C25 – C27 = 0.1 µF (Ceramic Disc) |
| Semiconductors |
| IC1 = LM1458 (Dual Operational Amplifier)
IC2, IC2 = LM2002A (Audio Power Amplifier) T1 = BC557 (PNP, General Purpose Transistor) T2 = BC547 (NPN, General Purpose Transistor) D1, D2 = 1N34 (Germanium diode) LED1 – LED12 = 500mm LED |
| Miscellaneous |
| LS1, LS2 = 4Ω, 10W speakers |


“dual band graphic equaliser IC LM1458 (IC1).” is a misnomwer since its just a Dual Opamp. The external circuitry is what makes that section into am Equiliser.
The simple RC filters used here for the Graphic EQ section lead to extremely low Q. That makes each tone control act more like a Volume Control since it covers almost the whole audio band rather than just a small section of frequencies.
You really need Gyrators for each band instead of these simple RC filters.
Don’t waste your time with the simple “Graphic EQ” shown here.
Yes, Q of RC filter is very low. The circuit posted here is to show tone control using passive device.
You can check 5 and 10 band graphic equalizer ciruit.
https://bestengineeringprojects.com/5-band-audio-equalizer-circuit-using-lm833/
https://bestengineeringprojects.com/10-band-graphic-equalizer-circuit/