Dustbin have been important part of our life. But, the issue we have to deal is its open cap. Due to this open cap, insect and flies visit the garbage and also the same flies roam around out kitchen or lunch buffet. This leads to serious health issue. In order to solve this issue, we had design here a Smart Dustbin using Arduino Uno. This smart dustbin automatic open its cap when we pass our hand above it.
Component Required for Smart Dustbin usign Arduino Uno
Arduino Uno Board
Servo Motor
HC-SR04 Ultrasonic Sensor
ON/OFF Switch
10K Pull-up Resistor
Circuit Description of Smart Dustbin using Arduino Uno
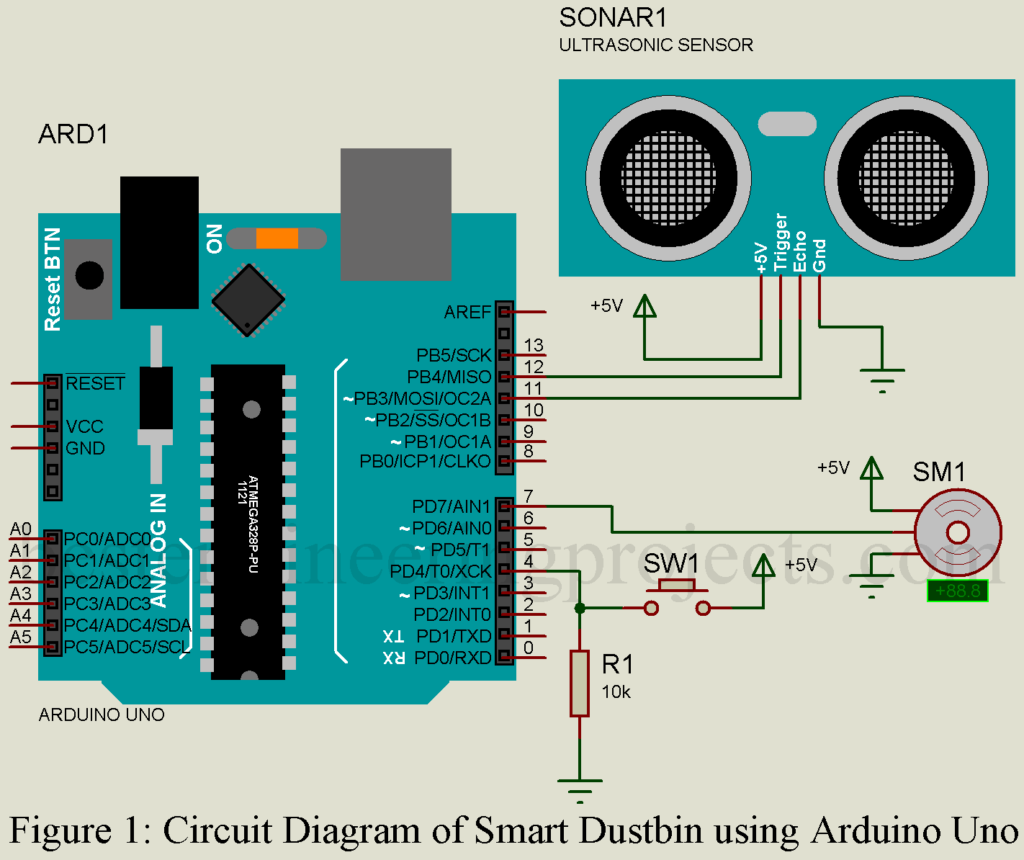
The circuit of smart dustbin is shown in figure 1. As we know that Arduino Uno board consist ATmega328 AVR microcontroller which is heart of the board. It is accompanied by other components like a power supply, ultrasonic module HC-SR04 and servo motor.
The ultrasonic sensor echo pin and trigger pin is connected to pin digital pin D7 and D8. The +Vcc pin is connected to +5V supply and GND pin is connected to ground pin of arduino uno board. The control (PWM) pin of servo motor is connected to digital pin D9 of arduino. Hence, servo motor is used to open the cap of dustbin.
For this project and components used, the preset level of distance between dustbin and hand is fixed to 30 to 70 cm.
Ultrasonic Sensor: Ultrasonic sensor HC-SR04 module is used to locate the distance between the dustbin and hands of user. The principle behind finding distance of obstacle is sonar wave. It only detects obstacle when Trigger pin receive high pulse for the period more then 10 us. When this sensor verifies the presence of hand (obstacle) it starts to send eight cycles of ultrasonic burst at 40 KHz and then it waits for reflected ultrasonic signal.
As we know that there are two drums in ultrasonic sensor module where one is for transmitting ultrasonic pulse where other drums is for receiving ultrasonic signal.
Once ultrasonic detect obstacle, the echo pin of module is set high. Waiting period of reflected pulse is completely dependent upon the location of obstacle. When the echo signal is obtained, we can calculate the distance by using the formula
Distance (in cm) = (duration/2) / 29.1
Various other project using Ultrasonic posted in bestengineeringprojects.com
HC-SR04 Ultrasonic Sensor
Initially, the cap of dustbin is switched back to zero-degree position (Close) by the servo motor. The controller keeps on monitoring the signal receive from ultrasonic module. When ultrasonic module detects an obstacle, the controller check if it crosses a threshold distance value set for open the cap of dustbin. As soon as that happens, the controller triggers the servo motor when then open the cap for limited line (as set in software). For our prototype we had set time for 10 second.
Here in this project we had also used a ON/OFF switch, in order to activate and de-activated the smart dustbin when ever we want to use it. A pull-up resistor of 10K is connected in series of switch as shown in circuit diagram in order to solve the de-bouncing problem.
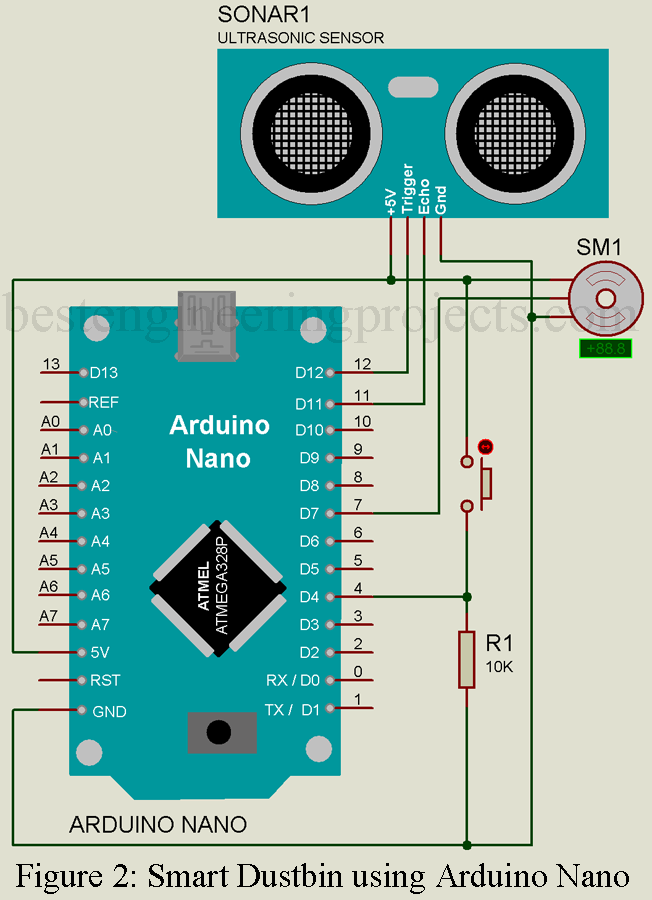
You can also use arduino NANO instead of arduino uno. You do not have to change source code because the board use identical pin for controlling servo motor, switch and ultrasonic sensor.
Software for Smart Dustbin using Arduino
The simplest part of the project smart dustbin using arduino is software part because it is clean, simple and easy to understand. The program check the distance had also used “Servo.h” inbuilt library function for servo operation. You can assume any value of motor rotation using “myServo.write(angle)” function but here we had only use two state of position (1) zero degree and (2) 1800.
The software source code is given below:
|
1 2 3 4 5 6 7 8 9 10 11 12 13 14 15 16 17 18 19 20 21 22 23 24 25 26 27 28 29 30 31 32 33 34 35 36 37 38 39 40 41 42 43 44 45 46 47 48 49 50 51 52 53 54 55 56 57 58 59 60 61 62 63 64 65 66 67 68 69 70 71 72 73 |
#include <Servo.h> //servo library //-----Wiring--- #define trigPin 12 #define echoPin 11 #define servoPin 7 //----Wiring--- Servo servo; long duration, dist, average; int flag=0; //button flag long aver[3]; //array for average void setup() { servo.attach(servoPin); pinMode(4,INPUT); //button is connected to D3 pin pinMode(trigPin, OUTPUT); //Assign trigger pin as output pinMode(echoPin, INPUT); //Assign echo pin for input servo.write(90); //open cap on power on delay(1000); servo.write(3); } void measure() { //here is for range sensor digitalWrite(trigPin, LOW); delayMicroseconds(5); digitalWrite(trigPin, HIGH); delayMicroseconds(15); digitalWrite(trigPin, LOW); pinMode(echoPin, INPUT); duration = pulseIn(echoPin, HIGH); dist = (duration/2) / 29.1; //obtain distance } void loop() { if (digitalRead(3)==1 && flag==0) { //if button pressed servo.write(90); //open cap delay(3000); //wait 1 second for servo flag=1; //remember that cap is opened } if (digitalRead(3)==0 && flag==1) { //if button released servo.write(3); //close cap delay(1000); //wait 1 second for servo flag=0; //remember that cap is closed } if (flag==0) { for (int i=0;i<=2;i++) { //average distance taken up to three time measure(); aver[i]=dist; delay(50); //50 milli second delay between measurements } dist=(aver[0]+aver[1]+aver[2])/3; //average distance by 3 measurements } if (dist>10 && dist<30 && flag==0) { //if hand on the distance between 10 to 30 cm servo.write(90); delay(10000); //open cap for 10 seconds servo.write(3); delay(1000); } if (dist>30 && dist<60 && flag==0) { //if hand on the distance between 30 to 60 cm servo.write(90); delay(3000); //open cap for 3 seconds servo.write(3); delay(1000); } } |


how u download the Arduino uno and ultrasonic sensor component for Proteus? can you give me link to download it.
how to know if the circuit diagram is work. because my motor only rotate once (90 degree)
If you are facing any issue in your project please go through the making video.
Thankyou.