Arduino is an open source and become famous in very short time, due to its powerful features and simplicity. Arduino comes as boon for inventor, artist etc. One can make their own system without having much knowledge about core electronics and assembly programming.
In this article you will learn how to pause the code and resume using a push button switch. Sometime, we want our code to run only when user do some action like to press switch of get some value of sensor. Few years back while making game arena for manual battel bot, I had used two switches for two team whether they are ready to start match or not. When one team press the switch indicating they are ready, the program will wait for another team to press the switch. When both the team become ready the timer for 3 minutes will start with beep sound. In the tutorial ”” you will learn how to pause the program and resume only when one press the button without using delay function. We cannot use delay function where program have to resume after user interaction.
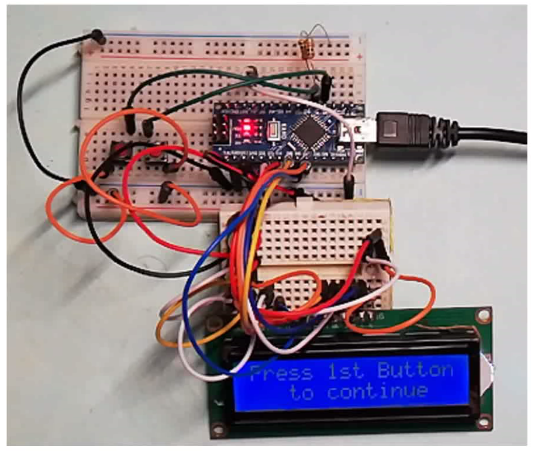
Figure 2: Author Prototype of Pause and Resume Arduino Program using Switch
Note: For demo purpose we are using 16×2 alphanumeric LCD.
Components Required Pause and Resume Arduino Program using Switch
Arduino nano x 1
Push Button Switch x 2
10k resistor x 2
16×2 LCD x 1
10K Variable resistor x 1
330E resistor x 1
Circuit Description of Pause and Resume Arduino Program using Switch
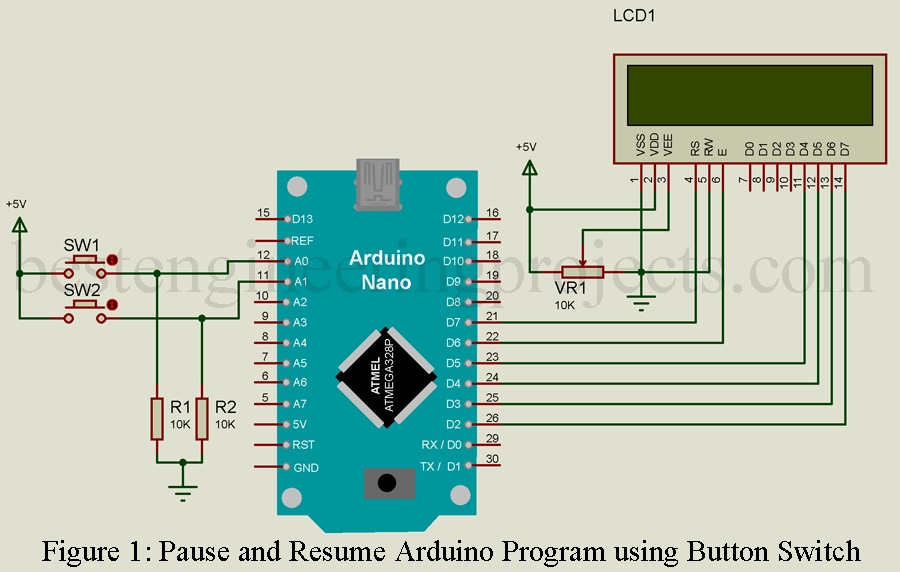
The circuit of “” is shown in figure 1, it is built around arduino Nano, two push button switches, an LCD and few other electronic passive components like resistor. LCD is used here only for demo purpose. If you have any confusing about interfacing LCD with arduino then please do watch interfacing video posted in youtube.
Two switches with pulldown resistor is connected to arduino nano analog pin A0 and A1 as shown in circuit diagram. Two pulldown resistors are also used here in order to overcome the transient response of switch. These switches are configured in high level trigger because one end of both switches is connected to +5V power supply.
Software Code:
Software code is written in arduino programming and compiled using arduino IDE. Let’s see the code. For explanation we are going to split the code in various small section.
Defining the pin of button and LCD used in the project. If you connect the LCD as show in circuit, you do not have to change it but if you modify your connection you also have to change the pin definition.
|
1 2 3 4 |
int Button1 = A0; int Button2 = A1; const int rs = 7, en = 6, d4 = 5, d5 = 4, d6 = 3, d7 = 2; LiquidCrystal lcd(rs, en, d4, d5, d6, d7); |
In setup function we will define the property of button switch i.e. whether we use it as input or output. Similarly, we also begin the LCD.
|
1 2 3 4 |
void setup() { lcd.begin(16, 2); pinMode(Button1, INPUT); pinMode(Button2, INPUT); } |
Loop function run repeatedly, when loop function run, it calls button function and returns to loop function only when button is pressed.
|
1 2 3 4 |
void loop() { CheckButton1(); CheckButton2(); } |
CheckButton() function check whether the button 1 is pressed or not. When button is pressed, the value become high for CheckButtonPress1 and return back to loop function.
|
1 2 3 4 5 6 7 8 9 10 11 12 13 14 15 16 17 |
void CheckButton1(){ int CheckButtonPress1 = 0; while(1){ CheckButtonPress1 = digitalRead(Button1); lcd.setCursor(0, 0); lcd.print("Press 1st Button"); lcd.setCursor(0, 1); lcd.print(" to continue"); if(CheckButtonPress1 == HIGH){ lcd.clear(); lcd.setCursor(0, 0); lcd.print("1st But. Pressed"); delay(2000); return; } } } |
Complete Software Code
|
1 2 3 4 5 6 7 8 9 10 11 12 13 14 15 16 17 18 19 20 21 22 23 24 25 26 27 28 29 30 31 32 33 34 35 36 37 38 39 40 41 42 43 44 45 46 47 48 49 50 51 52 53 54 55 56 57 58 59 60 61 |
#include <LiquidCrystal.h> int Button1 = A0; int Button2 = A1; const int rs = 7, en = 6, d4 = 5, d5 = 4, d6 = 3, d7 = 2; LiquidCrystal lcd(rs, en, d4, d5, d6, d7); void setup() { lcd.begin(16, 2); pinMode(Button1, INPUT); pinMode(Button2, INPUT); } void loop() { CheckButton1(); CheckButton2(); lcd.clear(); lcd.setCursor(0, 0); lcd.print("***Program is***"); lcd.setCursor(0, 1); lcd.print("***Resumed***"); delay(5000); } void CheckButton1(){ int CheckButtonPress1 = 0; while(1){ CheckButtonPress1 = digitalRead(Button1); //lcd.clear(); lcd.setCursor(0, 0); lcd.print("Press 1st Button"); lcd.setCursor(0, 1); lcd.print(" to continue"); if(CheckButtonPress1 == HIGH){ lcd.clear(); lcd.setCursor(0, 0); lcd.print("1st But. Pressed"); delay(2000); return; } } } void CheckButton2(){ int CheckButtonPress2 = 0; while(1){ CheckButtonPress2 = digitalRead(Button2); //lcd.clear(); lcd.setCursor(0, 0); lcd.print("Press 2nd Button"); lcd.setCursor(0, 1); lcd.print(" to continue"); if(CheckButtonPress2 == HIGH){ lcd.clear(); lcd.setCursor(0, 0); lcd.print("2nd But. Pressed"); delay(2000); return; } } } |