IR Remote Controller Fan Regulator using AT89C2051 is a simple circuit that can control the speed of the fan (you can also use this circuit to control the intensity of light; light dimmer). Previously we have posted a very interesting project on a fan regulator called Light Controlled Digital Fan Regulator that uses torchlight to control the speed of the fan.
Now, here we have come with a new idea i.e. control speed fan using the normal IR remote. The project IR Remote Controller Fan Regulator using AT89C2051 uses IR rays to control the speed of the fan within the range of 12 meters.
Circuit Description IR Remote Controller Fan Regulator using AT89C2051
The circuit of the IR Remote Controller Fan Regulator using AT89C2051 is very simple and straightforward, thus there are no difficulties to understand for one who is familiar with the microcontroller. For more simplicity, we had divided the entire circuit into three main sections.
- Power Supply
- IR Sensor
- Control Unit
Power Supply | IR Remote Controller Fan Regulator using AT89C2051
The circuit of the power supply unit for the IR Remote Controller Fan Regulator using AT89C2051 is designed around a center-tapped transformer, rectifier diode, series voltage regulator (7805), and capacitor. Basically, the power supply circuit is designed using a full-wave rectifier.
The AC mains input (230V) is connected to the primary winding of X1. The main function of the transformer is to lower the voltage to the desired level (12V-0-12V). The secondary terminal (output) of the transformer is connected to the diode for rectification. The pulsating DC is further filtered by capacitor C1 before giving to relay. This filtered output is further changed to +5V using a series voltage regulator (7805) for microcontroller and other circuit components as shown in circuit diagram figure 1. LED1 is used to indicate the power supply.
IR Sensor | IR Remote Controller Fan Regulator using AT89C2051
Here we have used TSOP1738 to detect IR signals transmitted from remote. For simplicity of circuit, we had used IR remote available in the market rather than transmitter circuit. The IR signal generated by IR remote is detected by the IR receiver (TSOP 1738) and sends the output pulse to the receiver pin (pin 2) P3.0 of MCU (AT89C2051).
Control Unit | IR Remote Controller Fan Regulator using AT89C2051
The heart or main part of the project IR Remote Controller Fan Regulator using AT89C2051 is MCU (AT89C2051). Here in this project, MCU recognizes the signal from the IR receiver and further control the output. AT89C2051 is a 20-pin DIP MCS-51 family having 2Kb and 128 bytes of memory for flash ROM and RAM respectively.
Transistors T1, T2, and T3 connected to the output pin of MCU as shown in figure 1 are used to drive relay RL1, RL2, and RL3 respectively. Their relay is used to control the speed of the fan using resistors R6 through R9.
Check out other interesting projects posted on bestengineeringprojects.com
- Load Protector Circuit and Remote Switching
- Infrared Remote Controller Using Arduino
- DTMF Based Remote Control System
- Universal Arduino IR Receiver Circuit
Working of IR Remote Controller Fan Regulator using AT89C2051
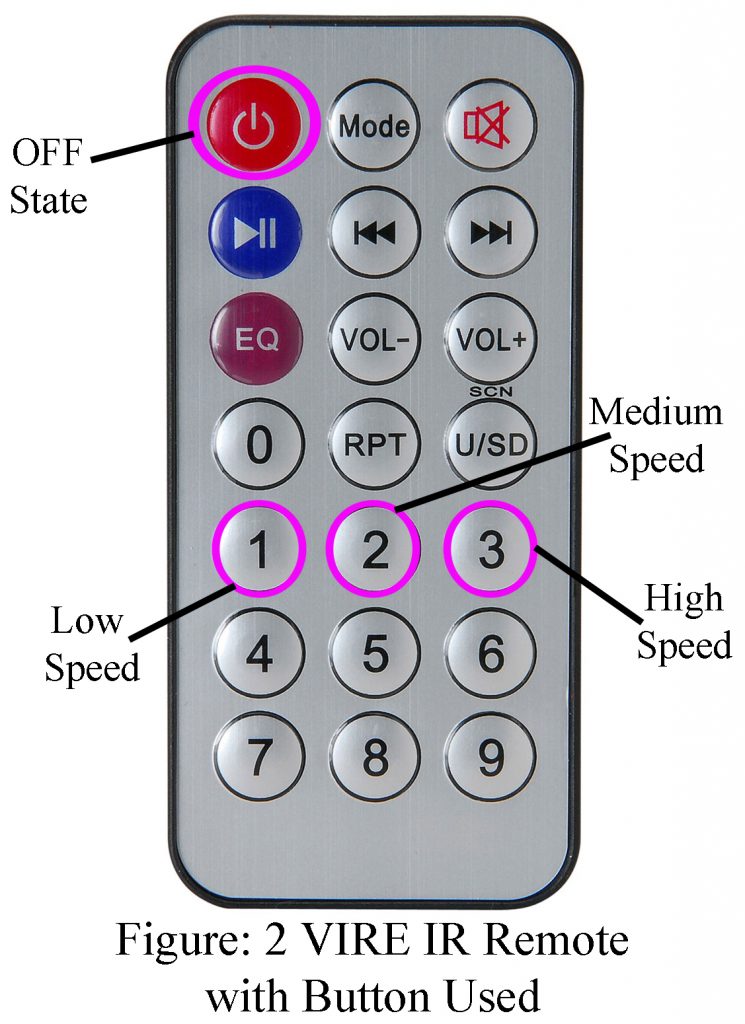
In this section, we will discuss the working procedure as well as the control procedure. For testing of the project IR Remote Controller Fan Regulator using AT89C2051 we had used the VIRE remote shown in figure 2.
In our project, we had only used four buttons of the remote controller (power, 1, 2, and 3). For a better description, we had divided them into four cases and tabulated them as shown below.
|
Table 1 |
|||
|
Cases |
Button Pressed |
State |
Relay State |
| Case 1 | Power Button | Off | All off |
| Case 2 | Button 1 | Low Speed | Relay RL1 ON |
| Case 3 | Button 2 | Medium Speed | Relay RL2 ON |
| Case 4 | Button 3 | High Speed | Relay RL3 ON |
| Case 5 | Any Button Except above 4 Buttons | Insert Delay | Don does not Affect the circuit |
PCB Design of IR Remote Controller Fan Regulator using AT89C2051: –
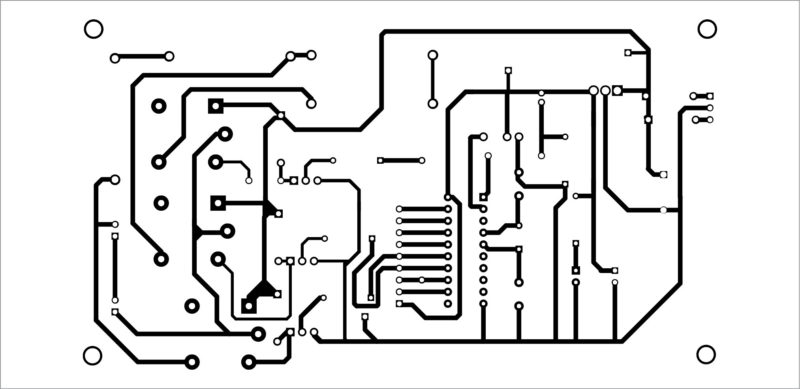
Figure 3 and Figure 4 show the Solder Side PCB and Component Side PCB respectively. In this PCB design, we do not include a transformer because this made PCB bulky and large. Thus, a 3-pin connector (CON1) is provided to connector secondary winding of transformer as shown in the PCB diagram.
Figure 3: Solder Side PCB design for IR Remote Controller Fan Regulator using AT89C2051
Figure 4: Component Side PCB design IR Remote Controller Fan Regulator using AT89C2051
Click Here to Download PCB Design
Software for IR Remote Controlled Fan Regulator using AT89C2051
The programming part is very simple and easily understandable because we had only used simple branching statements to compare and control output. For programming, we had preferred embedded C language and compile in Keli Micro Vision 4 Version.
Click Here To Download Software Code
PARTS LIST OF IR REMOTE CONTROLLED FAN REGULATOR USING AT89C2051
| Resistor (all ¼-watt, ± 5% Carbon) |
| R1 = 220 Ω
R2 = 8.2 KΩ R3 – R5 = 10 KΩ R6 – R9 = 100 Ω, 2W RNW1 = 10 KΩ (Resistance Network) |
| Capacitors |
| C1 = 2200 µF, 25V (Electrolytic Capacitor)
C2 = 100 µF, 16V (Electrolytic Capacitor) C3 = 10 µF, 16V (Electrolytic Capacitor) C4, C5 = 33 Pf (Ceramic Capacitor) |
| Semiconductors |
| IC1 = 7805 (Series Voltage Regulator)
IC2 = AT89C2051 (Microcontroller Unit) D1 – D5 = 1N4007 (General Purpose Rectifier Diode) T1 – T3 = BC547 (NPN general Purpose Diode) LED1 = 5mm any color LED TRX1 = TSOP1738 (Receiver) |
| Miscellaneous |
| X1 = 230V to 12V, 750mA centre-tapped transformer
CON1 = 3-pin berg strip male CON2, CON3 = 2-pin connector RL1 – RL3 = 12V, 1C/O relay XTAL1 = 11.0592 MHz Crystal IR Remote = VIRE IR Remote |


thanks a lots for share