Here is projects called “Infrared Remote Controller Using Arduino” which allow you to control any type of electrical gadget using any infrared remote control. The project posted here records an infrared message from an existing remote control and give output as required. Here, we use EEPROM memory to store the infrared signal code so that we can use this remote even arduino board is disconnected.
Circuit Description of Infrared Remote Controller Using Aruino:-
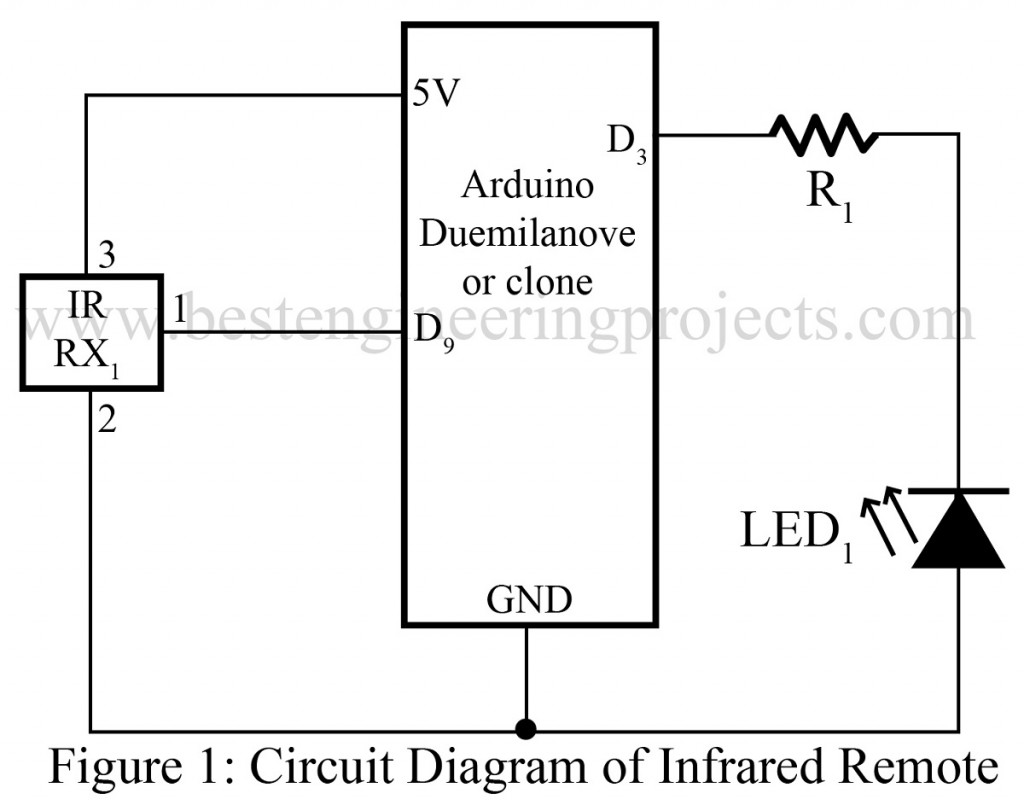
The circuit of infrared remote controller is designed using an arduino board and a IR receiver module. IR receiver module is three pin IC containing an infrared photo-diode. When it detect any infrared signal it passes to the arduino board through digital pin 5 as shown in figure. In this circuit we use digital pin 3 for output. The LED used in this circuit can be removed by any switching circuit.
Software:
For working of this project we used infrared library, which can be downloaded from the link belowand unzip it. Put the downloaded IRRemote file in the library section i.e. C:\Program Files\Arduino\Arduino-0017\hardware\libraries (If you are using window). CLICK HERE TO DOWNLOAD
Check out other Infrared (IR) based project posted in bestengineeringprojects.com
- Proximity Detector Circuit Using 555 timer IC
- Universal Arduino IR Receiver Circuit
- IR Remote Controller Fan Regulator using AT89C2051
- DIY Opto Reflector Sensor using 555
- Power Saver Circuit Diagram using PIR
After that upload the given code in arduino board and your remote controller is ready to use.
THE CODE
#include <EEPROM.h>
#include <IRremote.h>
int irRxPin = 9;
int f = 38;
IRrecv irrecv(irRxPin);
IRsend irsend;
decode_results results;
int codeLength = 0;
int currentCode = 0;
void setup()
{
Serial.begin(9600);
Serial.println(“0-9 to set code memory, s – to send”);
irrecv.enableIRIn();
setCodeMemory(0);
}
void loop()
{
if (Serial.available())
{
char ch = Serial.read();
if (ch >= ‘0’ && ch <= ‘9’)
{
setCodeMemory(ch – ‘0’);
}
else if (ch == ‘s’)
{
sendIR();
}
}
if (irrecv.decode(&results))
{
storeCode();
irrecv.resume();
}
}
void setCodeMemory(int x)
{
currentCode = x;
Serial.print(“Set current code memory to: “);
Serial.println(currentCode);
irrecv.resume();
}
void storeCode()
{
// write the code to EEPROM, first byte is length
int startIndex = currentCode * (RAWBUF + 1);
int len = results.rawlen – 1;
EEPROM.write(startIndex, (unsigned byte)len);
for (int i = 0; i < len; i++)
{
if (results.rawbuf[i] > 255)
{
EEPROM.write(startIndex + i + 1, 255);
}
else
{
EEPROM.write(startIndex + i + 1, results.rawbuf[i]);
}
}
Serial.print(“Saved code, length: “);
Serial.println(len);
}
void sendIR()
{
// construct a buffer from the saved data in EEPROM and send it
int startIndex = currentCode * (RAWBUF + 1);
int len = EEPROM.read(startIndex);
unsigned int code[RAWBUF];
for (int i = 0; i < len; i++)
{
int pulseLen = EEPROM.read(startIndex + i + 2);
if (i % 2)
{
code[i] = pulseLen * USECPERTICK + MARK_EXCESS;
}
else
{
code[i] = pulseLen * USECPERTICK – MARK_EXCESS;
}
}
irsend.sendRaw(code, len, f);
Serial.print(“Sent code length: “);
Serial.println(len);
}