Are you looking for an easy project to monitor environmental conditions in real-time? This project will show you how to create an ESP32 Temperature and Humidity Meter whose readings will be received in real-time. This small, inexpensive project requires the ESP32 microcontroller, CHT8305 temperature and humidity sensor, a 20×4 I2C LCD display, and a DS3231 Real-Time Clock (RTC) module.
The system toggles: it will present the current temperature, humidity, date, and time for 10 seconds and then show the maximum and minimum values of the temperature and humidity for 5 seconds. In this article, we’ll walk you through every step—from selecting the components to putting the circuit together—making it great for home automation, tracking conditions in agriculture, or even as a learning project.
For more details on related projects, check out these guides:
- Build a Temperature, Humidity, and Dew Point Data Logger with ESP32
- Interfacing the CHT8305 Sensor with ESP32: Real-Time Temperature and Humidity Display
- How to Set Up a Real-Time Clock (RTC) with ESP32 and DS3231 Using NTP Time Synchronization
Components Required
- ESP32 Development Board: A versatile microcontroller with built-in Wi-Fi and Bluetooth, ideal for IoT projects.
- CHT8305 Sensor: A precise temperature and humidity sensor.
- 20×4 I2C LCD Display: A 20-character by 4-line display to show the sensor data.
- DS3231 RTC Module: A high-accuracy real-time clock to keep track of date and time, even when the device is powered off.
- Jumper Wires (if needed): These are used to make connections between the components.
- Breadboard or PCB (if needed): For assembling the circuit.
Overview | ESP32 Temperature and Humidity Meter
The ESP32 Temperature and Humidity Meter with Real-Time Display is designed to monitor environmental conditions in two modes:
- Real-Time Mode: Displays the current date, time, temperature, and humidity on the LCD for 10 seconds.
- High/Low Mode: Displays the highest and lowest recorded temperature and humidity values over the day for 5 seconds.
The cycling between modes makes the device ideal for continuous monitoring in environments-such as greenhouses, laboratories, or even at home-where tracking fluctuations in temperature and humidity is essential.
Building the Circuit ESP32 Temperature and Humidity Meter
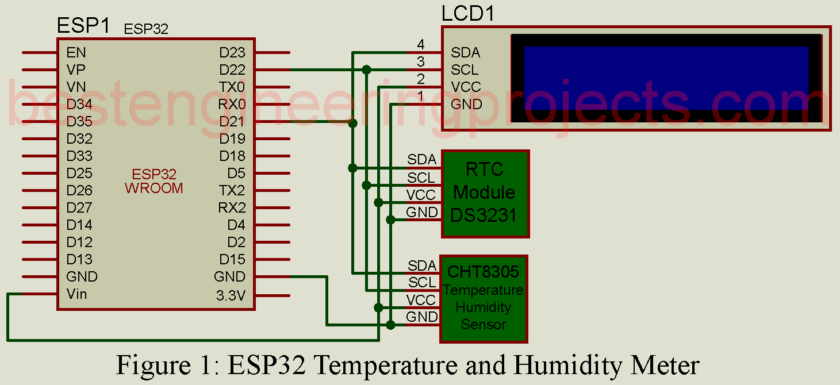
To build this project, you’ll need to connect all the components using the I2C protocol, that allows multiple devices to communicate over two pins (SDA and SCL).
Steps to Assemble the Circuit:
- ESP32 to CHT8305: Connect the SDA and SCL pins of the CHT8305 sensor to GPIO21 and GPIO22 on the ESP32.
- ESP32 to RTC Module: Connect the DS3231 RTC module to the same I2C bus (GPIO21 for SDA and GPIO22 for SCL).
- ESP32 to 20×4 LCD Display: The I2C LCD also connects to GPIO21 (SDA) and GPIO22 (SCL), sharing the I2C bus.
Using the I2C protocol can reduce the wiring complexity and free up other GPIO pins on the ESP32 for future expansion.
|
1 2 3 4 5 6 7 8 9 10 11 12 13 14 15 16 17 18 19 20 21 22 23 24 25 26 27 28 29 30 31 32 33 34 35 36 37 38 39 40 41 42 43 44 45 46 47 48 49 50 51 52 53 54 55 56 57 58 59 60 61 62 63 64 65 66 67 68 69 70 71 72 73 74 75 76 77 78 79 80 81 82 83 84 85 86 87 88 89 90 91 92 93 94 95 96 97 98 99 100 101 102 103 104 105 106 107 108 109 110 111 112 113 114 115 116 117 118 119 120 121 122 123 124 125 126 127 128 129 130 131 132 133 134 135 136 137 138 139 140 141 142 143 144 145 146 147 148 149 150 151 152 153 154 155 156 157 158 159 160 161 162 163 164 165 166 167 168 169 170 171 172 173 174 175 176 177 178 179 180 181 182 183 184 185 186 187 |
#include <Wire.h> #include <LiquidCrystal_I2C.h> #include <RTClib.h> #define CHT8305_I2C_ADDRESS 0x40 // I2C address of the CHT8305 sensor // Initialize the LCD (I2C address, columns, rows) LiquidCrystal_I2C lcd(0x27, 20, 4); RTC_DS3231 rtc; // Variables for sensor data uint8_t buf[4] = {0}; // Buffer to read data from the sensor uint16_t tempData, humData; // Raw temperature and humidity data float temperature; // Calculated temperature float humidity; // Calculated humidity // Variables to track highest and lowest values float highestTemp = -100; float lowestTemp = 100; float highestHum = 0; float lowestHum = 100; unsigned long previousMillis = 0; const long interval1 = 10000; // 10 seconds for date, time, temp, humidity const long interval2 = 5000; // 5 seconds for highest/lowest temp and humidity bool showHighLow = false; void setup() { Wire.begin(); lcd.init(); lcd.backlight(); // Initialize RTC if (!rtc.begin()) { lcd.print("Couldn't find RTC"); while (1); } if (rtc.lostPower()) { rtc.adjust(DateTime(F(__DATE__), F(__TIME__))); } // Display initial message lcd.setCursor(0, 0); lcd.print("Initializing..."); delay(2000); } void loop() { DateTime now = rtc.now(); // Read temperature and humidity from the CHT8305 sensor if (readCHT8305()) { // Update the highest and lowest temperature and humidity if (temperature > highestTemp) highestTemp = temperature; if (temperature < lowestTemp) lowestTemp = temperature; if (humidity > highestHum) highestHum = humidity; if (humidity < lowestHum) lowestHum = humidity; unsigned long currentMillis = millis(); // Display date, time, temperature, and humidity for 5 seconds if (!showHighLow && currentMillis - previousMillis >= interval1) { previousMillis = currentMillis; showDateTimeAndTempHum(now, temperature, humidity); showHighLow = true; } // Display highest and lowest temperature and humidity for 2 seconds else if (showHighLow && currentMillis - previousMillis >= interval2) { previousMillis = currentMillis; showHighLowTempHum(); showHighLow = false; } } else { // Handle sensor read error lcd.clear(); lcd.setCursor(0, 0); lcd.print("Sensor Error"); delay(1000); } } // Function to display centered text void showDateTimeAndTempHum(DateTime now, float temp, float hum) { lcd.clear(); // Display "Temp & Hum Meter" centered in row 1 lcd.setCursor((20 - 15) / 2, 0); // 15 characters in "Temp & Hum Meter", 20 columns wide display lcd.print("Temp & Hum Meter"); // Display date and time in row 2, formatted as DD/MM/YYYY HH:MM:SS char dateBuffer[11]; snprintf(dateBuffer, sizeof(dateBuffer), "%02d/%02d/%04d", now.day(), now.month(), now.year()); char timeBuffer[9]; snprintf(timeBuffer, sizeof(timeBuffer), "%02d:%02d:%02d", now.hour(), now.minute(), now.second()); lcd.setCursor(0, 1); // Start at first column of row 2 lcd.print(dateBuffer); lcd.setCursor(11, 1); // Shift to 12th column for time with seconds lcd.print(timeBuffer); // Display temperature and humidity in rows 3 and 4 lcd.setCursor(0, 2); lcd.print("Temperature: "); lcd.print(temp, 1); lcd.print((char)223); // Degree symbol lcd.print("C"); lcd.setCursor(0, 3); lcd.print("Humidity: "); lcd.print(hum, 1); lcd.print("%"); } // Function to display the highest and lowest temperatures and humidity of the day void showHighLowTempHum() { lcd.clear(); lcd.setCursor(0, 0); lcd.print("High Temp: "); lcd.print(highestTemp, 1); lcd.print((char)223); // Degree symbol lcd.print("C"); lcd.setCursor(0, 1); lcd.print("Low Temp: "); lcd.print(lowestTemp, 1); lcd.print((char)223); // Degree symbol lcd.print("C"); lcd.setCursor(0, 2); lcd.print("High Hum: "); lcd.print(highestHum, 1); lcd.print("%"); lcd.setCursor(0, 3); lcd.print("Low Hum: "); lcd.print(lowestHum, 1); lcd.print("%"); } // Function to read data from the CHT8305 sensor bool readCHT8305() { if (readReg(0x00, buf, 4)) { // Extract raw temperature and humidity data tempData = (buf[0] << 8) | buf[1]; // Combine first two bytes for temperature humData = (buf[2] << 8) | buf[3]; // Combine next two bytes for humidity // Convert raw data to human-readable values using the sensor's formula temperature = ((float)tempData * 165 / 65535.0) - 40.0; humidity = ((float)humData / 65535.0) * 100; return true; } return false; } // Function to read data from a register of the CHT8305 sensor uint8_t readReg(uint8_t reg, uint8_t* buffer, size_t size) { if (buffer == NULL) { Serial.println("Buffer ERROR!! : null pointer"); return 0; } // Start I2C transmission Wire.beginTransmission(CHT8305_I2C_ADDRESS); Wire.write(reg); // Send the register address to read from // End the transmission and check if successful if (Wire.endTransmission() != 0) { return 0; } delay(20); // Wait for data to be ready // Request 'size' bytes of data from the sensor Wire.requestFrom(CHT8305_I2C_ADDRESS, (uint8_t)size); // Read the requested bytes into the provided buffer for (uint16_t i = 0; i < size; i++) { if (Wire.available()) { buffer[i] = Wire.read(); } } return size; // Return the number of bytes read } |
Functionality of the Meter
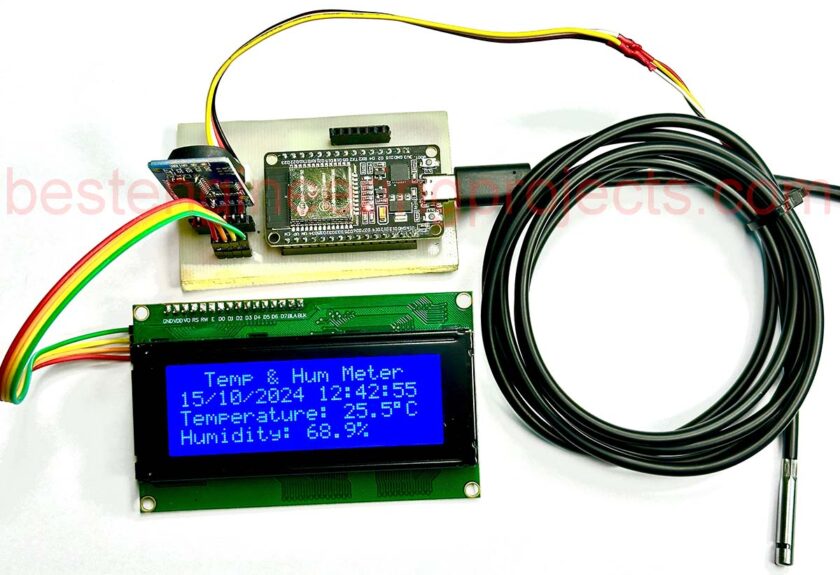
- Displaying Date, Time, Temperature, and Humidity: The DS3231 RTC module provides the current date and time, while the CHT8305 sensor measures the ambient temperature and humidity. These values are displayed on the LCD for 10 seconds. The first two lines show the date and time, and the last two show the current temperature and humidity.
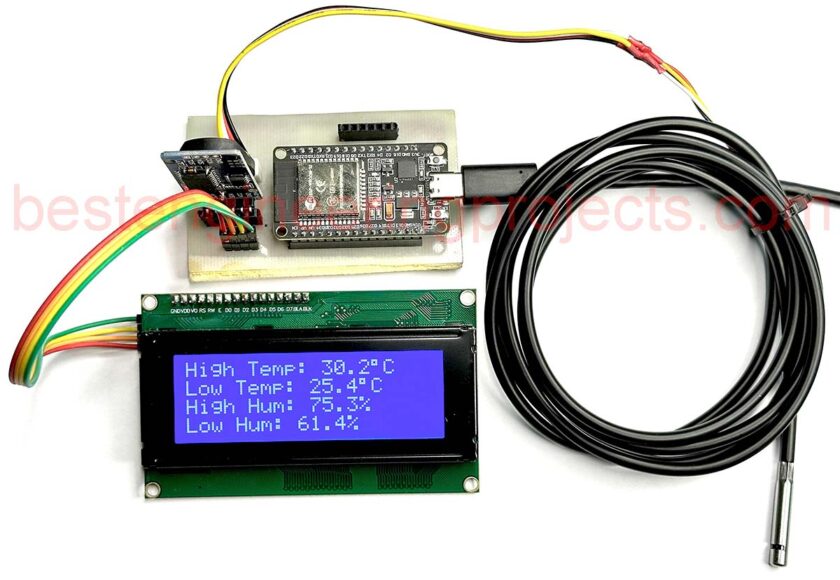
- High/Low Tracking: The meter constantly checks the temperature and humidity throughout the day for the highest and lowest values. After displaying the current conditions, the meter automatically toggles to display the day’s high and low readings for 5 seconds.
- Alternating Display: The meter toggles between the current reading display and the high/low display at fixed intervals. This helps you monitor both the current conditions and the highest and lowest temperature and humidity levels of the day.
Advantages of Using the ESP32 and I2C Protocol
- ESP32’s Versatility: The ESP32 is a powerful microcontroller with Wi-Fi and Bluetooth connectivity, perfect for IoT applications. Future enhancements include remote data monitoring or cloud integration.
- Efficient I2C Communication: The I2C protocol enables efficient communication between multiple devices, such as a sensor, RTC, and LCD over the same two wires, hence simplifying hardware design by reducing wiring complexity.
- Accurate Timekeeping: DS3231 RTC module provides high accuracy and thus can keep pace with time in case of system power off. This will ensure that the data is accurately timestamped.
Figure 2: Temperature and Humidity Meter Prototype
Applications of ESP32 Temperature and Humidity Meter
The following are different practical scenarios where an ESP32-based temperature and humidity meter will be helpful to:
- Greenhouses and Farms: Economized water consumption due to monitored environmental conditions promotes efficient plant development.
- More innovative Home Automation: Connect the meter to a smart home to keep and monitor indoor air quality.
- Data logging for research: They can be used to track various environmental changes in scientific research studies by collecting accurate and timestamped data.
Figure 3: Alternating Display for High and Low Value
The ESP32 Temperature and Humidity Meter with Real-Time Display is an easy and functional project for real-time environmental monitoring. Such a meter would track the high and low daily readings and thus provide full data for anyone looking to monitor and improve environmental control.
This project can easily scale up with the addition of more features, such as data logging, wireless communication, or even environment-based automation, all enabled by the ESP32 and I2C communication.
Ideally, This project suits the DIY enthusiast, hobbyist, or anyone genuinely interested in IoT, home automation, and environmental monitoring.


