Temperature and humidity monitoring is an essential aspect of IoT, smart agriculture, industrial automation, and home automation systems. DHT11 and DHT22 are two widely used low-cost temperature and humidity sensors that offer digital output and are easy to interface with microcontrollers like Arduino, ESP32, and Raspberry Pi. We’re gonna tear these sensors apart (not literally, please), see how they tick, and, most importantly, learn how to hook ’em up with Arduino for your next project.
By the time you finish this guide, you’ll know:
- How these sensors actually work.
- The difference between DHT11 & DHT22.
- How to connect them with Arduino.
- How to write the code.
- What happens when you power them with 3.3V vs. 5V.
- Real-world accuracy tests & graphs.
- Alternative sensors if you need something even better.
If that sounds good, let’s jump in!
What Are DHT11 and DHT22 Sensors?
Both of these sensors are used to measure Air Temperature and Humidity. They will pick up the data and will report it to you. That’s all, is it not?
This is where things get interesting:
DHT11 is like that reliable but old-school flip phone—it gets the job done, but don’t expect it to survive.
DHT22 is somewhat similar to a new smartphone—smoother, more accurate, but expensive.
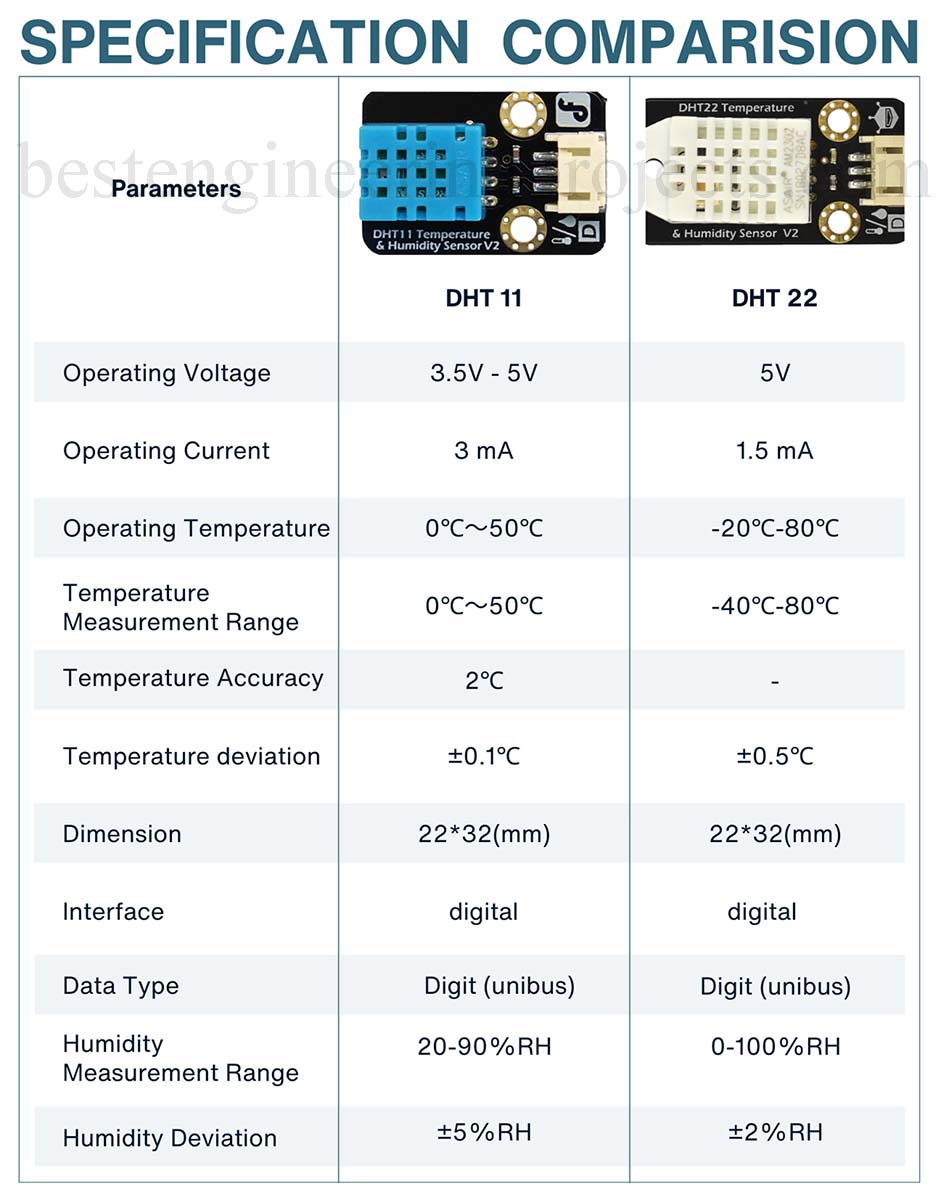
Figure 1: DHT11 and DHT22 comparison
Where Do You Use These?
- Weather monitoring stations (your own tiny weather forecast).
- Greenhouses (plants love stable temperature & humidity).
- Smart homes (automated air conditioning, humidifiers).
- HVAC systems (fancy way of saying heating & cooling).
- IoT projects (make the internet of things, cooler… literally).
- Industrial monitoring (factories, warehouses, labs).
Working of these Sensors?
Both sensors have:
- A capacitive humidity sensor (a tiny piece of polymer that absorbs moisture).
- A thermistor (resistor that changes when temperature changes).
- An ASIC chip (converts everything into readable digital data).
Data Transmission
When the sensor measures temperature and humidity, it doesn’t just keep the information to itself—it communicate with Arduino through a digital pin.
This data packet is 40 bits long including
- Humidity (Integer & Decimal) – How much moisture is in the air.
- Temperature (Integer & Decimal) – How hot or cold it is.
- Checksum – An inbuilt error check that ensures the data isn’t corrupted.
- DHT11 vs. DHT22: The Key Differences
DHT11 is for prototype or for college project where every penny is important but can compromise bit in accuracy where as precision matter and few dollar doesnot matter for you go for DHT22.
Connecting DHT Sensors to Arduino
Components Required
- Arduino :- UNO or Compatable x 1.
- Sensors: DHT11, DHT22 x 1.
- Resistors: 10kΩ x2.
- Jumper Wires :- As per required.
- Breadboard :- As per required.
Circuit Diagram and Connections
The cirucit is shown in figure below where DHT11 and DHT22 data pin is connected to arduino uno digital pin D8 and D7 respectively. A pull up resistor each of 10K is also connected to data pins for stable reading. Where power is given to the sensors through arduino 5V and GND pins as shown in circuit diagram. In order to display sensors reading a 20×4 alphanumeric I2C LCD is used and is connected to I2C pin of Arduino UNO i.e. A4 and A5.
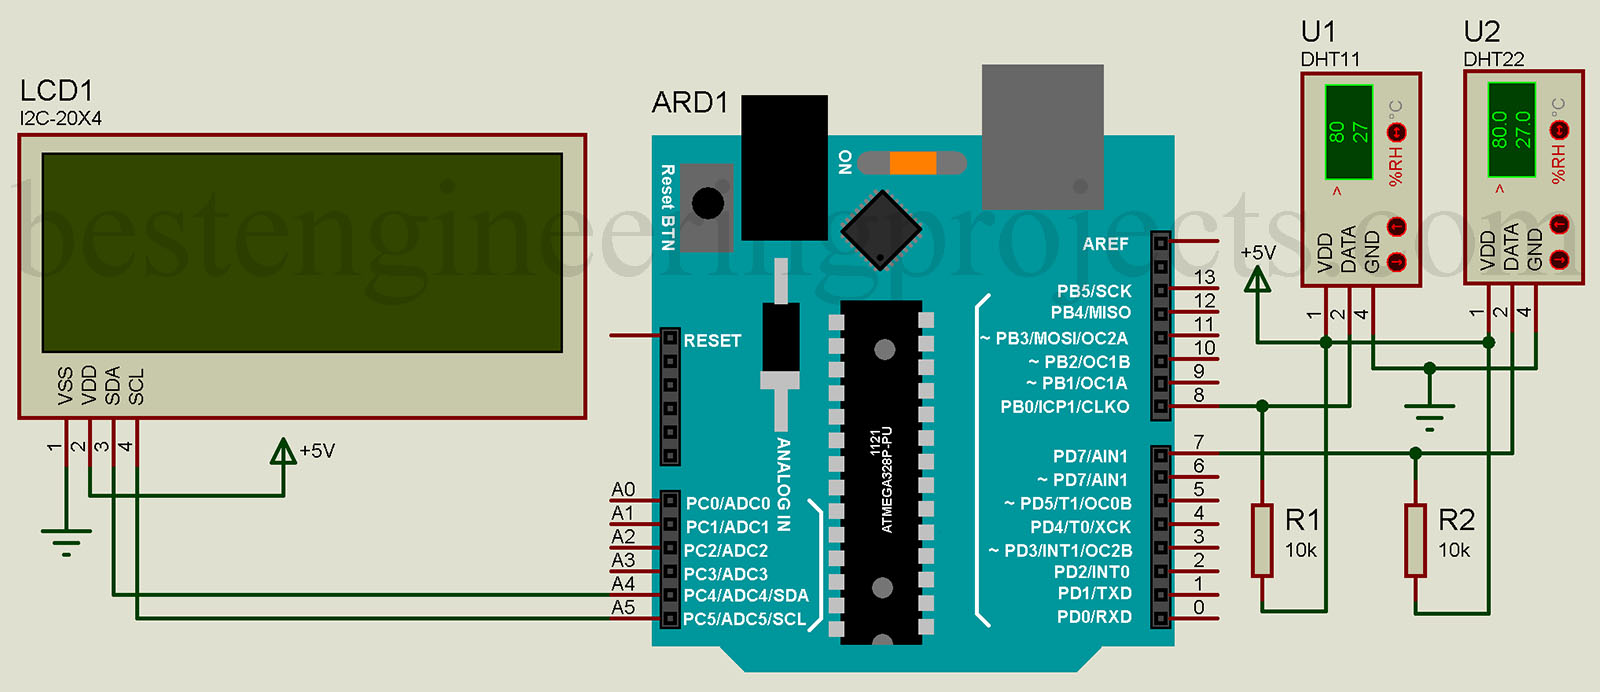 Figure 2: Arduino and DHT Sensors Connection
Powering With 3.3V vs. 5V: Does It Matter?
Powering With 5V:
- Stronger signal → Works with longer cables (up to 20 meters).
- Faster response → More accurate data.
Powering With 3.3V:
- Lower power consumption → Great for battery-powered projects.
- Weaker signal → Works best with short cables (<1m).
Verdict: If you can, use 5V. But if your microcontroller runs on 3.3V logic (ESP32, ESP8266), then 3.3V works fine with short wires.
Arduino Code: Read Temperature & Humidity
The moment you upload this code on your Arduino, sit back and get to witness your DHT sensor indicate actual temperature and humidity readings.
There is a new reading on the screen every couple of seconds, and it shows you a current snapshot of air temperature and humidity.
|
1 2 3 4 5 6 7 8 9 10 11 12 13 14 15 16 17 18 19 20 21 22 23 24 25 26 27 28 29 30 31 32 33 34 35 36 37 38 39 40 41 42 43 44 45 46 47 48 49 50 51 52 53 54 55 56 57 58 59 60 61 62 63 64 65 66 67 68 69 70 71 72 73 74 75 76 77 78 79 80 81 82 83 84 85 86 87 88 89 90 91 |
#include <Wire.h> #include <LiquidCrystal_I2C.h> #include <DHT.h> // Define I2C LCD Address (0x27 or 0x3F depending on your LCD) LiquidCrystal_I2C lcd(0x27, 20, 4); // Define DHT Sensors #define DHT11_PIN 8 #define DHT22_PIN 7 DHT dht11(DHT11_PIN, DHT11); DHT dht22(DHT22_PIN, DHT22); // Timers for sensor reading and logging unsigned long previousSensorMillis = 0; unsigned long previousLogMillis = 0; // Intervals (in milliseconds) const unsigned long sensorInterval = 2000; // 5 seconds void setup() { Serial.begin(115200); // Debugging Serial lcd.init(); lcd.backlight(); dht11.begin(); dht22.begin(); } void loop() { unsigned long currentMillis = millis(); // Read sensor data every 5 seconds if (currentMillis - previousSensorMillis >= sensorInterval) { previousSensorMillis = currentMillis; // Read DHT11 Sensor float temp11 = dht11.readTemperature(); float hum11 = dht11.readHumidity(); // Read DHT22 Sensor float temp22 = dht22.readTemperature(); float hum22 = dht22.readHumidity(); // Check if data is valid if (isnan(temp11) || isnan(hum11) || isnan(temp22) || isnan(hum22)) { Serial.println("Error reading from DHT sensors!"); lcd.setCursor(0, 0); lcd.print("Sensor Error! "); } else { // Print on Serial Monitor Serial.print("DHT11 - Temp: "); Serial.print(temp11); Serial.print(" C, Hum: "); Serial.print(hum11); Serial.println(" %"); Serial.print("DHT22 - Temp: "); Serial.print(temp22); Serial.print(" C, Hum: "); Serial.print(hum22); Serial.println(" %"); // Display Data on LCD lcd.clear(); lcd.setCursor(7, 0); lcd.print("DHT 11"); lcd.setCursor(0, 1); lcd.print("T="); lcd.print(temp11); lcd.print((char)223); lcd.print("C"); lcd.print(" "); lcd.print("H="); lcd.print(hum11); lcd.print("%"); lcd.setCursor(7, 2); lcd.print("DHT 22"); lcd.setCursor(0, 3); lcd.print("T="); lcd.print(temp22); lcd.print((char)223); lcd.print("C"); lcd.print(" "); lcd.print("H="); lcd.print(hum22); lcd.print("%"); } } } |
Real-World Performance: Data & Graphs
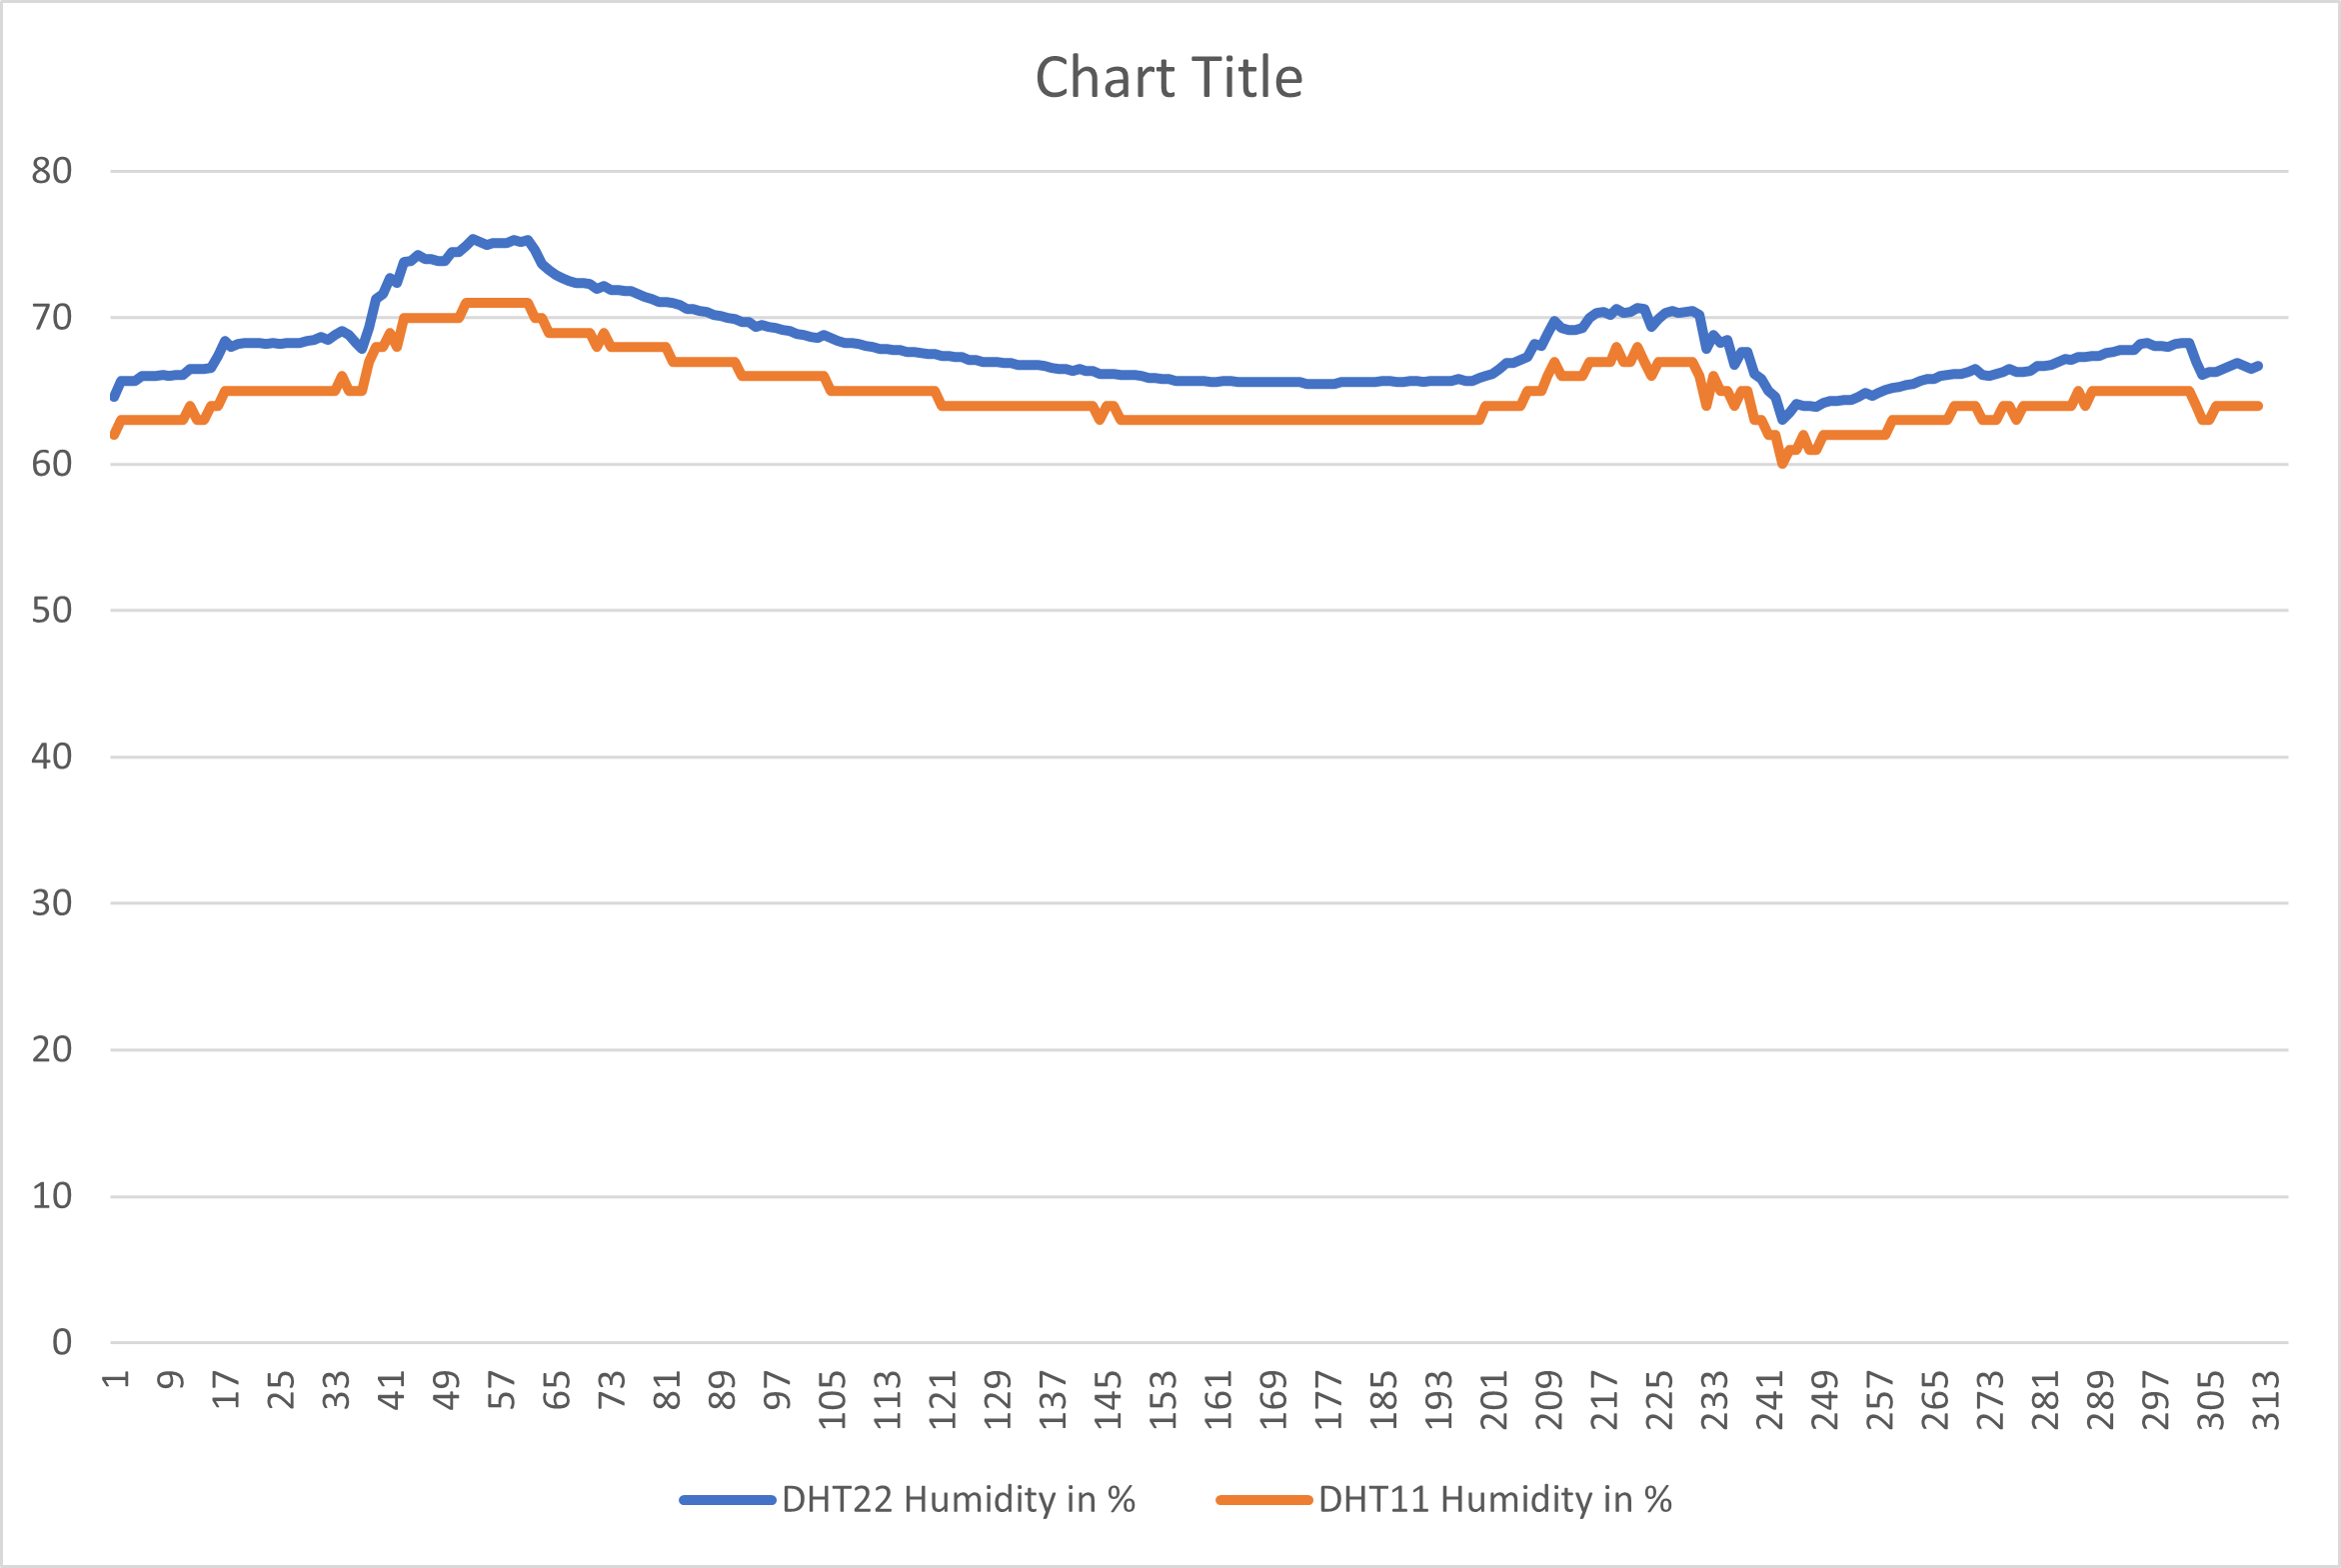
Figure 2: DHT11 and DHT22 humidity comparison
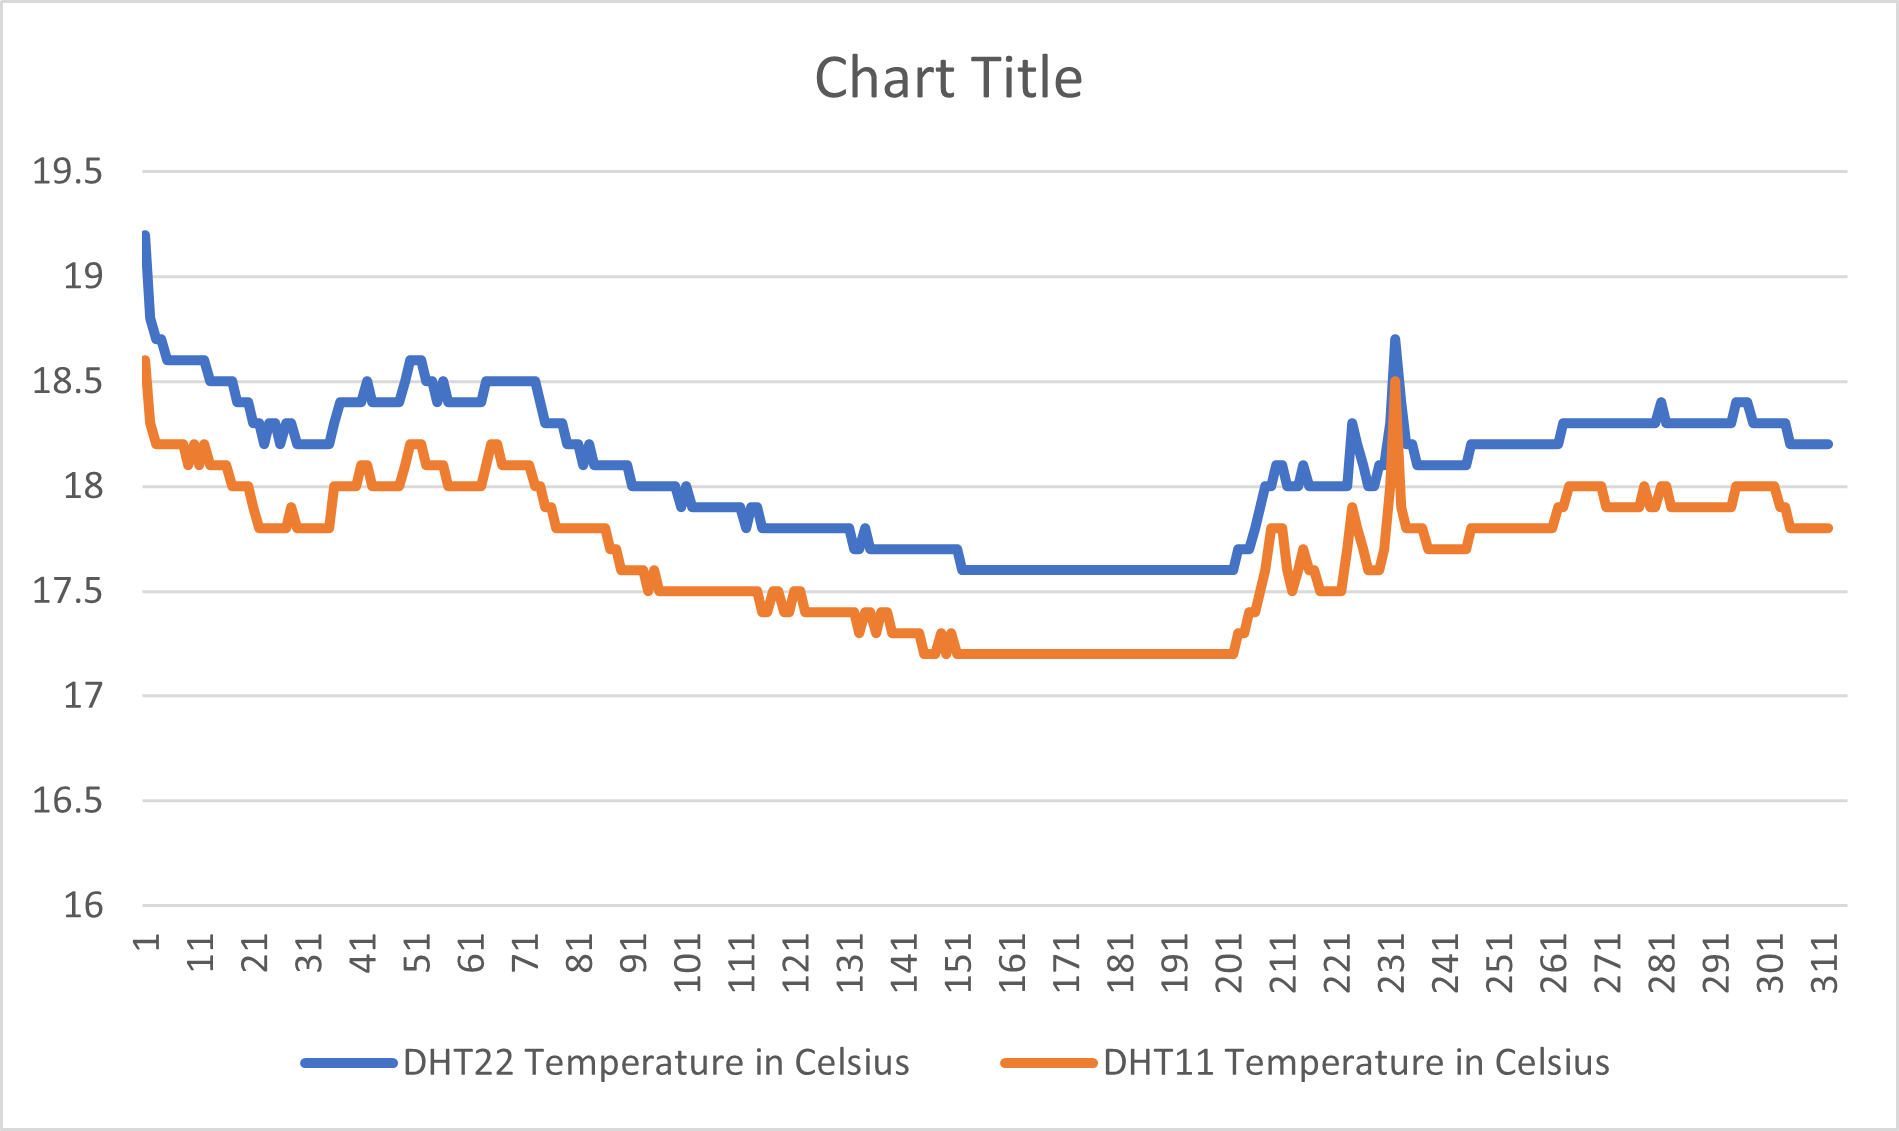
Figure 3: DHT11 and DHT22 temperature comparison
DHT11 and DHT22 temperature and humidity comparison graphs indicate the average differences within a 24-hour time period. DHT22 (blue line) is more stable and precise with a smoother trend and fewer temperature and humidity data fluctuations. It traces changes precisely with ±0.5°C temperature accuracy and ±2% RH humidity accuracy and is therefore the better choice for precise environmental monitoring. For comparison, the DHT11 (orange line) is more volatile in temperature and humidity readings with its ±5% RH accuracy being less consistent. Its own temperature readings also take gigantic strides and round-off errors, which reveal its ±2°C accuracy and smaller operating range.
Among all these outcomes, it is apparent that DHT22 is the superior sensor with more stable and precise readings, and thus ideal for application in weather stations, greenhouses, and industry where high accuracy is of utmost importance. DHT11, being inexpensive, would be suitable for low-precision applications.
Alternative Sensors
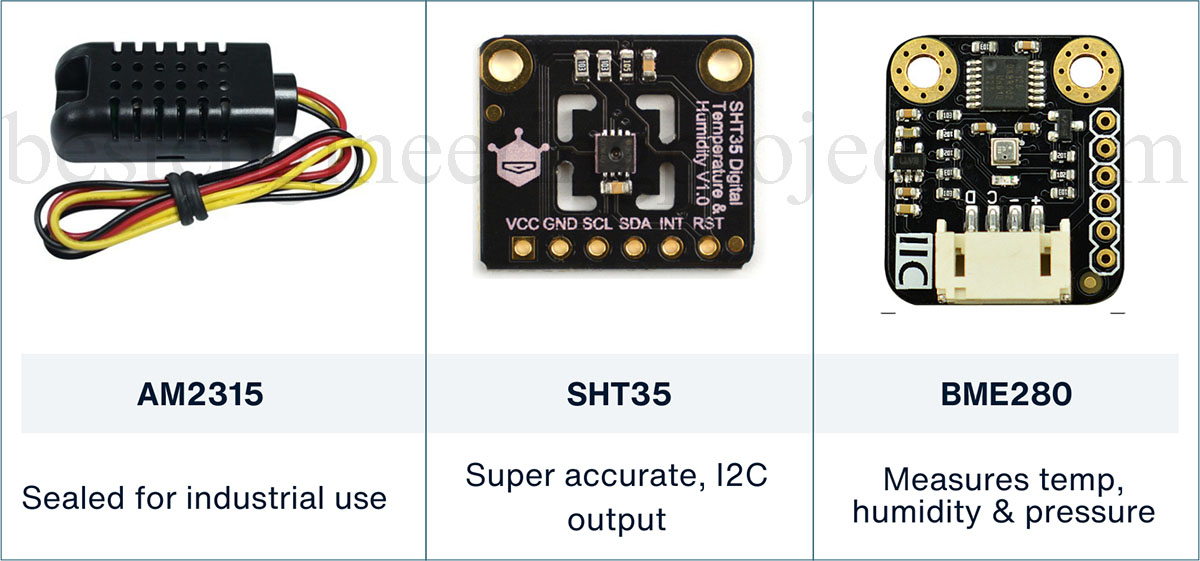 Figure 5: Alternative for DHT Sensors
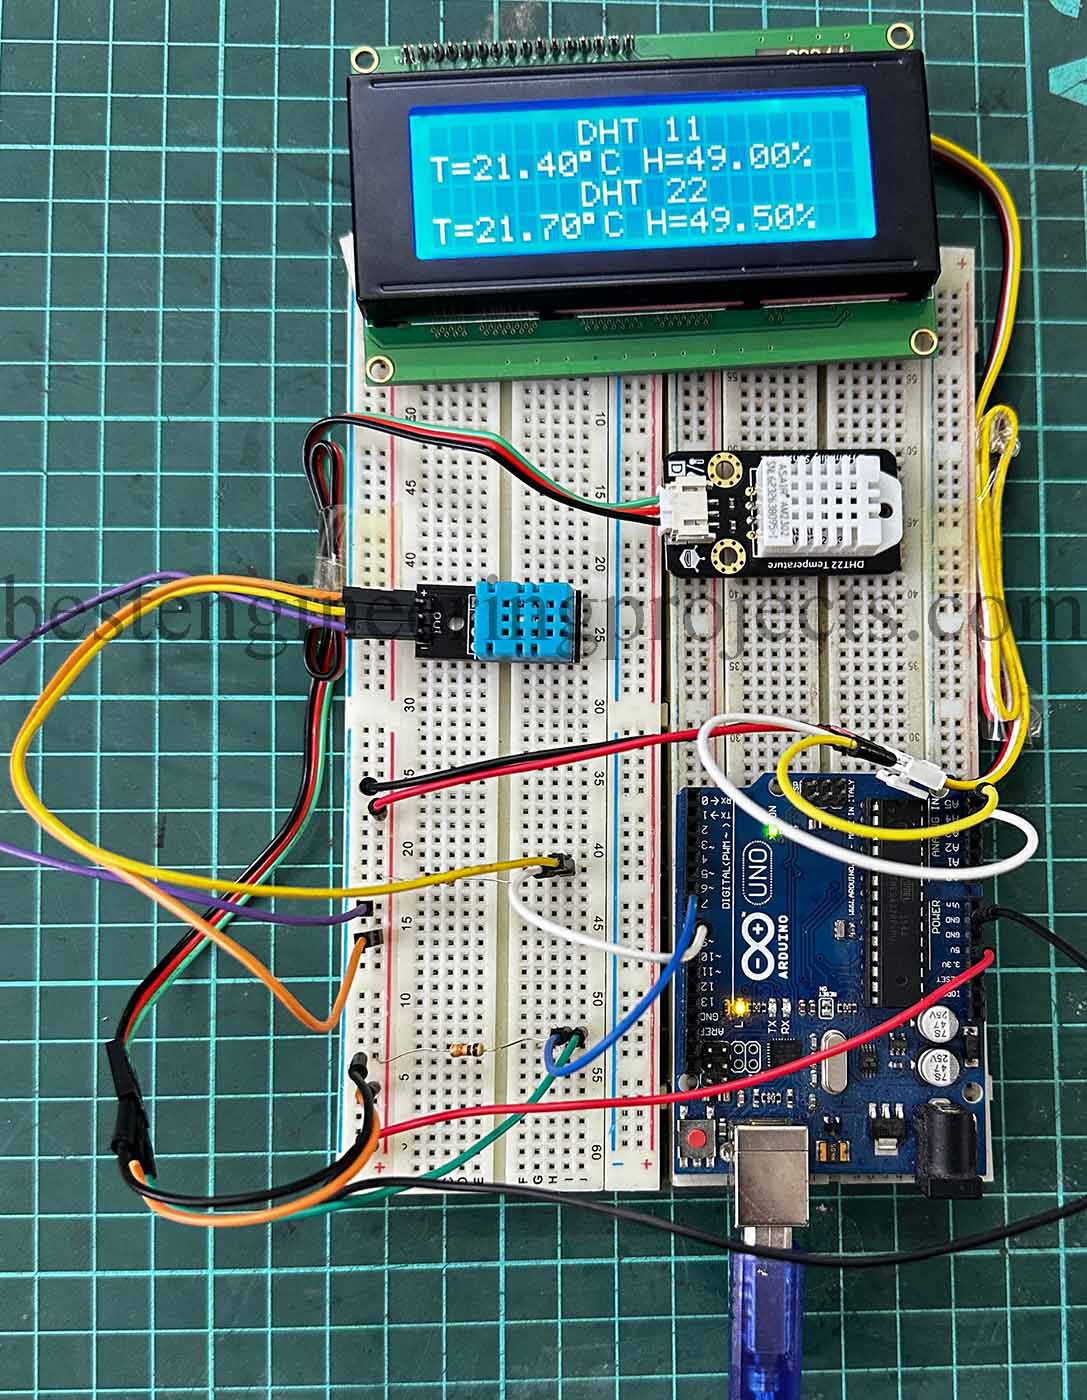
Figure 6: Author Prototype of Arduino and DHT sensors