The circuit posted here is of Arduino FM Receiver using digital radio—receiver module TEA5657 by Philips. Additional components like audio power amplifier, Arduino uno board, and LCD module to display station number and frequency. However, for the receiving system to function flawlessly, external components like a capacitor, resistor, etc are included in the circuit, which is necessary. if you wish to make your FM transmitter circuit using Arduino please go through this link: Arduino FM Transmitter
Description Arduino FM Receiver Circuit using TEA5767
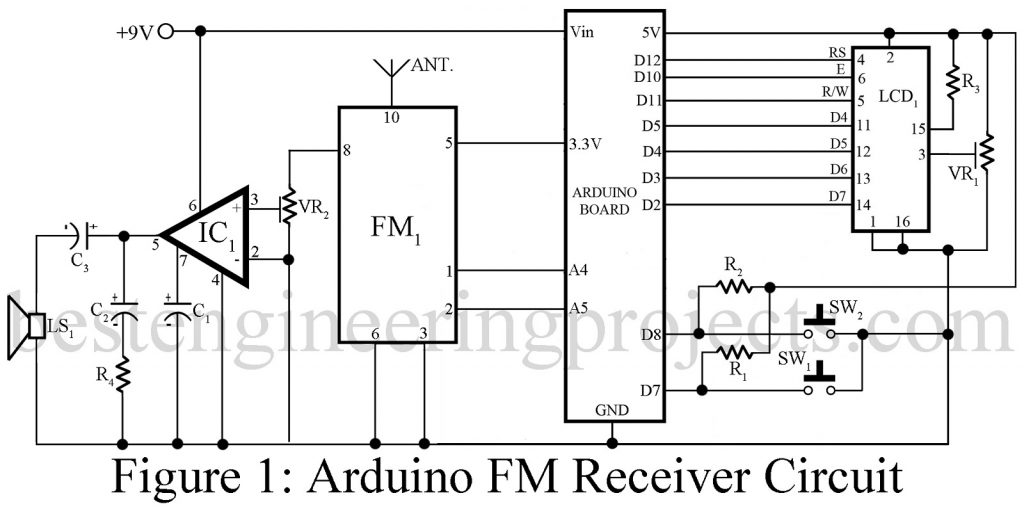
The circuit of the project Arduino FM Receiver is shown in figure 1. The main or controlling part of the system is the Arduino uno board which is a prototyping platform consisting ATmega 328 microcontroller.
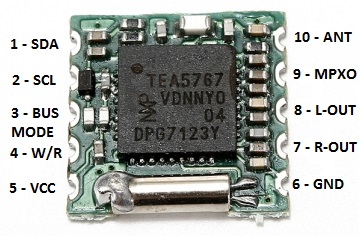
TEA5657 Module | Arduino FM Receiver Circuit using TEA5767
Now talking about the receiver module, TEA5767. TEA5767 is a low-voltage fully integrated intermediate frequency (IF) FM stereo radio module. It includes features like stereo and mono output, station scanning, indicating signal strength, adjustment-free, etc. TEA5767 receiver module operates either in I2C protocol or in 3-wire BUS protocol which can be selected using the BUSMODE pin (pin 3). Here, in this project Arduino FM Receiver BUSMODE is grounded because we had used the I2C protocol.
Figure: TEA5767
Data pin (pin 2) and clock pin (pin 3) of FM receiver module is connected to analog pin (A4 and A5) of Arduino uno board respectively where pin 3 and 6 are grounded as shown in the circuit diagram. Output is taken from pin 7 and pin 8 of the receiver module for the left and right channels respectively.
The output from the FM receiver module is given to low power audio amplifier IC (LM386) because the output of the radio receiver module is meager and inaudible. Here, in the circuit, we used only the left channel output. If you need stereo output you must use another LM386 for the right channel output. Variable resistor VR2 is used to control the volume in the speaker.
Two resistors R1 and R2 with two Push-to-on switches are used to change the frequency (up and down) respectively to change the channel. These two resistors are Pull-up resistors used to control the switch bounce condition.
We all know that the length of the antenna must be the size of the wavelength. For the project posted here, we used a 75cm antenna connected to pin 10 of the radio receiver module.
Software code
Now let’s talk about software. The software is written and compiled in the Arduino IDE environment. You can directly download the software package and upload it to the Arduino uno board. The package contains the software code with an auto-scan function and without an auto-scan function.
Click Here to Download Software
For a better understanding of code, we had already used comment, but still, we had listed some syntax.
- BeginTransmission(0x60); “Starts communication with TEA5767 module where 0x60 is for write and 0x61 is for reading”
- Write(0x00); “For sending data bit by bit in I2C protocol”
- Mode;
Before dealing with this syntax first, we must know about the write mode data sequence.
When a station is found it sets the RF flag 1 i.e. RF = 1 which is stored at bit 3 where bit 4 is used to store stereo or mono signal strength.
The sentence used to update value is “Buffer[i] = Wire.read();”
- read(); “Read data of write mode data sequence in read mode”
OUTPUT OF LCD
- Shows the frequency stored in buffer (0);
- Display scanning in search mode;
- Shows signal strength stored in buffer (3);
Click Here to Download PCB Design
PARTS LIST
| Resistors (all ¼-watt, ± 5% Carbon) |
| R1, R2 = 10 KΩ
R3 = 330 KΩ R4 = 10 Ω VR1, VR2 = 10 KΩ preset |
| Capacitors |
| C1 = 22 µF/25V (Electrolytic Capacitor)
C2 = 10 µF/25V (Electrolytic Capacitor) C3 = 100 µF/25V (Electrolytic Capacitor) |
| Semiconductors |
| BOARD1 = Arduino Uno Board
IC1 = LM386 Low-Power Amplifier FM1 = TEA5767 Digital Radio Receiver Module LCD1 = 16×2 LCD |
| Miscellaneous |
| SW1, SW2 = Tactile Switch
BATT.1 = 9V Battery LS1 = 8-ohm, 0.5W speaker ANT. = 75cm Hookup Wire Antenna |


Such a awsome proects. Thankyou sir for posting it.