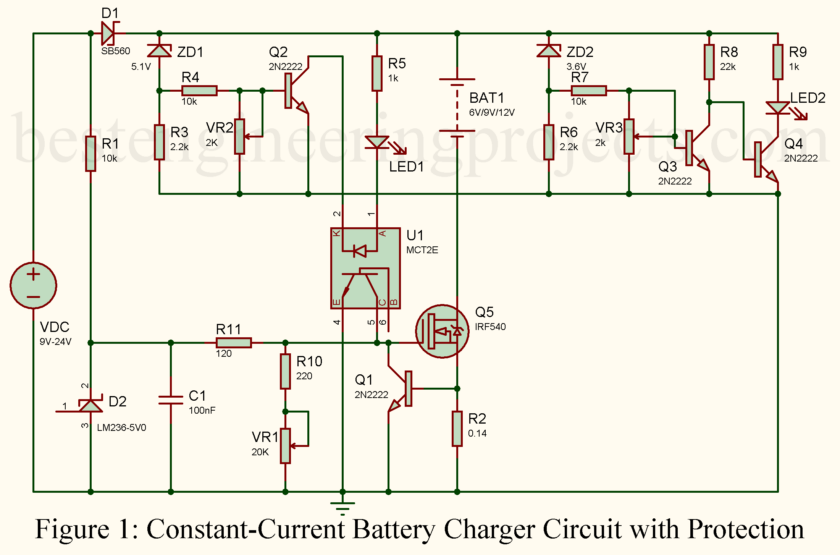
Ever wished your battery charger could do more than, well, charge? What if it could be smart enough to know when your battery’s full or even warn you when it’s about to run out of juice? That’s the magic of the Constant-Current Battery Charger Circuit with Protection. It’s like the caring friend who not only lends you a hand but also ensures you’re on the right track. Let’s explore this innovative circuit that charges your battery efficiently and keeps it safe from overcharging and deep discharge.
Why Constant-Current Charging?
Think of your battery as a marathon runner. Charging it too fast is like forcing the runner to sprint the entire marathon—it’ll burn out too soon. On the other hand, constant-current charging gives the battery a steady flow of energy, just the right pace for long-lasting performance. This circuit ensures your battery receives a constant current, typically one-tenth of its capacity in ampere-hours. For example, a 4.5Ah battery would be charged at a current of around 450mA—gentle and effective.
Key Features of This Circuit
- Supports Multiple Battery Voltages: This circuit has you covered whether charging a 6V, 9V, or 12V battery. You can even tweak it for other battery voltages by changing the values of the zener diodes (ZD1 and ZD2).
- Adjustable Charging Current: With a potmeter (VR1), you can fine-tune the charging current to match your battery’s capacity.
- Overcharge Protection: The circuit automatically stops charging once the battery reaches its full charge (e.g., 13.5–14.2V for a 12V battery). There’s no need to babysit—the charger has an internal shut-off switch.
- Deep-Discharge Protection: If the voltage drops too low (e.g., 11V for a 12V battery), an LED indicator warns you to recharge it. This keeps your battery from being over-drained and damaged.
- Low Quiescent Current: The idle circuit draws less than 5mA, saving energy.
- Short-Circuit Protection: The circuit limits the current in case something goes wrong, like an accidental shorting of the battery terminals.
- Wide Input Voltage Range: It operates with a DC input ranging from 9V to 24V, hence versatile for various power sources.
How It Works
This circuit is neatly divided into three sections: constant-current source, overcharge protection, and deep-discharge protection.
- Constant-Current Source
- The core of this section is the MOSFET T5 (IRF540), which regulates the current flowing to the battery.
- The voltage reference diode D2 (LM236-5.0) provides a stable reference voltage for consistent operation.
- By adjusting the potmeter VR1, you can set the gate-source voltage (VGS) of the MOSFET to achieve the desired charging current.
- The resistor R2 (0.14Ω) acts as a current sensor. It ensures that the current is kept constant and within safe limits.
- T1 (2N2222) provides an additional layer of current limiting in case of a fault or short circuit.
- Overcharge Protection
- The zener diode ZD1 monitors the battery voltage. When the battery reaches its full charge, ZD1 starts conducting.
- This activates T2, lighting up LED1 to indicate that the battery is fully charged.
- The optoisolator U1 (MCT2E) is triggered, which shuts off the MOSFET T5, stopping the charging process entirely.
- Deep-Discharge Protection
- The zener diode ZD2 ensures that the circuit monitors the battery voltage during discharge.
- If the voltage drops below the safe threshold (e.g., 11V for a 12V battery), ZD2 stops conducting.
- This turns off T3 and activates T4, lighting up LED2 to warn you that the battery is deeply discharged.
Specifications
- Battery Voltage Support: 6V, 9V, and 12V (other voltages possible with modifications).
- Input Voltage Range: 9V to 24V.
- Charging Current: Adjustable, typically 1/10th of battery capacity.
- Protection Features:
- Overcharge protection with automatic shut-off.
- Deep-discharge protection with LED indication.
- Short-circuit protection.
- Power Efficiency: Quiescent current < 5mA.
- Upgradable for Higher Currents: The circuit can handle charging currents up to 5A with minor modifications.
Building and Adjusting the Circuit
- Assemble the Circuit: Use a general-purpose PCB to keep the layout clean and organized.
- Set the Charging Current:
- Connect a series multimeter with the battery.
- Adjust VR1 until the desired charging current is achieved.
- Calibrate Overcharge and Discharge Levels:
- Fully charge the battery and adjust VR2 to set the overcharge threshold.
- Discharge the battery to the minimum safe voltage and adjust VR3 for deep-discharge protection.
Why this circuit stands out
This is not just a battery charging circuit; it’s about doing things right. It’s intelligent, efficient, and adaptive while protecting your battery against overcharging, which will otherwise lead to overheating and a shortened life cycle. It also prevents deep-discharging silent killers for batteries, letting you know when to recharge.
This charger acts like a caring guardian for lead-acid or Ni-Cd batteries. Simple in design, with adjustable parameters and strong protection, it is an ideal solution for hobbyists and professionals.
So, why stick to old-school chargers that don’t know when to stop or start? Build this constant-current battery charger circuit with protection and give your batteries the care they deserve. Your gadgets and power tools will thank you!

In this blog, the detailed explanation of the constant-current battery charger circuit with protection is informative and useful. It offers practical insights for anyone looking to build safe, efficient charging systems.
Hi Sir ,
Your circuit is really very good . It has got lot of features and versatility to match different voltage ratings of batteries by simply changing ZD1 and ZD2.
Including over current and short circuit protections.
I have got one suggestion you can connect Collectors
of Q2 directly to the gate of the mosfet. For the full charge indication you can connect a diode cathode to the gate of mosfet and add a resistor and led to the bat + because isolating with the opto coupler ie not required ,it makes the circuit more simple .
Regards V.Sambath kumar